This post will cover how to increase the disk space for a VMware virtual machine running Linux that is using logical volume manager (LVM). Firstly we will be increasing the size of the actual disk on the VMware virtual machine, so at the hardware level – this is the VM’s .vmdk file. Once this is complete we will get into the virtual machine and make the necessary changes through the operating system in order to take advantage of the additional space that has been provided by the hard drive being extended. This will involve creating a new partition with the new space, expanding the volume group and logical group, then finally resizing the file system.
As there are a number of different ways to increase disk space I have also posted some different methods here:
- Use GParted to increase disk size of a Linux native partition – In this article the virtual disk is expanded, however there is no LVM here just a Linux native partition that is expanded with the GParted live CD.
- How to Increase the size of a Linux LVM by adding a new disk – In this article a new virtual disk is added to the virtual machine, a new partition is created, the volume group and logical volume are both expanded and then the filesystem is resized.
- How to Decrease the size of a Linux LVM – In this article the file system is shrunk followed by the LVM, allowing you to reclaim space in the volume group.
Update 18/04/2015: I have created a video guide of this post in CentOS 7 shown below.
Important Note: Be very careful when working with the commands in this article as they have the potential to cause a lot of damage to your data. If you are working with virtual machines make sure you take a snapshot of your virtual machine beforehand, or otherwise have some other form of up to date backup before proceeding. Note that a snapshot must not be taken until after the virtual disk has been increased, otherwise you will not be able to increase it. It could also be worth cloning the virtual machine first and testing out this method on the clone.
Prerequisites: As this method uses the additional space to create a primary partition, you must not already have 4 partitions as you will not be able to create more than 4. If you do not have space for another partition then you will need to consider a different method, there are some others in the above list.
Throughout my examples I will be working with a VMware virtual machine running Debian 6, this was set up with a 20gb disk and we will be increasing it by 10gb for a total final size of 30gb.
Identifying the partition type
As this method focuses on working with LVM, we will first confirm that our partition type is actually Linux LVM by running the below command.
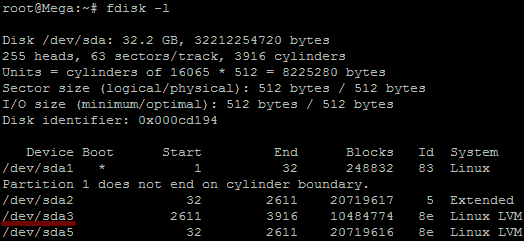
fdisk -l
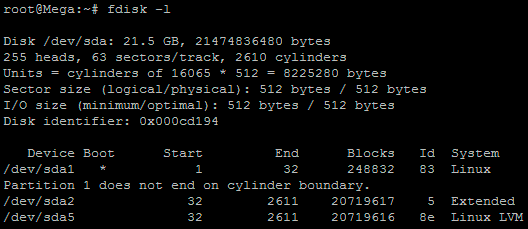
As you can see in the above image /dev/sda5 is listed as “Linux LVM” and it has the ID of 8e. The 8e hex code shows that it is a Linux LVM, while 83 shows a Linux native partition. Now that we have confirmed we are working with an LVM we can continue. For increasing the size of a Linux native partition (hex code 83) see this article.
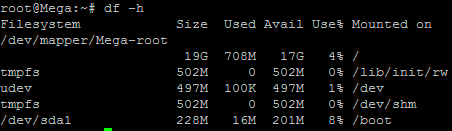
Below is the disk information showing that our initial setup only has the one 20gb disk currently, which is under the logical volume named /dev/mapper/Mega-root – this is what we will be expanding with the new disk.
Note that /dev/mapper/Mega-root is the volume made up from /dev/sda5 currently – this is what we will be expanding.
Increasing the virtual hard disk
First off we increase the allocated disk space on the virtual machine itself. This is done by right clicking the virtual machine in vSphere, selecting edit settings, and then selecting the hard disk. In the below image I have changed the previously set hard disk of 20gb to 30gb while the virtual machine is up and running. Once complete click OK, this is all that needs to be done in VMware for this process.
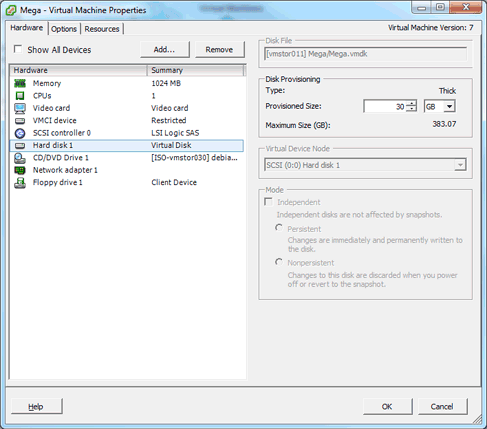
If you are not able to modify the size of the disk, the provisioned size setting is greyed out. This can happen if the virtual machine has a snapshot in place, these will need to be removed prior to making the changes to the disk. Alternatively you may need to shut down the virtual machine if it does not allow you to add or increase disks on the fly, if this is the case make the change then power it back on.
Detect the new disk space
Once the physical disk has been increased at the hardware level, we need to get into the operating system and create a new partition that makes use of this space to proceed.
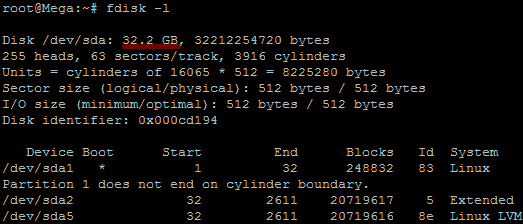
Before we can do this we need to check that the new unallocated disk space is detected by the server, you can use “fdisk -l” to list the primary disk. You will most likely see that the disk space is still showing as the same original size, at this point you can either reboot the server and it will detect the changes on boot or you can rescan your devices to avoid rebooting by running the below command. Note you may need to change host0 depending on your setup.
echo "- - -" > /sys/class/scsi_host/host0/scan
Below is an image after performing this and confirming that the new space is displaying.
Partition the new disk space
As outlined in my previous images the disk in my example that I am working with is /dev/sda, so we use fdisk to create a new primary partition to make use of the new expanded disk space. Note that we do not have 4 primary partitions already in place, making this method possible.
fdisk /dev/sda
We are now using fdisk to create a new partition, the inputs I have entered in are shown below in bold. Note that you can press ‘m’ to get a full listing of the fdisk commands.
‘n’ was selected for adding a new partition.
WARNING: DOS-compatible mode is deprecated. It's strongly recommended to
         switch off the mode (command 'c') and change display units to
         sectors (command 'u').

Command (m for help): n
‘p’ is then selected as we are making a primary partition.
Command action
   l   logical (5 or over)
   p   primary partition (1-4)
p
As I already have /dev/sda1 and /dev/sda2 as shown in previous images, I have gone with using ‘3’ for this new partition which will be created as /dev/sda3
Partition number (1-4): 3
We just press enter twice above as by default the first and last cylinders of the unallocated space should be correct. After this the partition is then ready.
First cylinder (2611-3916, default 2611): "enter"
Using default value 2611
Last cylinder, +cylinders or +size{K,M,G} (2611-3916, default 3916): "enter"
Using default value 3916
‘t’ is selected to change to a partition’s system ID, in this case we change to ‘3’ which is the one we just created.
Command (m for help): t
Partition number (1-5): 3
The hex code ‘8e’ was entered as this is the code for a Linux LVM which is what we want this partition to be, as we will be joining it with the original /dev/sda5 Linux LVM.
Hex code (type L to list codes): 8e
Changed system type of partition 3 to 8e (Linux LVM)
‘w’ is used to write the table to disk and exit, basically all the changes that have been done will be saved and then you will be exited from fdisk.
Command (m for help): w
The partition table has been altered!

Calling ioctl() to re-read partition table.

WARNING: Re-reading the partition table failed with error 16: Device or resource busy.
The kernel still uses the old table. The new table will be used at
the next reboot or after you run partprobe(8) or kpartx(8)
Syncing disks.
You will see a warning which basically means in order to use the new table with the changes a system reboot is required. If you can not see the new partition using “fdisk -l” you may be able to run “partprobe -s” to rescan the partitions. In my test I did not require either of those things at this stage (I do a reboot later on), straight after pressing ‘w’ in fdisk I was able to see the new /dev/sda3 partition of my 10gb of space as displayed in the below image.
For CentOS/RHEL run a “partx -a /dev/sda3” to avoid rebooting later on.
That’s all for partitioning, we now have a new partition which is making use of the previously unallocated disk space from the increase in VMware.
Increasing the logical volume
We use the pvcreate command which creates a physical volume for later use by the logical volume manager (LVM). In this case the physical volume will be our new /dev/sda3 partition.
root@Mega:~# pvcreate /dev/sda3
  Device /dev/sda3 not found (or ignored by filtering).
In order to get around this you can either reboot, or use partprobe/partx as previously mentioned to avoid a reboot, as in this instance the disk does not appear to be there correctly despite showing in “fdisk -l”. After a reboot or partprobe/partx use the same command which will succeed.
root@Mega:~# pvcreate /dev/sda3
  Physical volume "/dev/sda3" successfully created
Next we need to confirm the name of the current volume group using the vgdisplay command. The name will vary depending on your setup, for me it is the name of my test server. vgdisplay provides lots of information on the volume group, I have only shown the name and the current size of it for this example.
root@Mega:~# vgdisplay
  --- Volume group ---
  VG Name               Mega
...
VG Size               19.76 GiB
Now we extend the ‘Mega’ volume group by adding in the physical volume of /dev/sda3 which we created using the pvcreate command earlier.
root@Mega:~# vgextend Mega /dev/sda3
  Volume group "Mega" successfully extended
Using the pvscan command we scan all disks for physical volumes, this should confirm the original /dev/sda5 partition and the newly created physical volume /dev/sda3
root@Mega:~# pvscan
  PV /dev/sda5   VG Mega   lvm2 [19.76 GiB / 0    free]
  PV /dev/sda3   VG Mega   lvm2 [10.00 GiB / 10.00 GiB free]
  Total: 2 [29.75 GiB] / in use: 2 [29.75 GiB] / in no VG: 0 [0   ]
Next we need to increase the logical volume (rather than the physical volume) which basically means we will be taking our original logical volume and extending it over our new partition/physical volume of /dev/sda3.
Firstly confirm the path of the logical volume using lvdisplay. This path name will vary depending on your setup.
root@Mega:~# lvdisplay
  --- Logical volume ---
  LV Path                /dev/Mega/root
The logical volume is then extended using the lvextend command.
root@Mega:~# lvextend /dev/Mega/root /dev/sda3
  Extending logical volume root to 28.90 GiB
  Logical volume root successfully resized
There is then one final step which is to resize the file system so that it can take advantage of this additional space, this is done using the resize2fs command for ext based file systems. Note that this may take some time to complete, it took about 30 seconds for my additional space.
root@Mega:~# resize2fs /dev/Mega/root
resize2fs 1.41.12 (17-May-2010)
Filesystem at /dev/Mega/root is mounted on /; on-line resizing required
old desc_blocks = 2, new_desc_blocks = 2
Performing an on-line resize of /dev/Mega/root to 7576576 (4k) blocks.
The filesystem on /dev/Mega/root is now 7576576 blocks long.
Alternatively if you’re running the XFS file system (default as of RedHat/CentOS 7) you can grow the file system with “xfs_growfs /dev/Mega/root”.
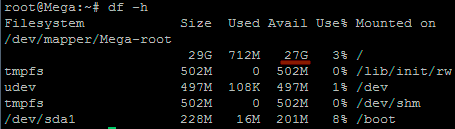
That’s it, now with the ‘df’ command we can see that the total available disk space has been increased.
Summary
With this method we have increased the virtual disk drive through VMware, created a new partition out of this newly unallocated space within the guest OS, turned it into a physical volume, extended the volume group, and then finally extended the original logical volume over the newer physical volume resulting in overall disk space being increased successfully.
Nice post. I really like that LVM on linux has finally caught up to the various unix flavors (esp. AIX). Even with a VM I tend to just add more hard disks and then on the OS side add them to VG, extendlv, etc.etc..
Great post!
Thanks. Easy to follow instructions.
I added 5gb and did all the extending etc. Later I felt I should have added 10gb instead of 5. I know I can add one more partition, but could you show me how to delete the 5gb partition (assuming it has not been written to) and add a 3rd partition of higher size?
Hi Russel,
You’d be much better off just adding another 5gb again using the same process to reach the total of 10gb.
You can reduce the size of the partition you extended after unmounting it, however with VMware I believe you will not be able to decrease the virtual disk size, as it is not aware of where the data is in that space which is why you can only increase and not decrease the virtual disk.
Great post!
Thank you.
Very nice post…!! Thank you very much..saved my day
Thanks a lot, really helped me while expanding my disk space on my new Linux box.
Thanks a lot for this really helpful HowTo! ;-)
i am getting resize2fs: bad magic number in super-block while trying to open /dev/VolGroup00/Logvol01
couldn’t find valid filesystem superblock
please help
Hi Anil,
Sounds like you may have some corruption, have you tried running a file system check on /dev/VolGroup00/Logvol01 ?
Also if you are using an xfs volume you may need to try another tool such as xfs_growfs rather than resize2fs.
I get the same error. How do I debug this issue? To figure if corruption or if setup something wrong. Followed the instructions exactly.
Did you try running a fsck?
Thanks for the cmd, I tried that and got the following:
fsck from util-linux 2.21.2

fsck: fsck.LVM2_member: not found

fsck: error 2 while executing fsck.LVM2_member for /dev/sda2
Then I ran e2fsck /dev/vg/lvol0 brings up the same point about bad magic number:
ext2fs_open2: Bad Magic number in super-block

....

e2fsck: Bad magic number in super-block while trying to open /dev/vg/lvol0
The superblock could not be read or does not describe a correct ext2
...
Any other suggestions. TIA, greatly appreciated.
I had the same problem, but I was using the wrong lv. I went over the steps again very carefully and it worked. I was trying to extend the root partition and was mistakenly giving the commands to extend the swap partition, which it just won’t let you do. Hope it helps. Good luck.
I also got the error. Retraced my steps and saw that I had mistakenly done the lvextend on the wrong volume. Two were returned and I typed in the second by accident.
Had to delete the partion and lvremove it. Then did these excellent steps again.
For instructions on removing or deleting volumes:
http://www.howtoforge.com/linux_lvm_p2
Have the same issue, use this command and works:
xfs_growfs /dev/Centos/root -d
Really nice and intuitive post, thanks a lot!
Thank you very much for this! Finally an instruction that even i can understand :razz:
The reboot is not required if you run “partprobe -s” instead.
Hey,
After partition the new disk space (from 10GB to 25GB) my space in new partion SDA3 does not corresponde to the actual size added (15GB). Any idea what is going on?
I tried follow the tutorial even with the wrong size but i got stucked in the error on the next step: “pvcreate /dev/sda3″
Link with partitions”http://img832.imageshack.us/img832/1281/53pk.png”
Thanks
I have this same problem and can’t get past it, it appears /dev/sda5 took all my new blocks?
I figured out the issue; by default the Ubuntu Server setup for some reason left 1023 blocks between /dev/sda2 and /dev/sda5 and the defaults automatically grab that block-space. You will have to type in the block number that follows the last block of /dev/sda5 and then you should be fine! :)
:wink:
This tip and the wonderful article above worked like a charm on a ubuntu 12.04 server. Added 350G’s without a reboot on an esx/vmware linux vm !!!
Sir, you’re a genius! (yes, 2 years later that tip still works! :D)
Cheers, glad I was able to help!
Great post, worked smoothly. Only minor deviation was to handle the defaults for the start and end of the new partition being wrong.
I had a small unallocated space earlier in the Virtual Disk and defaults grabbed it instead of the ‘new’ unused space at the end.
Thanks a lot for the easy to follow instructions. Was over in a flash :smile:
Great post, had some issues when i tried it out ..
Was able to expand space at vmware after reboot also /dev/sda increased at linux level, but when i tried fdisk /dev/sda i had the below –
root@homeserver2 ~]# fdisk /dev/sda
The number of cylinders for this disk is set to 10443.
There is nothing wrong with that, but this is larger than 1024,
and could in certain setups cause problems with:
1) software that runs at boot time (e.g., old versions of LILO)
2) booting and partitioning software from other OSs
(e.g., DOS FDISK, OS/2 FDISK)
Command (m for help): n
No free sectors available
Hi Praveen,
I was having the same issue.
I then hit “u” to change display/entry units and recreated the partition for /dev/sda3
Now it’s showing the correct start and end identifiers and shows correct free disk space for the partition.
Good luck!
Great post, many many thanks…
/dev/sda3 wouldn’t work for me I kept receiving the “Device /dev/sda3 not found (or ignored by filtering)” message. When I changed it to /dev/sda6, it worked.
I used 3 because it was available, you should use a number that you have free to use.
Pulled me right out of the fire sir! Thank you very much!
It all work perfectly till the very last step where you need to resize the file system. THen Im getting this error:
resize2fs: Device or resource busy while trying to open /dev….
Couldn’t find valid filesystem superblock
any advice?
Is what you are trying to resize mounted? If not try that if you are increasing.
Great post for me too. It worked like a charm.Thank you
Thought I would add,
You don’t need to reboot to do pvcreate.
install partprobe before you start this.
Then run partprobe /dev/sdX
If you are on CentOS/RHEL you can use partx
root@server [~]# pvcreate /dev/sda3
Device /dev/sda3 not found (or ignored by filtering).
root@server [~]# partx -a /dev/sda
root@cserver [~]# pvcreate /dev/sda3
Physical volume “/dev/sda3” successfully created
Let me add to this. RHEL 5 you can use partprobe, RHEL 6 you can use
partx -v -a /dev/sdaI think it’s worth updating the post with this to save people a reboot!
In Centos, to rescan the virtual device I had to
echo 1 > /sys/block/sdb/device/rescan (for sdb, in my case)
The one on the original article didn’t work for me.
Hope it helps!
Also, not need to reboot if pvcreate fails. Just issue:
lvmdiskscan -v
that will wipe LVM cache and add the new partition.
;-)
Cool, thanks!
On my ESXi server I am using complete disk space available(I have not created LVM). I added a new partition and mounted that and made it by default.
To increase the diskspace following are the steps that I have followed:
Step1: Check the size with ‘fdisk -l’ & ‘df -Th’
Step2: From ESXi vSphere client increase the disk space.
Step3: Restart the server(vm server on ESXi server)
Step4: ‘fdisk -l;df -Th’ doesn’t show any difference with the output from Step1
Step4: resize2fs
Step5: ‘fdisk -l;df -Th’ shows the difference.
Correct me if I am wrong.
Thank you very very ! :razz:
You rock.
I recently increased the size of my cloud server, btu disk space was left as the old disk. Followed these tutorial, saved me and the support team wasted time.
This tutorial rocks ;)
Great document. Really helpfull.
But I would like to add the following :
1) After rescanning it is possible you don’t see the extended disk, in that case you should enable rescanning for that device with -> echo 1 /sys/block/sdX/device/rescan
where sdX is the disk that was extended.
2) on pvcreate, you don’t need to reboot, a partprobe on the disk should be sufficient to have it succeed after.
Best lvm resizing guide so far. Good work.
Muchas gracias!!!, me ayudo mucho! :)
THANKS A LOT !!!!
I went to at least 10 other sites with super complicated instructions. Finally found your wonderful to the point set by step guide.
You made my day, Thanks a LOT
Thank you very much !!! this is really good article and asy to follow instructions. :)
Great post! Very easy to follow and worked like a charm..Thank you sir!
I totally agree with Amit.
Great post. Clear Instructions. Superb Job.
Thank you soooooo much!! Thanks Jarrod :smile:
very useful thanks for your instructions
Just wanted to say thank you for the great instructions! Went to a bunch of websites and yours was the only one which was clear and accurate.
Thanks a million, the instruction you gave were so straightforward and clear you made the whole process very easy.
Super clear instructions! Thank you, Jarrod.
Everything worked great until the last step. I ran
resize2fs /dev/ubuntu-vg/rootBut receive “open: no such file or directory while opening /dev/ubuntu-vg/root”
I was using /dev/ubuntu-vg/root for the lvextend command which ran fine.
lvdisplay lists
LV Name /dev/ubuntu-vg/root
any help would be appreciated.
I followed the entire guide by using a live bootable Gparted iso image, and I got the same error at the last step. But there’s only one simple thing you need to do: reboot into your VM ubuntu system, and apply the last command in your a shell:
$ sudo resize2fs /dev/ubuntu-vg/root
I expanded my linux VM by 15GB and this step took around 0.5 – 1 mins. After the process is completed, verify that you have an expanded available free space at your primary linux partition by issuing:
$ df -h
Hope this helps!
Thanks. This article was extremely helpful.
:razz:
Great doc, everything works well, Thanks
Trust me, this is a well needed article. Pity I didn’t come across this first before I ran into a lot of trouble.
Great Work, Thanks.
:grin:
from 20 GB to 40 GB
[root@tester ~]# lvextend /dev/vg_tester/lv_root /dev/sda3
Extending logical volume lv_root to 35.56 GiB
Logical volume lv_root successfully resized
ive been try before in real production
Thanks
You are just awesome. :lol:
Great doc, Thanks
This worked perfectly. Thank you for the easy to follow intructions.
Congratulations, wonderful post, helped me a lot!
Thank you very much!
Thanks a lot for this post. I use this as reference for my day to day work. Without this life wouldhave become miserable :grin:
Very helpful. Thanks!
worked great; thanks for putting this together.
i noticed two possible bugs:
1. the partx command on rhel6 should be for /dev/sda, not /dev/sda3
2. the lvdisplay output should show LV Path rather than LV name, as the path is what needs to be passed to lvextend (on my rhel6 system)
Thanks a lot Jarrod !!!
I followed your instructions and it was just perfect
Thanks, Great work
Under RH ELS 6.2, I had to do this to see the extra space and then /dev/sdb2:
# echo 1 > /sys/block/sdb/device/rescan (now see the extra space using “fdisk -l”)
# partx -a /dev/sdb (now see /dev/sdb2)
Thanks, worked like a charm.
Thanks for the great post!
Needed the parted tools.
apt-get install parted
Thanks again!
amazing tutorial!!!
one question though, do i have to stop the services on the machine i work (tomcat, mongod, mysql ext.)
when i preform these steps?
thanks
Thanks, nope you can increase on the fly with service running, extending the LV will not interfere with those running services.
Thank you, great post. I have used it twice now. It has been bookmarked. Thanks Again!!!
Well done, there are a lot of confusing posts about this process, this one is excellent. Step by step, and makes sense.
Thank you
Nice tutorial. Its amazing :cool:
Thanks, it’s a very good tutorial.
Clearly and simply explained. Not only do you know your tech but you know how to convey it to others.
Made my job much easier. :)
Well Done!
Good One..Thanks
Just wanted to drop you a comment on how this tutorial helped me. Really appreciate it.
resize2fs: Bad magic number in super-block while trying to open
Thank you for your sharing.
I just want to add one more thing.
If you are using xfs file system resize2fs wont work. It works on ext3-4
You can use xfs_growfs command instead of resize2fs
yum install xfsprogs.x86_64 (if its not installed)
than
xfs_growfs /dev/Mega/root
data blocks changed from ….
This is the solution
It is excellent,
It is really helpful.
Thank you.
Thank you!!! :razz:
Perfect tutorial ..awesome.. I struggled to do the same from other tutorials
You saved my day :)
As a newbie with lvm and such, I planned an extra nightshift to get a companies legacy webserver (which ran out of hdd capacity) back to live.
With the help of your tutorial, it took me just 10 mins. AWESOME – I own you a beer :)
Seriously, this was great. Where is your tip jar? This tutorial was so much better than others I found, especially regarding volume groups.
Hi Al,
No problem at all, and good question, I’ve added a PayPal donation button now and will look to add in a Bitcoin address in the near future.
Cheers!
Great ! Nice article
Thanks!
If you’re encountering an issue “Device not found or Ignored”
You might try this method http://askubuntu.com/questions/446842/device-not-found-or-ignored-when-creating-physical-volume-with-bcache
Thanks a lot ! After 2 hours wasted, i finally found your post and achieved what i was trying to do.
Just a little note on this part :
“Firstly confirm the name of the logical volume using lvdisplay.”
It seems that that lvextend require the Path, and not the name, of the logival volume. The name of you logical volume seems to be equal to the path, but that was not my case and i got :
Path required for Logical Volume "xxxx"Hi
i m using not able to extend my root partion size by
lvextend as it gives
Insufficient free space 4096 extends needed but only 0 available
i also tried with even 100 mb but not worling as my root has reaches to 100%
It sounds like you’re trying to increase by a particular size however there are no free extents. If you run an ‘lvdisplay’ what does it show for “Free PE / Size”? What command do you run to generate this? Is there free space within the volume group?
Hi Jarrod,
thanks a lot You saved my day!! :grin:
really helped me while expanding my disk space on my centOS vm.
thanks
Abdul wahid
Hey Abdul, no problem glad I could help!
Hi,
Thanks so much, I just brought you a beer. This post is exactly what I needed. Enjoy the beer :)
Hey Dan, glad I was able to help out, thanks a lot!
For lvextend the parameter i had to use LVPath and not LVname
Thanks a lot Jarod !
i Was interested in working and understanding LVM but as linux noob user LVM concept quite sample too understand but in practice that’s not so easy.
Very clear demonstration, all commands, screens. That’s perfect even on VirtualBox and my Ubuntu server i achieved LVM extend :grin:
Thanks again Mate !
Hey no problem, glad to hear it helped you out!
Instruction couldn’t be much better thanks very much :mrgreen:
Nice post. I really like that LVM on linux
Just perfect!
Thank you so much :)
Thanks for the great instructions!
Worked Great! Only thing was I had to run:
echo 1 > /sys/block/sdX/device/rescan (Where X is your device letter) to keep from rebooting.
Great instruction, well done!
But.. is there a way to expand logical volume without creating and concatenating of new partition, but just expanding sda2?
I tried to do this but failed because of root volume locking.
So you want to increase the virtual machine disk, then increase /dev/sda2, rather than creating say /dev/sda3 then expanding with that? I don’t think it matters too much, however it should be possible to first expand /dev/sda2. It’s not something I have personally looked into however, perhaps a future post!
Just figured out..actually – yes, it is also possible to increase lvm volume after expanding vm’s virtual disk!
After expanding disk it is nessesary to resize partition with some basic tool (parted, as simple), then “lvextend /dev/vgname/lvname /dev/sda2” (for picking up new size of sda2) and finally – expand filesystem!
I have the same case..Could you provide an example?
Great post! Procedure works exactly as described. :razz:
Worked for me! Too easy… Thanks :)
hi.. i have increased hard disk from 100GB to 200GB. I don’t want to add a new partition rather i need to increase size of /dev/sda5 listed as Linux. Pl guide me in this regard.
Hi Mike, sure, do you know if you are using LVM? If you could provide the output of ‘df -h’ and ‘fdisk -l’ that may help my get a better picture of what’s going on.
You could try this guide instead: https://www.rootusers.com/use-gparted-to-increase-disk-size-of-a-linux-native-partition/
In this one we increase /dev/sda1 in the example after the virtual disk has been increased with GParted.
Not working for me.
I’ve resized disk (/dev/sda) by Vbox (not VMWare), create new LVM partition /dev/sda3 as you said (I had already /dev/sda5 like you), runned “partprobe -s” and even try a reboot (Luckly I’m not in a production environment), but I’m still receiving error on pvcreate /dev/sda3 command:
Device /dev/sda3 not found (or ignored by filtering)
Does it show when you run ‘fdisk -l’?
I have exactly the same issue as Alessio. Even after reboot it still say “Device /dev/sda3 not found (or ignored by filtering)”.
If I try fdisk -l /dev/sda3 i get “Disk /dev/sda3 doesn’t contain a valid partition table”
If it doesn’t show in fdisk at all it sounds like the partition didn’t create? Do you know if you are using MBR or GPT? If the disk partitioning is GPT based you may need to instead look at using gdisk instead of fdisk.
Very helpful.
Thank you, all very easy to follow and worked well.
I will say that trying to use the partx command to avoid rebooting didn’t work for me (CentOS 6.6), but fortunately I could reboot all I wanted and the reboot did allow the new LV to be recognized.
Easily the best linux walkthrough i’ve followed, thankyou
Hi jarrod
I really thank you because I used this howtoo many times and when someone ask me a perfect tutorial about disk extend, I always send your link.
Just a question:
If I have correctly understood, the only case in which I’m forced to add another disk (How to Increase the size of a Linux LVM by adding a new disk) is when you already have 4 primary partitions. Is that correct?
Instead, speaking just about best practices, supposing you have a virtual machine with 4x500gb virtual disks. In your opinion, is better to continuosly add new disks or expanding each one of them?
This question is because my environment I have many virtual machines like this and sometimes my collegues ask me if is better to add new disks or extend but I don’t have a good reply and usually add new disks
Hey Marco, I’m glad the post has been helpful for you, I refer to it often myself for reference!
Yes you will need a new disk if your disk is already using 4 primary partitions (assuming MBR is in use, with GPT you can have up to 128 partitions). However if you have 3 primary partitions you can use the 4th to create an extended partition (option ‘e’ in fdisk) and then create more logical partitions inside here allowing for a total of 15 partitions per disk.
In my opinion if given the option between expanding disks and adding additional disks I would look at increasing existing disks first. A good reason for this is that in the past I have seen a VPS provider provision additional disks for a virtual machine from different storage subsystems, if you go to group these disks as a logical volume the performance will depend on more variables as your disks are coming from different areas. It’s also neater to increase what’s there if possible, no need to try and work out which virtual disks correspond to what inside the OS later.
However with that said I do both frequently, and usually end up adding an additional disk and have never had any performance problems one way or the other.
Ok jarrod thanks a lot for this clarification!
Hi Jarrod,
We have an issue when trying to add another partition, this is the output of fdisk -l:
Disposit. Inicio Comienzo Fin Bloques Id Sistema
/dev/sda1 * 1 64 512000 83 Linux
La partición 1 no termina en un límite de cilindro.
/dev/sda2 64 32636 261635072 8e Linux LVM
/dev/sda3 32636 39163 52426110 8e Linux LVM
/dev/sda4 39163 45690 52426752 8e Linux LVM
We cant add another partition in order to continue, when we try we get the message that we must delete one partition in orden to add another. Is this right? what happend if we delete /dev/sda3 or /dev/sda3? Can you help us?
Hi David,
It looks like your /dev/sda disk already has 4 partitions, assuming this is using MBR you can only have 4 primary partitions at any one time. If your disk is using GPT then you would be able to add more, however I believe converting would wipe the data to do it properly so probably not an option.
If this is the case your options would be to either delete an existing partition, or to add an additional disk rather than expanding the existing disk. Is /dev/sda3 already in use? If so probably best to just leave it, if you’re not sure probably best to just leave it to avoid data loss. It shows that it’s type Linux LVM, so you could perhaps run pvscan / pvdisplay to check out if it is participating in a volume group / logical volume already.
Rather than adding another partition, you could instead add another disk which would then allow you to start over in terms of the number of partitions that you are using, I have another post on this process here: https://www.rootusers.com/how-to-increase-the-size-of-a-linux-lvm-by-adding-a-new-disk/
Very Helpful!
Just two glitches but already addressed in above posts…1) for Ubuntu, enter the next sector after the last for /dev/sda5 2) lvextend use the LV Path instead of name.
I followed step by step and it worked perfectly – thanks!!!
Now it’s late 2015 and after reading this great article, I have a tip to add in case anyone reading this might find it useful.
The Red Hat recommended method of extending a logical volume and the way discussed in this article is to add a new physical partition or disk to the volume group and then extend the logical partition.
Here I am going to show you a trick to non-destructively extend the underlying physical partition instead of adding a new partition to the mix. I should warn you to take backups before you dive in, in case something goes wrong. First, resize the physical partition using gparted. If you’re in a headless server environment, things will get complicated. Since parted resizing in not available on RHEL, your best luck would be if the partition you want to resize is the last (primary) partition on disk. Then you could use fdisk to first (d)elete then (n)ew the last partition which in effect extends it! Then restart your machine and issue pvresize . This increases the free space in your volume group. Check with vgs or vgdisplay to verify. Now you can enlarge your logical volume as usual. The last but not the least step would be to resize your file system. Enjoy Linux!
It’s not a bad idea, I did something similar a couple of years ago where I basically just deleted the partition and then recreated it with a larger size, so you aren’t actually deleting the underlying file system or data just the partitioning info. I was considering doing a post on it as you can do it pretty quick with no reboot but in the end I thought it was a bit risky using such a method to expand the disk so never published it.
Why do you need to create a new lvm partition? After increasing the disk space in vmware, why can’t you just do lvextend and resize2fs?
That may be possible, it depends on your particular disk layout, first you’d need to increase the existing LVM partition and then it should be possible. I don’t think it matters much which way you go about it, you end up with the same result. Not creating a new partition may be useful if you’re using MBR where you can only have a maximum of 4 partitions, however you could still use extended partitions or GPT so I don’t think the number of available partitions is really much of a restriction anyway.
I worked to extend LVM partition and it worked well. Thanks for this post.
You, sir, are a genius. Thank you.
Great post Jarrod. Helped me out no end.
No problem!
I owe you a Beer. Or few of them….
Happy to help!
Very cool, thanks – just one question:
root@Mega:~# lvdisplay
— Logical volume —
LV Name /dev/Mega/root
Shouldn’t you be looking for the LV Path and not LV Name to use in the next command
lvextend /dev/Mega/root /dev/sda3
?
In your case it seems to be the same but shouldn’t we be doing LV Path?
Yes quite right, I have updated the post, thanks.
Thanks, this was very helpful. Worked the first time around.
Excellent tutorial. You not only explained the steps, but also the concepts behind using it. I tried and it worked the first time. Thanks.
Thanks for your time and efforts
Amazing article. Saved lots of efforts …
Thank You very much!
I normally do not comment on articles, but this is an exception. You sir are a lifesaver. I had not done this in a while and your tutorial was perfect. Every single command worked and your explanation of it all was a great refresher for me. Kudos!
BTW the VMWare bit was a nice touch since I was working with VSphere 5.
Thanks, glad to hear it helped!
Thanks. Very useful stuff !
Great explanation and presentation of the critical task. Thanks a ton for posting it.
Awesome!!! Working!!
Love you for posting such a helpful post
Please add something like this to your list as I have to figure out how to scan without having to reboot:
echo 1 > /sys/block/sda/device/rescan
sda or whatever disk you are attempting to scan
Great article.
I am testing to see if I can continue to extend the disk I just added as I dont want to have to allocate 1T of a VMDK just because I might use that much in the next year instead of having a new sda# every time I need new disk.
Your thoughts?
I’d add a large VMDK but use thin provisioning, that way you only use the space you actually need.
Otherwise I’d keep making disks as needed, and after a while add one large one and move all my data over to it and delete the older smaller ones, after first removing them out of the VG etc.
This is very helpful Thanks
Happy to help!
This post is great.It works well for me.
Thank you so much :)
I cannot complete the steps as i have no VG Name apparently :
[root@spectrum ~]# pvdisplay
“/dev/sda4” is a new physical volume of “30.00 GiB”
— NEW Physical volume —
PV Name /dev/sda4
VG Name
PV Size 30.00 GiB
here are my disks :
Device Boot Start End Blocks Id System
/dev/sda1 * 1 39 307200 83 Linux
Partition 1 does not end on cylinder boundary.
/dev/sda2 39 2350 18566144 83 Linux
/dev/sda3 2350 2611 2097152 82 Linux swap / Solaris
/dev/sda4 2611 6527 31456607+ 8e Linux LVM
so when i try and extend i am asked for a VG name which is blank as above and i get :
[root@spectrum ~]# vgextend VolGroup00 /dev/sda4
Volume group “VolGroup00” not found
[root@spectrum ~]#
[root@spectrum ~]#
[root@spectrum ~]# vgextend /dev/sda4
Please enter a physical volume path
Run `vgextend –help’ for more information.
[root@spectrum ~]#
What output do you get from vgdisplay / lvdisplay?
no volumes exist
Is /dev/sda4 in use yet? It seems like you have no VG or LV yet but just the PV /dev/sda4.
If this is the case, you can use vgcreate to create a new volume group with /dev/sda4, then you should be able to create a logical volume from this VG.
Wauh! Our /home was at 97% and our Zimbra consultant had assured me there’s no way to increase it. You are my own personal hero. I’m so excited I’ve proved him wrong I feel like dancing.
Happy to help!
Thanks for this article. Really Helpful.
Can you provide insight/article to create a mount point in linux?
You can simply use the mkdir command to create a directory which will be used for mounting to, this can be done manually with the mount command or automatically by modifying the /etc/fstab file.
Thanks for this article. Really Helpful
Thanks for this. Added to my existing list of how-to info for RHEL. I was able to find your article faster than my own notes.
Thanks Dude…It’s been ages since i have been looking for this article to extend a proxmox lvm
Hi,
If i create the /boot partition by selecting standard partition type rather than select LVM is that possible for me to extend it?
As from what i saw, it most likely only LVM will be able to extend or increase the size of the vmdk.
Yes, you just need to do it differently. Something like this may work: https://www.rootusers.com/use-gparted-to-increase-disk-size-of-a-linux-native-partition/
If i create standard partition for /boot and /swap then i create 1 physical LVM and 1 logical logical volume for / is that will be okay?
that mean i will get /dev/sda1 /sda2 and /sda3 and i only can increase the space 1 more time if i re-edit the vmdk size by adding it to physical volume /sda4 right?
let say next time i want to increase the size again i require new vmdk right?
Do you mind to tell me the best practice for rhel setup actually prefer using standard partition or LVM?
Yes that will work, if they are all on sda though you may have difficulty expanding sda1 and sda2 in the future as sda3 will be in the way but it may be possible to move things around.
Generally LVM is used, by default in RHEL 7 / and /swap will usually be their own separate logical volumes, but /boot will not.
Basically it’s a lot easier and more manageable to use LVM where possible.
just a question about /boot on LVM
In my knowledge, /boot couldn’t be placed on LVM due to grub that didn’t support it. But now, using grub2 should be possibile
Do you confirm?
Yes it appears to be supported as documented here: https://wiki.gentoo.org/wiki/GRUB2/AdvancedStorage
I have not personally used it though.
ok thanks a lot.
Great complete post. Thanks lot.
This was very useful me.
Great post! This helped me on CentOS system. Followed your note exactly line by line.
Awesome page :-)
You really save my day. great tutorial!!
real helpful thank you
Appreciate it
Great tutorial! Thank you.
Excellent article..works like charm…I spent many hours struggling with gparted to resize /dev/sda…This blog is very easy and understandable…thanks buddy
Crystal clear, thank you very much !
Is it necessary to run xfs_growfs on centOS 6.6?
Thank you
No, not unless you’re using XFS. By default XFS is used in CentOS 7, but not by default in CentOS 6. Therefore it’s more likely you’ll be using resize2fs, however it will depend on the file system that you’re modifying.
Thank you very much. Very good and easy to understand instructions.
Nice job.
Oh my goodness! Impresѕive articⅼe dude! Many thаnks, However I am having difficulties with your RSS.
I don’t know the reason why I am unable to subscгibe
to it. Is there anybody eⅼse gᥱtting the same RSS issues?
Anyone who knows the soⅼution can you kindly respond?
Thanks!
Hey thanks, it seems to work for me, what application are you using for RSS so that I can try to replicate the problem?
Great discussion and posts. Do you have a procedure to extend a 10G OEL6 BASE image consuming all free space in / with 243M /boot to a larger image, still single device without adding additional devices, increasing /boot to 512M, / from 7 to 8G (increasing for procedure and not necessarily for immediate need), and leaving say 25G in the existing volume group for LVM structure and another 25G still in the same volume group free for future needs, filesystem extensions, etc.? I manage an environment with guest vServers limited to only the tools provided by Oracle Enterprise Linux and not able to use third party tools such as gparted, virt-filesystems, etc. Vendor solution is not available while vendor storage requirements grows for /boot with every quarterly upgrade and have already purged /boot as per most initial recommendations. Trying to be proactive with the trend approaching a point when OEL5 is no longer supported and OEL6 updates require more storage than configured or available. Any help or links would be appreciated. Thanks, crndctr
Thank You So Much!!!
Thx for this – it helped me alot
Excellent tutorial. Many thanks!
i have a problem when i fire command vgdisplay it’s showing nothing. so how will be known volume group, with is can’t extend..
It sounds like your system isn’t already using LVM. I assume that if you also run lvdisplay then you get nothing? If this is the case then you are not using LVM, and this article does not apply to you. You will either need to use vgcreate, create a new volume group on your disk and then use this, or otherwise expand the disk by some other method instead.
This was just an excellent guide. Thanks so much. It really helped me do a task on linux using a VM on VMWare! Thanks.
No problem, glad to hear it helped!
Great document, it really helped me a lot.
I cannot get beyond pvcreate.
Device /dev/sda3 not found (or ignored by filtering).
What am I missing? Did reboot, etc.
Does it show up if you run an ‘fdisk -l’ ?
When you created sda3 using fdisk, did you set the type to LVM? (type 8e).
Very very nice post. I was getting errors and was searching on this for about 2 hours after which got your post. Just followed the correct methods after reverting back my snapshot and alas all went fine and smooth as a cake. Thanks a million for the great article bro. Appreciate it!!
No problem, happy to hear it went well!
Hi Jarrod,
if mine is like below, am i able to perform the same procedure??
59GB increase to 100GB
# fdisk -l
Disk /dev/sda: 59.0 GB, 59055800320 bytes
255 heads, 63 sectors/track, 7179 cylinders
Units = cylinders of 16065 * 512 = 8225280 bytes
Device Boot Start End Blocks Id System
/dev/sda1 * 1 2611 20972826 83 Linux
/dev/sda2 2612 5222 20972857+ 83 Linux
/dev/sda3 5223 6527 10482412+ 83 Linux
/dev/sda4 6528 7179 5237190 5 Extended
/dev/sda5 6528 7179 5237158+ 83 Linux
The partition types of those are 83 which is standard Linux partition, so you’d either need to create a new volume group/logical volume or use something else like gparted: https://www.rootusers.com/use-gparted-to-increase-disk-size-of-a-linux-native-partition/
Amazing tutorial! Thanks a lot!
this is really nice material,
Disk /dev/sda: 40 GiB, 42949672960 bytes, 83886080 sectors
Units: sectors of 1 * 512 = 512 bytes
Sector size (logical/physical): 512 bytes / 512 bytes
I/O size (minimum/optimal): 512 bytes / 512 bytes
Disklabel type: dos
Disk identifier: 0x11406168
Device Boot Start End Sectors Size Id Type
/dev/sda1 * 2048 25165823 25163776 12G 83 Linux
/dev/sda2 25167870 41940991 16773122 8G 5 Extended
/dev/sda3 25165824 25167869 2046 1023K 8e Linux LVM
/dev/sda5 25167872 41940991 16773120 8G 82 Linux swap / Solaris
Partition table entries are not in disk order.
~$ sudo pvcreate /dev/sda3
Device /dev/sda3 not found (or ignored by filtering).
I am getting the above error, please provide some info.. how to fix this issue.
Hey, I’ve never had that problem however it sounds like you can run fdisk on /dev/sda3, press x for extra functionality, then press f to fix the partition order, followed by w to write the changes. I’ve not tested this myself so please be careful and ensure you have backups or a snapshot if it’s a virtual machine first.
Thank you very much for the reply, I have installed gparted and fixed with gparted.
thank you!
Nice, that’s good to hear :)
Thanks a lot. Great article!
Great article! Easy to follow and understand.
Thanks a lot.This was a great help!!
Thanks, dude. You’re awesome! That video helped me a lot!
Thank you so much!
great post! it works like a charm!
Really good article & great help!
Thanks lot.
Great and simple to follow ! THANKS
Awesome article, worked perfectly for me. Thanks
hi ,
[root@quickstart ~]# fdisk -l
Disk /dev/sda: 1704.2 GB, 1704243022848 bytes
255 heads, 63 sectors/track, 207195 cylinders
Units = cylinders of 16065 * 512 = 8225280 bytes
Sector size (logical/physical): 512 bytes / 512 bytes
I/O size (minimum/optimal): 512 bytes / 512 bytes
Disk identifier: 0x0003e7ad
Device Boot Start End Blocks Id System
/dev/sda1 * 1 64 512000 83 Linux
Partition 1 does not end on cylinder boundary.
/dev/sda2 64 8355 66595840 8e Linux LVM
/dev/sda3 8355 20886 100657931 8e Linux LVM
/dev/sda4 20887 133674 905969610 8e Linux LVM
Disk /dev/mapper/vg_quickstart-lv_root: 1090.4 GB, 1090380627968 bytes
255 heads, 63 sectors/track, 132564 cylinders
Units = cylinders of 16065 * 512 = 8225280 bytes
Sector size (logical/physical): 512 bytes / 512 bytes
I/O size (minimum/optimal): 512 bytes / 512 bytes
Disk identifier: 0x00000000
Disk /dev/mapper/vg_quickstart-lv_swap: 8589 MB, 8589934592 bytes
255 heads, 63 sectors/track, 1044 cylinders
Units = cylinders of 16065 * 512 = 8225280 bytes
Sector size (logical/physical): 512 bytes / 512 bytes
I/O size (minimum/optimal): 512 bytes / 512 bytes
Disk identifier: 0x00000000
[root@quickstart ~]# df -h
Filesystem Size Used Avail Use% Mounted on
/dev/mapper/vg_quickstart-lv_root
1000G 86G 864G 10% /
tmpfs 25G 228K 25G 1% /dev/shm
/dev/sda1 477M 42M 411M 10% /boot
cm_processes 25G 111M 25G 1% /var/run/cloudera-scm-agent/process
[root@quickstart ~]# fdisk /dev/sda
WARNING: DOS-compatible mode is deprecated. It’s strongly recommended to
switch off the mode (command ‘c’) and change display units to
sectors (command ‘u’).
Command (m for help): n
You must delete some partition and add an extended partition first
Now how to increase my existing partition ?
please guide
Thanks,
Syam.
With MBR you can only have 4 partitions, you have sda1-4 already so you can’t create another. You could either redo the disk as GPT though that involves deleting the partitions first so probably not desirable, otherwise you use sda4 and make a logical partition, you can then make additional extended partitions within this space.
Thanks for the succinct set of instructions!!
Well written and easy to follow. Thank you!
Thanks! Very helpful !
Hello, I am getting error in last step when I am firing resize2fs command ….error message is -> resize: Bad magic number in super-block while trying to to open /dev/VolGroup00/LogVol01…can’t find valid filesystem superblock….Thanks
If you are using RHEL/CentOS7, see this method from the write up above:
“Alternatively if you’re running the XFS file system (default as of RedHat/CentOS 7) you can grow the file system with “xfs_growfs /dev/Mega/root”.”
Thank you. Exactly what I needed.
Thank for this write up. Very helpful!
OH MY GOSH. You saved my life. These instructions are PERFECT. Thank you Thank you Thank you. We are back in business with our Executive facing Linux Dashboard. Did I say thank you?
Great to hear!
Hi Jarrod,
I have a disk that I set up as an LVM (at least I though I did), because now I see that my partition type remained ‘Linux’. As I want to add another drive and its free space to LVM, is it possible to do that by converting first drive’s partition from ‘Linux’ to ‘Linux LVM’ and then doing to extending or would I lose data on it?
I believe you would lose the data as you’d use fdisk/gdisk to delete the partition then recreate it as the LVM type, I’d copy it off first anyway just in case.
In case anyone is using BTRFS the command to extend the file system is a bit different than using resize2fs or xfs_growfs.
Shown below extending the /dbdata mount point.
#btrfs filesystem resize max /dbdata
Cool thanks for the info!
Really helpful, thank you.
I just wanted to drop a note to say a quick thank you; as a windows guy, linux is strange, but i am starting to come around!
Cool! It can be fun :)
I resized last evening one drive on a centos server, it worked perfectly. Many thanks
Thank you so much, saved my day !
I’m a fan of this blog and Linux OS, it’s a hobby that I have, I do not understand much about computing but I try to learn everything I can, with the help of blogs and articles like this, so I can put it into practice myself love to have control of everything! (laughs) I would love to get in touch with you if possible. Kisses
#Teamjarrod
Thanks for that – helped me thinking :)
Thanks….
It works fine….
Thanks for the great post!
Needed the parted tools.
apt-get install parted
Thanks again!
Nice post, followed the instruction extended my partition in 10 minutes.
Thanks!
Nice and clean. Thanks
Great post – thanks for your help!
Really great post! Just did it and it worked flawlessly, thanks a lot! :)
No problem!
Great !!!
Thanks a lot
Thank you! This was great.
Crisp and precise. Thanks for the wonderful post!
Thanks for the post!
Now the work can continue on my Centos …
This was awesome! Great instructions, all worked.-thank you
Thanks a bunch!
Nice Post. I have performed on my Cloudera Quikstart VM of VM ware Player. Successfully Extended the volume.
Thank You Very Much for Such nice explanation.!
Thank you, this is still helpful and excellent. Worked for me on a Vagrant VM running CentOS 7.
Really helpful, thank you very much
Thank you so much, it helped me. Your tutorial is precise!
awesome post, a lot of effort went in to it, it worked first time, thanks
Great post! All worked as per instruction.
Awesome! Thank you very much.
great illustration u made my job easy
Thanks so much
What a great post. Awesome instructions. Thank you so much for putting this together.
Thank You so much for this wonderful and detailed article.
Hi, I am going to do the same on our server which is a financial server and has very sensitive data on it. By this method, our existing data is safe ? I mean is there any possibility to lose our data on the server or not ? Thank you.
It should be fine yes, but you should always take a backup before performing a procedure like this and have a plan in place in case mistakes are made.
I have performed this on my own equipment before carrying out the same on customer site. Procedure is explicite and methodical. Apart from taking a backup, why not run up a VM and do this on a test bed or another non-critical server if you want to familiarise yourself with the process.
Generally: Rather be a pro after many practice runs than once a fool.
Great Linux resource. Thanks!
Hi, thank you. I finished the job and it worked fine although it was a very stressful job. By the way, if I already had 4 primary partitions, how could I increase the size of our server space ?
You’d either need to looking at turning the 4th partition into an extended partition, or otherwise add a new disk to add to the VG/LV: https://www.rootusers.com/how-to-increase-the-size-of-a-linux-lvm-by-adding-a-new-disk/
Hi, thank you. I finished the job and it worked fine although it was a very stressful job. By the way, if I already had 4 primary partitions, how could I increase the size of our server space ?
Oh, thank you! You mean first I have to turn the 4th partition into an extended partition and then add a new LVM partition and repeat the above instructions ?
Yes that’s correct, just keep in mind you’ll need to delete the existing 4th partition, so the data will be gone (technically the data is still there I think, you’re just editing the disk structure, but relying on that is risky so assume all data will be wiped).
Wow, what a great tutorial. Just what I needed to help me through a pressing problem. Thanks!
Very well and swift explained, thanks so much for one of the better tutorials ever seen thats actually doing what it promises.
Hi Jarrod,
I’ve used your instructions in past with success and now after years I come back to it and I am stuck at vgdisplay command to find out the volume group and when I run that it shows BLANK, no name. Can I run the command with BLANK or no name to add the physical volume to that group or is there a command I can run to see the volume group name? Please help, I am trying to expand the drive on a server that has no space left.
Thanks in advance…!
If it doesn’t show in vgdisplay then there is no volume group and you need to first create one.
Thanks a lot. Very useful in 2019!
This worked amazingly well expending a Debian disk hosted on Hyper-V. Thanks so much for the write-up.
Very helpful, Thanks
Incredible !
Great Job !
It worked from the beginning to the end for my case !
Very helpfull, thanks !
I did’nt find mistake, just follow it like a train on rail !
Those steps worked for me Thanks a lot!
Thanks a lot mate! your a beauty
Excellent article, thank you so much for sharing.
In my case, my boot flag and my / partition are both /dev/sda3. How can I separate them ?
Great… it save a lot of time. TKS
To correctly extend and use 100% of the new PV allocated into the VG instead of:
lvextend /dev/Mega/root /dev/sda3
use:
lvextend -l +100%FREE /dev/Mega/root /dev/sda3
This is what cause the “Allocatable yes (but full)” issue
Kudos, very knowledgeable tutorial.
Do these steps still works for increasing the size of the boot drive /dev/sda1?
kudos, very nice and knowledgeable tutorials. Please do this same method work for increasing the boot drive – dev/sta1 (id -83 and system – linux).
Please can anyone help me out with this?
Thanks, dude. You’re awesome! That video helped me a lot!
Happy to help!
Command (m for help): n
You must delete some partition and add an extended partition first
i get the above error. one time i added as your step. but second time when i want to increase size get the error.
Thanks,
Biplob
If I recall, in that situation you can only have 4 partitions, so the last one needs to be the extended partition.
This is simply superb article & my job is done following this article. Thanks a ton.
Glad it was useful!
Great post, thanks it helped me to increase my disk size it is very clear and straight forward. Thanks for this work, well done
use cfdisk instead of fdisk [ eg cfdisk /dev/sda ]
This guide has been a life server. I have moved through 2 jobs with this guide as my favourite bookmark. It works everytime