This post will cover how to increase the disk space for a VMware virtual machine running Linux that is using logical volume manager (LVM). Firstly we will add a new disk to the virtual machine and then extend the original LVM over this additional space. Basically we will have two physical disks but just one volume group and one logical group that is using the space on both disks together. With this method there is no down time for the virtual machine.
As there are a number of different ways to increase disk space I have also posted some different methods here:
- How to Increase the size of a Linux LVM by expanding the virtual machine disk – In this article the virtual disk that is using LVM is expanded, whereas in this current article we are instead increasing the virtual disk and expanding the Linux native partition.
- Use GParted to increase disk size of a Linux native partition – In this article the virtual disk is expanded, however there is no LVM here just a Linux native partition that is expanded with the GParted live CD.
- How to Decrease the size of a Linux LVM – In this article the file system is shrunk followed by the LVM, allowing you to reclaim space in the volume group.
Important Notes: Be very careful when working with the commands in this article as they have the potential to cause a lot of damage to your data. If you are working with virtual machines make sure you take a snapshot of your virtual machine beforehand, or otherwise have some other form of up to date backup before proceeding. It could also be worth cloning the virtual machine first and testing out this method on the clone.
Throughout my examples I will be working with a VMware virtual machine running Debian 6, this was set up with a 20gb disk and we will be adding a new 20gb disk for a total LVM size of 40gb.
Although my examples make use of virtual machines, this method would work with a physical server as well if you have added a new physical disk in and want to use that to expand the LVM.
Identifying the partition type
As this method focuses on working with LVM, we will first confirm that our partition type is actually Linux LVM by running the below command.
fdisk -l
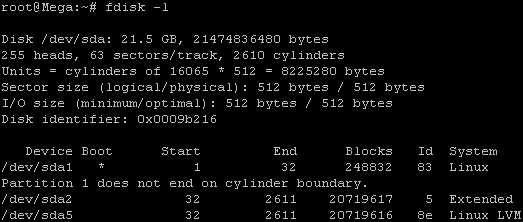
As you can see in the above image /dev/sda5 is listed as “Linux LVM” and it has the ID of 8e. The 8e hex code shows that it is a Linux LVM, while 83 shows a Linux native partition. Now that we have confirmed we are working with an LVM we can continue. For increasing the size of a Linux native partition (hex code 83) see this article.
Below is the disk information showing that our initial setup only has the one 20gb disk currently, which is under the logical volume named /dev/mapper/Mega-root – this is what we will be expanding with the new disk.
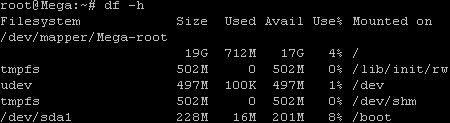
Note that /dev/mapper/Mega-root is the volume made up from /dev/sda5 currently – this is what we will be expanding.
Adding a new virtual hard disk
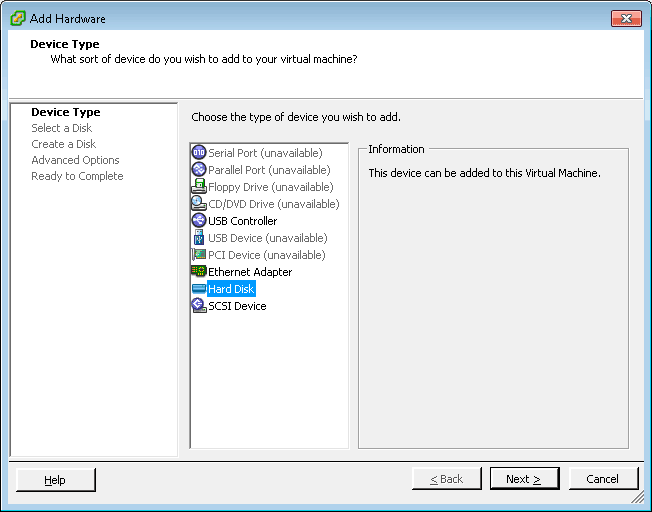
First off we add a new disk to the virtual machine. This is done by right clicking the virtual machine in vSphere, selecting edit settings and then clicking the “Add…” button which is used to add hardware to the virtual machine.
Select hard disk and click next.
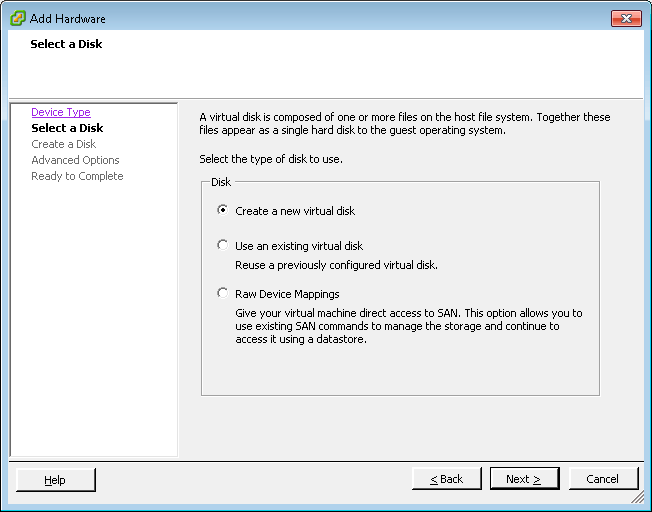
Select create a new virtual disk and click next.
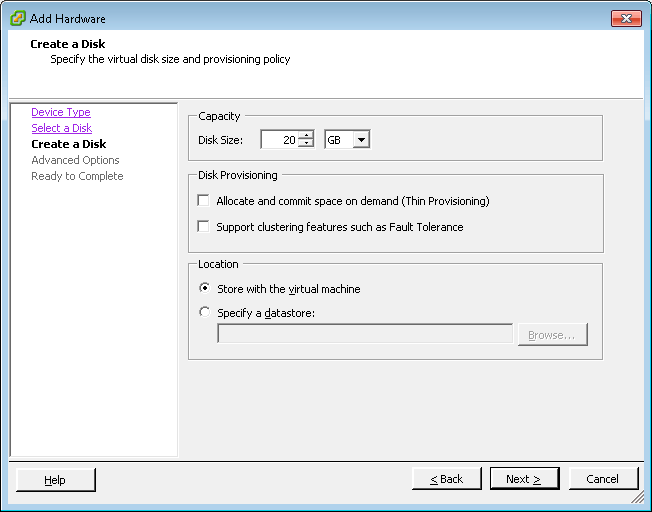
Select the disk size you want to add, I will be using 20gb as previously mentioned. I have also selected to store the disk with the virtual machine, it will store on the same datastore as the virtual machines files, this will be fine for my test purposes. Click next once complete.
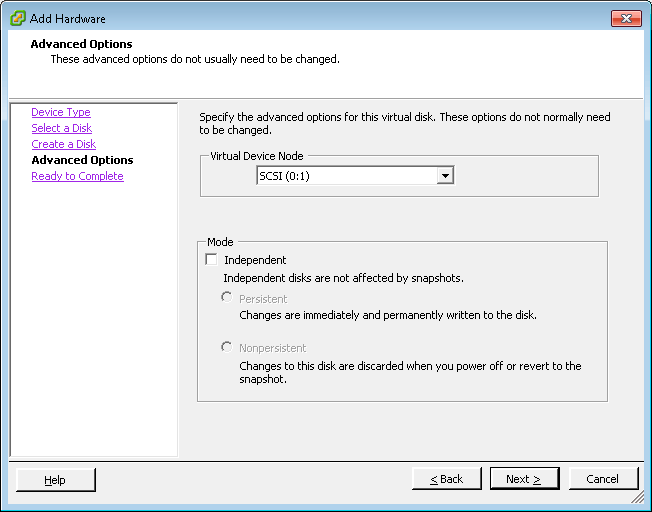
Select next on the advanced options page.
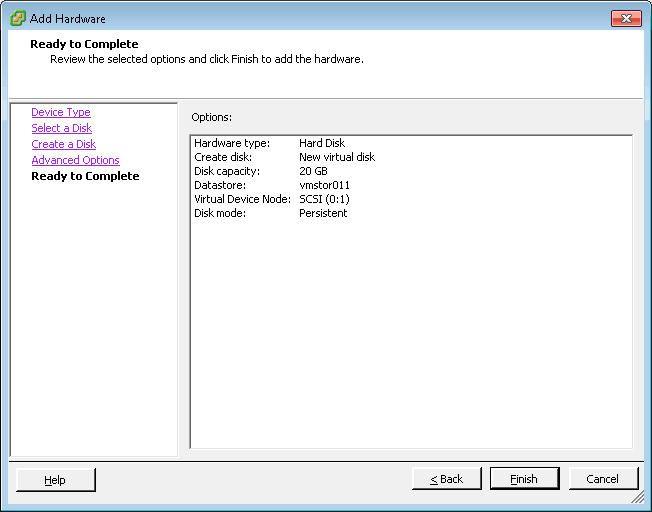
Review everything and click finish once you have confirmed the settings.
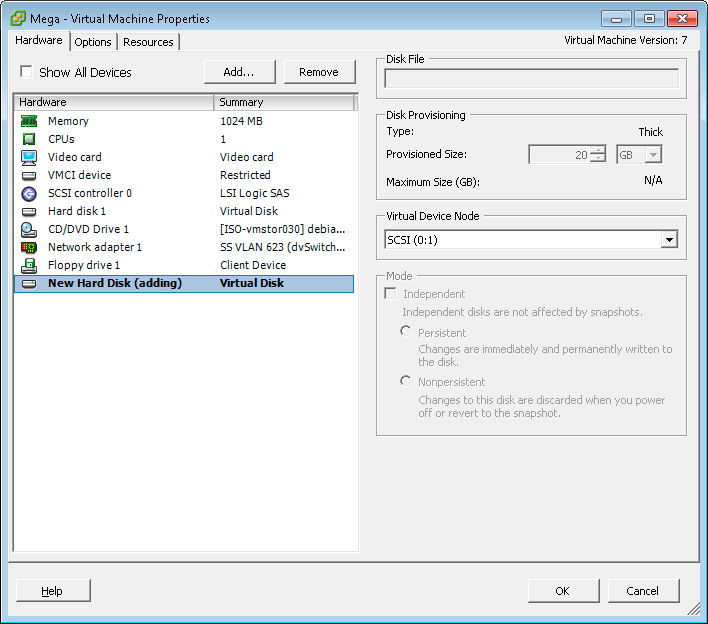
You will then see the new disk under the hardware devices tab and it will be labelled with (adding) which means it will not apply until you click OK, so click OK to complete the process.
Detect the new disk space
In my test for this example, as soon as I added the additional disk in through VMware it displayed through “fdisk -l” for me, you can see the second disk labelled /dev/sdb (I have cropped out the information on /dev/sda1 to make it less cluttered here). It is also worth noting that it shows as not containing a valid partition table, we are about to set this up.
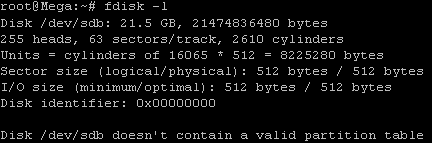
This may not however be the case for you, to avoid reboot you may need to rescan your devices, you can try this with the below command. Note that you may need to change host0 depending on your setup.
echo "- - -" > /sys/class/scsi_host/host0/scan
If you have issues detecting the new disk, just perform a reboot and it should then display correctly.
Partition the new disk
We now need to partition the new /dev/sdb disk so that it can be used, this is done by using fdisk.
fdisk /dev/sdb
This should provide us with the below prompt, the inputs I have entered in are shown in bold.
‘n’ was selected for adding a new partition.
root@Mega:~# fdisk /dev/sdb
Command (m for help): n
‘p’ is then selected as we are making a primary partition.
Command action
   e   extended
   p   primary partition (1-4)
p
As this is a new disk, we do not yet have any partitions on it so we will use partition 1 here.
Partition number (1-4): 1
Next we press the enter key twice, as by default the first and last cylinders of the unallocated space should be correct.
First cylinder (1-2610, default 1): "enter"
Using default value 1
Last cylinder, +cylinders or +size{K,M,G} (1-2610, default 2610): "enter"
Using default value 2610
‘t’ is selected to change to a partitions system ID, in this case we change to ’1′ automatically as this is currently our only partition.
Command (m for help): t
Selected partition 1
The hex code ’8e’ was entered as this is the code for a Linux LVM which is what we want this partition to be, as we will be joining it with the original Linux LVM which is currently using /dev/sda5.
Hex code (type L to list codes): 8e
Changed system type of partition 1 to 8e (Linux LVM)
‘w’ is used to write the table to disk and exit, all changes that have been done will be saved and then you will be exited from fdisk.
Command (m for help): w
The partition table has been altered!

Calling ioctl() to re-read partition table.
Syncing disks.
By using “fdisk -l” now you will be able to see that /dev/sdb1 is listed, this is the new partition created on our newly added /dev/sdb disk and it is currently using all 20gb of space.

Increasing the logical volume
Next we will use the pvcreate command to create a physical volume for later use by the LVM. In this case the physical volume will be our new /dev/sdb1 partition.
root@Mega:~# pvcreate /dev/sdb1
  Physical volume "/dev/sdb1" successfully created
Now we need to confirm the name of the current volume group using the vgdisplay command. The name will vary depending on your setup, for me it is the name of my test server. vgdisplay provides plenty of information on the volume group, I have only shown the name and the current size of it for this example.
root@Mega:~# vgdisplay
  --- Volume group ---
  VG Name               Mega
  VG Size               19.76 GiB
Now using the vgextend command, we extend the ‘Mega’ volume group by adding in the physical volume of /dev/sdb1 which we created using the pvcreate command just before.
root@Mega:~# vgextend Mega /dev/sdb1
  Volume group "Mega" successfully extended
Using the pvscan command we scan all disks for physical volumes, this should confirm the original /dev/sda5 partition and the newly created physical volume /dev/sdb1
root@Mega:~# pvscan
  PV /dev/sda5   VG Mega   lvm2 [19.76 GiB / 0    free]
  PV /dev/sdb1   VG Mega   lvm2 [19.99 GiB / 19.99 GiB free]
  Total: 2 [39.75 GiB] / in use: 2 [39.75 GiB] / in no VG: 0 [0   ]
Next we need to increase the logical volume with the lvextend command (rather than the physical volume which we have already done). This means we will be taking our original logical volume and extending it over our new disk/partition/physical volume of /dev/sdb1.
Firstly confirm the name of the logical volume using lvdisplay. The name will vary depending on your setup.
root@Mega:~# lvdisplay
  --- Logical volume ---
  LV Name                /dev/Mega/root
  LV Size                18.91 GiB
The logical volume is then extended using the lvextend command. We are extending the original logical volume of /dev/Mega/root over the newer /dev/sdb1
root@Mega:~# lvextend /dev/Mega/root /dev/sdb1
  Extending logical volume root to 38.90 GiB
  Logical volume root successfully resized
If you like you can then run vgdisplay and lvdisplay again to confirm the size of the volume group and logical volume respectively, I have done this and I now have the following.
  LV Size                38.90 GiB
  VG Size                39.75 GiB
However if you run a “df” command to see available disk space it will not have changed yet as there is one final step, we need to resize the file system using the resize2fs command in order to make use of this space.
root@Mega:~# resize2fs /dev/Mega/root
resize2fs 1.41.12 (17-May-2010)
Filesystem at /dev/Mega/root is mounted on /; on-line resizing required
old desc_blocks = 2, new_desc_blocks = 3
Performing an on-line resize of /dev/Mega/root to 10196992 (4k) blocks.
The filesystem on /dev/Mega/root is now 10196992 blocks long.
Alternatively if you’re running the XFS file system (default as of RedHat/CentOS 7) you can grow the file system with “xfs_growfs /dev/Mega/root”.
Rather than resizing the file system manually, you could instead use the -r option of the lvextend command which will automatically resize the file system to make use of the additional disk space.
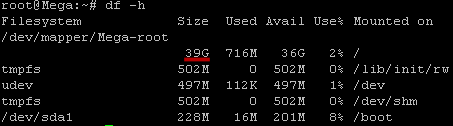
The resize took a minute or so to complete (it will depend on the disk speed and size), running the “df” command now shows the correct disk space for /dev/mapper/Mega-root
Summary
We have now increased the total disk space on the virtual machine by first adding a new virtual disk through VMware, created a new partition out of this newly unallocated space within the guest OS, turned it into a physical volume, extended the volume group, then finally extended the original logical volume over the newer physical volume resulting in overall disk space being increased successfully. This method allows for disk space upgrade with no down time, my virtual machine was not shut down or rebooted at all during this process. This is a very useful technique for upgrading disk space on production servers that can not go down.
Thanks, really useful tut.
These instructions are perfect. Not only was this exactly what I had to do on a production server, but your guidance and explanation of each step was right on!
In my case, at the very end, resize2fs reported that I needed to do an e2fsck -f /dev/whatever, then the resize2fs /dev/whatever, which I did, and all is well. :grin:
Hi Mark,
No problem, thanks for the good feedback!
Thanks, It helped to add physical to my RHEL box, it is not letting me add my partitions to physical I need to run dmsetup remove_all then every thing went well
Great instructions at the perfect pitch. One point – I didn’t realise that live resizing would have worked – it would have saved me from downloading and booting from system rescue CD if I had read ahead…
Thanks all the same- knowing that is a bonus and maybe I will try that in the future if I’m feeling confident with my backups…
Hey. Very useful tutorial, with everything working precisely as described. Like Mark, I also needed to run e2fcsk -f before resize2fs, but besides that, you had it spot on.
Thanks again!
Perfect guide! Just resized a partition under my oracle db without any problem :).
Thnx for the effort!
Great step by step
thank a lot for the howto, very straightforward, nothing was left behind.
I LIEK DIS. :razz:
Fantastic write up. Very succinct, and perfect instructions.
Thanks.
Absolutely perfect instructions!
Thank you very much for writing this up.
Awesome tut that even i could understand (and that says alot) :)
Worked perfectly, many thanks!
Unless someone knows something I don’t there is no reason to partition the disks before hand. All my LVM VGs are made up of raw disks. My understanding is it makes little difference either way and in my mind it is one less partition table that can become corrupt and one less layer to troubleshoot. If there is a benefit to partitioning the drive first I would be glad to hear it.
Thanks for the tutorial. I always like a sanity check before I do disk operations.
Side note growing a 4TB partition to 11TB will take HOURS with an online resize.
Indeed, recently did 5TB. :razz:
Great explanations, very clear and easy, definitely saving this page in my vault.
HI
that is really good steps
I tried all the steps but at then end I get an error : Couldn’t find valid filesystem superblock.
any one know how to solve this issue please let me know thanks a lot .
Greeting.
Thanks a lot…Great post!!!!
Thany you, applied successfully :grin: .
Very Nice information was published.
Is it possible to add a new disk from another node? not /dev/sdX in simple cases but something like 192.168.1.10:/dev/sdX.
Have you looked into using NFS? It won’t let you add the network disk into the LVM I don’t think but it’s a start for network disk mounts.
resize2fs /dev/systemVG/LVRoot
resize2fs 1.41.9 (22-Aug-2009)
resize2fs: Bad magic number in super-block while trying to open /dev/systemVG/LVRoot
Couldn’t find valid filesystem superblock.
it is mounted filesystem
e2fsck /dev/systemVG/LVRoot
e2fsck 1.41.9 (22-Aug-2009)
/dev/systemVG/LVRoot is mounted.
WARNING!!! Running e2fsck on a mounted filesystem may cause
SEVERE filesystem damage.
Do you really want to continue (y/n)? no
check aborted.
Please help
Before doing the check unmount the file system, you can do this with ‘umount /dev/systemVG/LVRoot’, however that may not be possible if it’s the root file system, you may need to boot into a live cd and perform the change.
yes you are right
This was awsome. I’ve been trying to extend my lvm on a physical machine, and this was the clearest instruction set I’ve found yet! Keep up the great work!
Thanks!
Great article, please keep it up. I’ve been using this guide for so many times and it always work like magic. The instructions are clear and everything is covered. Thanks so much!
Excellent!
Perfect! brief and very useful(along with example)
Thank you! :smile:
Great Article.. followed the same instruction and its working perfectly.!!!
Thanks!
Excellent! Worked perfect on one server.
But on my other server I get
“Can’t open /dev/sdb1 exclusively. Mounted filesystems?” after I write the command
pvcreate /dev/sdb1
Do you know what to do?
Is that disk mounted? Try unmounting it first?
that was fantastic! Thanks so much Jarrod
Thanks so much for the clear instructions, they were right on the money. The only thing I did different was add two disks, for a total of three, so I changed my vgextend and lgextend commands to add /dev/sdc1 at the end of the command.
Cheers, Bill
Thank you very much for this step-by-step manual! It helped me as a newbe solving a pretty technical issue. Now I feel a bit more experienced and would recommend your page.
Regards
Excellent tutorial!!! TYVM.
Great instructions, this is exactly what I needed to add additional space to a server I could not afford to take down.
Thank you, I have increased my VM disk succesful with this manual and had no issues at all, fantastic well documented!
Thanks! Worked perfectly
Thanks. Worked like a charm.
I want to know.. Can we change the size of root disk ? if yes then, plz provide steps for this.
In this example I increased the root partition of / (lvm “Mega-root”) so it should cover what you’re after.
Or did you mean increasing the original virtual hard disk, rather than adding a secondary one to expand into? If so I’ve covered that one here already: http://www.rootusers.com/how-to-increase-the-size-of-a-linux-lvm-by-expanding-the-virtual-machine-disk/
You sir know how to write clean and clear guide. Big thanks. Saved me hours of work trying to figure out how LVM work.
Lovely guide! I quote Stephen. :grin:
Grt Stuff…!!!
Could Anyone pls update about “How to reverse the same”
i.e. how to decrease the size of a linux vm by removing a disk which share same volume group with the old disk”.
Thanks in Advance…!!!
It is possible to reverse the process, I’ll try to do a future post on how to do it properly, basically you can move the LV/VG so that they are all on another disk, then remove the unused disk safely.
Hi Karan, just wanted to let you know that I have now created a guide on the reverse process, that is resizing the Linux LVM by shrinking it rather than expanding it.
http://www.rootusers.com/lvm-resize-how-to-decrease-an-lvm-partition/
Hope it helps!
Hi Jarrod,
It is really helpful and the steps detailed. I am newbie and I was able to add disk and extend an existing logical volume with ease.
Thanks & Regards
Siva
No problem, good to hear!
This is a good place to look for the steps to add a new disk
Thanks. :cool: :cool: :cool:
Jarrod, this is still my “Go To” article when I need to remember how to resize LVM disks. Thanks for the good write-up.
Great to hear! It is for me too when ever I need to quickly resize LVM :D
Thanks it worked really well on my rhel 7
Thanks, worked like a charm :)
Thanks. Worked like a charm.
Jarrod,
I was searched in other websites for a long and not satisfied.
But this post is awesome reference for me.Thanks a lot!!!
Would have been better ,if you could detailed explain on this below for a newbie like me.
echo “- – -” > /sys/class/scsi_host/host0/scan
Thanks CK, this should answer your question: https://access.redhat.com/documentation/en-US/Red_Hat_Enterprise_Linux/5/html/Online_Storage_Reconfiguration_Guide/scanning-storage-interconnects.html
Thanks for your quick notes jarrod, its helpful to me.
Thanks a lot, that worked like a charm :)
thanks a lot, worked perfectly
tons of thanks Jarrod. I was searching many stuffs for the past 2 days and I finally found it here.. neat explanation ..helped me alot.. thanks again..
This is my goto guide as well, nice and clear as a refresher when I haven’t done it for a while.
The only thing I do differently is to add the lvextend ‘-r’ option which does the resize step for you as part of the lvextend step. It uses fsadm so it should work for ext2/3/4, ReiserFS and XFS.
Thanks, yep I’ve been using the -r option with lvextend as well to automatically take care of the file system resize. I’ll update the post to mention this alternate method, however I think it’s still good to see how to manually resize the file system too. :)
Excellent tutorial!, very useful
You are super!
I’ve tried and tried and tried 100’s of “google searched solutions” but your approach was straightforward and it solved my problem (I’m embarrassed to say it but I had 0% space left on my dev-root vm machine).
Now thanks to your help everything is golden again!
Have a Great Year!
Thanks, that’s good to hear, cheers and you too!
I refer to this article almost every quarter. This is the best, most readable guide to get this done. Thanks.
Thanks! I refer to it a lot myself so I try to keep it updated and make sure it does what I need. :)
excellent…I just followed the steps.. it perfectly worked… Kudos to author..
Really really useful for me in the production environment…
Thank you so much
No problem, good to hear it worked well :)
Hello.. Thanks for this article. One question, this is for a vmware setup.
Will these instructions work in a regular, non virtualised setup?
Thanks, John
Yes it should, the main difference will be that you’ll be adding an additional physical disk rather than a virtual disk.
Thank you this really helped me a lot! I’ve learned so much with this. Now my VMs on proxmox have all the space they want~
No problem, that’s great to hear!
Fantastic info, thanks!
Thank you! i use this post repeatedly.
No problem! That’s good to hear, I refer to it often myself as well!
Thank you; very easy to follow instructions. Just added more space to a VM by creating a new disk and using the LVM commands provided in this blog post. Cheers!
Great to hear, thanks!
Thank you for this great tutorial. It helped a lot!
Now that helped a lot,
Thank you man for the good work!
[root@cgiengxx ~]# resize2fs /dev/VolGroup00/LogVol01
resize2fs 1.39 (29-May-2006)
resize2fs: Bad magic number in super-block while trying to open /dev/VolGroup00/LogVol01
Couldn’t find valid filesystem superblock.
Got this trying to fix this please help me.
Thank you.
Is there a file system on /dev/VolGroup00/LogVol01 or is that new? If so what file system is in place?
its a new volume
VolGroup00 is already exsiting just added 100GB of LogVol01 as new
Thanks for the post! Worked perfectly!
Saved me! Very easy to understand and each step explained, amazing!
This was a lifesaver. I’m still a linux newbie and was dreading the day my vm ran out of space as it already has 4 partitions setup on the virtual disk.
Glad it helped!
Thank You for the detailed and precise steps … very helpful
Internet! Unlike me it never forgets!
Awesome post from 4 years ago and still relevant today.
Thanks for the assist
Thank you man, it really helped me!
Really thx this is best page I find, after search and ask people who never say yes to any help request.
All works perfect on debian wheezy on cloud from 20Gb to 30GB
Thx again
Adding a request. If I add a second HD as example, but then I see it’s not enought, can I update the 2nd HD to a bigger size without adding a 3rd HD ?
I mean I added a 2nd HDD 10GB to a cloud server of 20GB. All is ok and I have now 30GB root disk. If I will need more GB, can and how update the 2nd HDD I just added ? Or I have to add a 3rd HDD ?
THX
Yes, if you increase the second virtual disk you can either create a new partition on that disk to use the new space, or look at increasing an existing partition on the disk to use that new space.
This guide is simply awesome. I followed your steps sincerely and within 10 mins I got everything done with no issues reported.Thank you so much for the steps.
Great,
Very understandable.
Thank you
thanks so much for the fantastic guide really useful. Works perfect on Ubuntu 14.04.3 LTS x64 no errors reported.
This is saved my @$$ on the fly at least five times now,
THANK YOU!!!
Almost committed to memory.
No problem! Happy to help :)
This guide was awesome. Not often do I come across instructions that make sense and don’t break things or defy all logic.
This is so awesome, thank you so much!!! 100% accurate and works just great! Thank you!
Thank you! It worked like a charm on ubuntu16.04 I really had no ideea how to do it.
Saved me. Thanks a lot…
Hello, i have an issue. I used the same steps to create a partion. Unfortunately i get an error when i do #pvcreate /dev/sdba3 . (Device /dev/sdba3 not found(or ignored by filtering)). How do i sort this issue?
When i do fdisk -l /dev/sda i can see my partion (/dev/sda3 … … 8e…).
Did you create /dev/sda3 with fdisk, or did it already exist and is in use elsewhere?
Yes, i did use fdisk to create it.
I also need to run “partprobe /dev/sda3” to get the server to see it.
thanks! helped a lot!
Excellent tutorial, I use it time and time again! Thanks!
Thanks! Precise and clear tutorial.
running at the last step returns error,anyone know a fix?
resize2fs: Permission denied to resize filesystem
Are you running as root?
yes,i’m running as root. resize2fs just don’t allow me to do so.
I can see from pvdisplay,lvdisplay that new disk is added, could you let me know how to undo the actions by removing the added disk from lvm
lvreduce /dev/Mega/root /dev/sdb1
or
pvmove,vgreduce ?
If you created the logical volume you’d use lvremove, then remove the physical volume from the volume group with vgremove, then delete the pv.
Thank you,i sorted it out.
I worked :)
nice explanation.
To the point tutorial with demo . Thanks you very much.
Excellent article. Particularly you’re note about using:
echo “- – -” > /sys/class/scsi_host/host0/scan
Thanks for putting it together. Save this in my notes for the next time I need to do an LVM resize…
No problem, yeah it’s quite useful :)
it work like a charm …thanks dude,
Great write up Jarrod, many thanks.
Could I please ask for some assistance with my situation?
I have a 30TB xfs file system on an LVM partition that currently spans 2 physical disks. One is 10TB and the other is 20TB, I’m currently at the point where i have to increase disk space.
I’ve created a 5TB raw disk in vSphere and its visible in the OS.
I currently see
/dev/sdb = 10TB
/dev/sdc = 20TB, and now
/dev/sdd = 5TB
My volume group consists of sdb and sdc, but I would like to add sdd to it and extend it. Just wanted to make sure I’m doing this correctly.
parted /dev/sdd (partition the new disk with as an lvm)
pvcreate /dev/sdd
umount /data (mount point of current lvg/lvm)
vgextend vg_data /dev/sdd
lvextend -L5T -n lv_data /dev/sdd
mount /dev/vg_data/lv_data /data
I’m pretty sure im missing something here, just wanted to see if i could please get some insight from you and/or others.
Sorry for the long comment and many thanks in advance.
Hey sorry for the late reply, I was away for a little bit! Yeah that looks like it will work, you shouldn’t need to umount /data though as the expand works fully online, but no harm in doing so if you want to be extra careful! The only thing missing is that you still need to expand the XFS file system after you do that LVM work, basically just run xfs_growfs on the the LV /data
This is a really late reply (sorry), but
lvextend -L5T -n lv_data /dev/sdd
is NOT what you want to do; there are multiple things wrong with this. That will make the volume a _total_ of 5TB, not add 5TB to the existing 30. From the manage, you need the “+” sign
-L, –size [+]LogicalVolumeSize[bBsSkKmMgGtTpPeE]
Extend or set the logical volume size in units of megabytes. A size suffix of M for megabytes, G for gigabytes, T for terabytes, P for petabytes or E for exabytes is optional. With the + sign the value is added to the actual size of the logical volume, and without it, the value is taken as an absolute one.
I also doubt you are using the -n correctly. In lvextend, that’s a “nofsck” option, not a “name” option. You need the full device path.
If you are trying to ADD additional space, you probably want
lvextend -L+5T /dev/vg_data/lv_data
Thank you so much for this article!
Cheers,
Andras
Good Article, helped me a lot.
Step by step, to the point, clear cut, flawless … what a helpful post! … tnx :)
Many Thanks..!!! Nice article for basic understanding of LVM
Cheers!
Great explained.
Thanks!
Great artical. It was very useful in my case. Thank you.
Thank you so much for this article! it helps me a lot.
Cheers,
No problem!
Many thanks for the article, it has been really helpful.
Can I ask for help on the following situation.
I just finished extending file system size with xfs_growfs
/dev/sda 400GB
/dev/sdb 2.5TB
For a total of ~3TB, but only until now I realize that MBR only supports 2TB max, so .5TB are wasted. Given the example “/dev/Mega/root” is just 2.5TB instead of 3TB.
Is there a way to recover the remaining space?
I haven’t actually experimented with anything over 2TB, my guess would be that you need to redo it as GPT, which could be difficult if you already have data there that can’t be moved elsewhere. I think there are some tools for converting to GPT, but they can be dodgy, definitely have a backup before trying.
Thanks for your post. It helped me a lot.
Thank you so much!
Was stuck with a VM that had barely enough space on the default LVM, and I couldn’t install the necessary Azure Site Recovery agent to migrate to the cloud.
After hours of looking through the Internet, found this post which worked flawlessly!
Thanks so much again!!
No problem! Good to hear you were able to fix it.
Thank you so much for this, it saved my bacon. Expanding volumes always makes me nervous. This article was 100% accurate in my case (VMware VM + Centos6). Super thanks! :D
No problem, good to hear it helped!
Excellent post!
Thank you!
hey Thank you , this is extremely well explained!
No problem, cheers!
Thank you for this guide. It’s succinct, yet detailed, and holds up.
Made my day! Thanks!
Precise and exact instructions still working for my Centos7 VirtualBox VM. Thanks
Thank you!!!
Understood and worked well.
this article was very nice and was very helpfull ..
great work..☺
Very helpful! But resize2fs results in errors in RHEL7, need to use xfs_growfs instead
Cheers, I mention that in the guide ;)
perfect, thanks for posting this. used and worked perfectly, took a few minutes.
Awesome, thanks a lot!
I followed and it works fine on my system with CENTOS7
Thanks a lot, – great job!!!!
Vladimir
Nice tutorial bro
Thanks a lot, – great job!
This is a life saver! After I failed on cloning old disk to new one. This is a real solution for adding a new virtual disk.
As Mentioned in
Yeah that’s covered in the blog post :) newer operating systems like CentOS 7 and above swap to XFS so that command is needed instead.
Awesome, thanks for the guide.
Thanks a lot, still works and super useful. Just did this on a production server and it worked flawlessly! Kudos!
If you are still reading these comments please pat yourself in the back. I have done this on a productions server, I was nervous but it has worked flawlessly! Many thanks
Still works. Thanks a lot!
Amazing! This worked for me after many hours of trying other procedures, thanks so much :)
Good info
I added create a 50G SDC drive. When “fdisk -l” doesn’t show the SDC drive, I use the command:
ls /sys/class/scsi_host
The system shows host0 host 1 host2 … host31. and I continue to execute the following command:
echo “- – -“> / sys / class / scsi_host / host0 / scan
…..
echo “- – -“> / sys / class / scsi_host / host31 / scan
fdisk -l
SDC drive is not visible. help me
thank you
Kudos. Almost 10 years later and still the most informative and detailed article out there. Wow!
Only tip I can add occurred with a test run, although valid command, it did bring up the disk
echo “- – -“> / sys / class / scsi_host / host0 / scan
in a different call, I did get the disk w/o a reboot
echo 1 > /sys/class/block/sd?/device/rescan
It’s work fine! Thanks you
This is a great tutorial/article. I followed all steps and was able to increase the size of my root partition on a VM. Thanks for your effort and time.