In this post we will cover how to increase disk space for a VMware virtual machine that is using a Linux native partition rather than logical volume manager (LVM). Firstly we will increase the size of the virtual disk on the virtual machine at the hardware level and then once this is complete we will boot into a GParted live CD and perform the changes required to make use of the additional disk space so that the operating system is able to use it.
As there are a number of different ways to increase disk space I have also posted some different methods here:
- How to Increase the size of a Linux LVM by expanding the virtual machine disk – In this article the virtual disk that is using LVM is expanded, whereas in this current article we are instead increasing the virtual disk and expanding the Linux native partition.
- How to Increase the size of a Linux LVM by adding a new disk – In this article a new virtual disk is added to the virtual machine, a new partition is created, the volume group and logical volume are both expanded and then the filesystem is resized.
- How to Decrease the size of a Linux LVM – In this article the file system is shrunk followed by the LVM, allowing you to reclaim space in the volume group.
Important Notes: During the time that the GParted ISO is mounted you will be booted into this live CD rather than your normal operating system, basically meaning that during this process there will be down time from normal server operations.
Be very careful when following this article as this process has the potential to cause a lot of damage to your data. If you are working with virtual machines make sure you take a snapshot of your virtual machine beforehand, or otherwise have some other form of up to date backup before proceeding. Note that a snapshot must not be taken until after the virtual disk has been increased in the first step below, otherwise you will not be able to increase the disk until it has been removed. It could also be worth cloning the virtual machine first and testing out this method on the clone.
Prerequisites: You will need to download the GParted live CD ISO file so that you can use it later, you can get this here.
Throughout my examples I will be working with a VMware virtual machine running Debian 6, this was set up with a 20gb disk and we will be increasing it by 10gb for a total final size of 30gb.
Below is an image displaying disk information on the server before we begin.
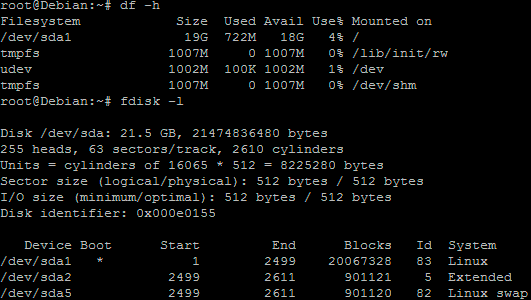
It is important to identify that you are actually using a Linux native partition – as this is what we are extending. As you can see in the above image /dev/sda1 is listed as “Linux” and it has the ID of 83. The 83 hex code shows that it is a Linux native partition, while 8e shows a Linux LVM. For information on increasing a LVM please see the linked posts above.
Note that /dev/sda1 is the partition we will be expanding.
Increasing the virtual hard disk
First off we increase the allocated disk space on the virtual machine itself. This is done by right clicking the virtual machine in vSphere, selecting edit settings, and then selecting the hard disk. In the below image I have changed the previously set hard disk of 20gb to 30gb while the virtual machine is up and running. Once complete click OK, this is all that needs to be done in VMware for this process.
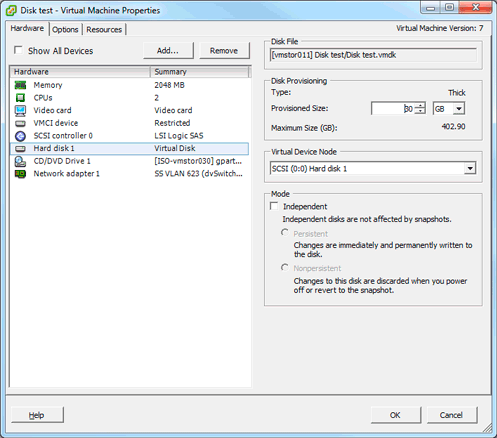
If you are not able to modify the size of the disk, the provisioned size setting is greyed out. This can happen if the virtual machine has a snapshot in place, these will need to be removed prior to making the changes to the disk. Alternatively you may need to shut down the virtual machine if it does not allow you to add or increase disks on the fly, if this is the case shut down and make the change, do not power the virtual machine back on at this stage as next we mount the GParted ISO.
Booting into the GParted Live CD
Now that we have increased the hard disk space of the virtual machines, we need to boot into the GParted live CD to continue, you can download this here.
Right click on the virtual machine in vSphere and select “Edit Settings” to bring up the properties.
Select the CD/DVD Drive and then select your GParted ISO, in this instance I have already uploaded this file to the datastore so I have just clicked the browse button to select it. Make sure that connect at power on is ticked.
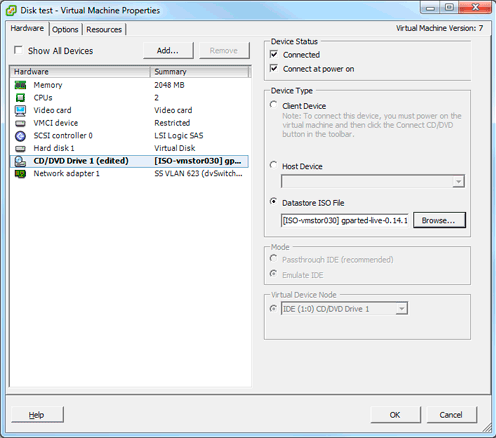
I have also selected for the boot options to be presented on the next boot so that I can select to boot into the ISO easier. You can also adjust the time to delay the boot so that you have appropriate time to select that you want to boot from CD, in the below image this is set to 5 seconds, and force to boot into bios is enabled so that I can select to boot from CD on next boot.

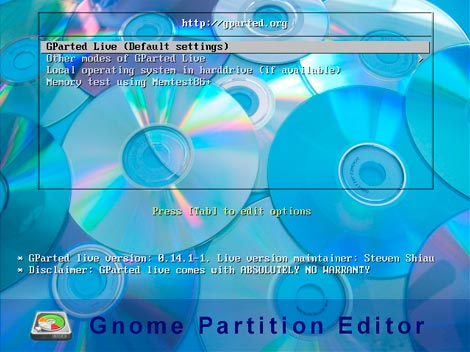
Now we are ready to power on the virtual machine (if your virtual machine was still on, shut down and power on), I have done this using some older versions of GParted in the past and it is worth noting that over time the GUI has changed so the following images may look a little different for you. I am using the current latest version of the live CD, version 0.14.1-1.
Once the virtual machine has powered on and you have booted to the CD, you will be presented with the following menu, just press enter to boot into GParted Live (Default Settings).
After some time you will then arrive at the following screen, for this I did not change anything and just accepted the defaults by pressing enter.
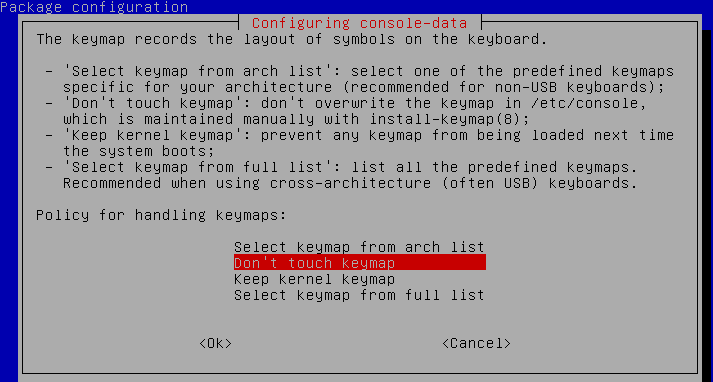
You will then be prompted to select a language, pressing enter defaults to English.
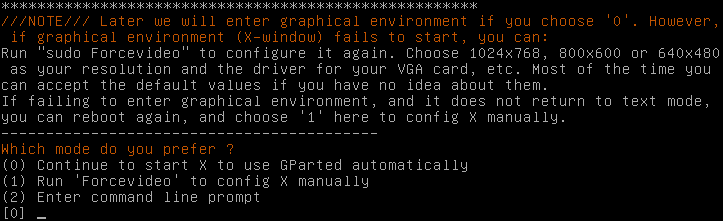
Next we select the default option 0 by pressing enter as we will be working with the GUI.
Once complete you will be presented with the GUI with GParted already open, if it is not already open you can select it from the Desktop icon.
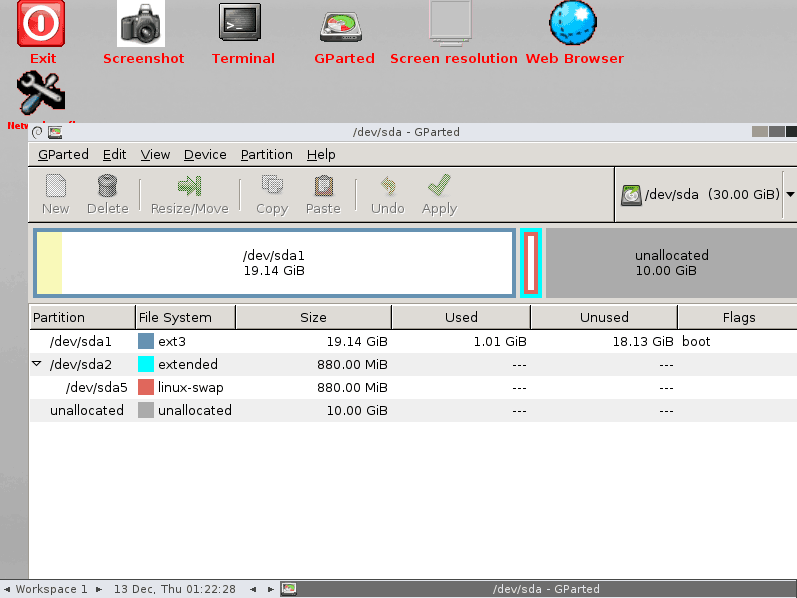
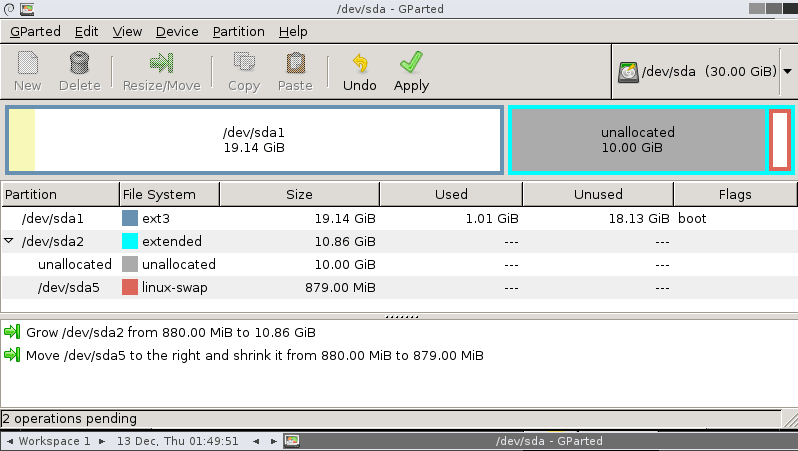
As you can see the original /dev/sda1 partition that is making use of the 20gb disk is there, as well as the new unallocated 10gb from when we increased the size of the virtual hard disk earlier. The space between the two is the swap space. The total /dev/sda disk size of 30gb is also shown.
What needs to be done now is get /dev/sda1 to take up that unallocated space, this is not currently possible because swap is in the way so we need to move things around. If you do not have swap in between the partition to be extended and the unallocated space then you will be able to skip down a few steps until you arrive at the image where /dev/sda1 and the unallocated space are next to each other.
First we select /dev/sda2 which is the extended partition containing the swap, we want to expand this to include the 10gb of unallocated space.
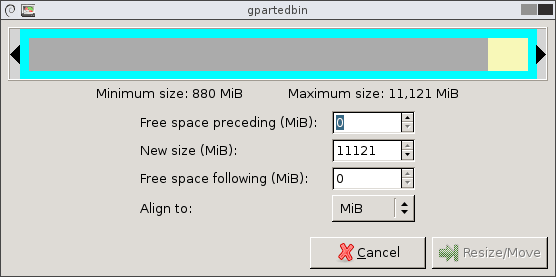
Select /dev/sda2 and click “Resize/Move” and you will be presented with the following.
Basically you just need to drag the black arrow of /dev/sda2 all the way to the end of the unallocated space and click the Resize/Move button.
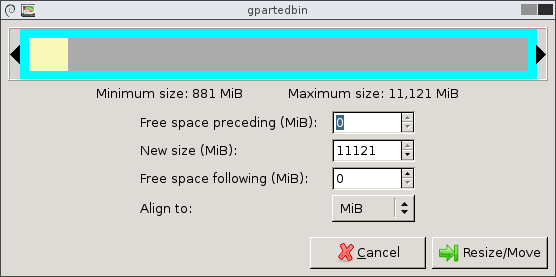
After doing this, you should see /dev/sda2 (represented by the blue box) spread out over the unallocated space.

This change and all further changes will not yet be applied, you can see the tasks down the bottom of the GParted interface and these will be applied only once you click the Apply button. Alternatively you can click the Undo button to remove a pending change.
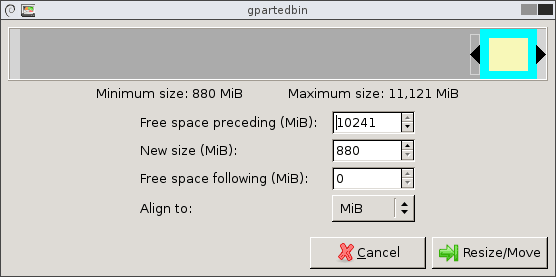
This time we want to select /dev/sda5 which is the swap partition and select Resize/Move, this will result in the following.
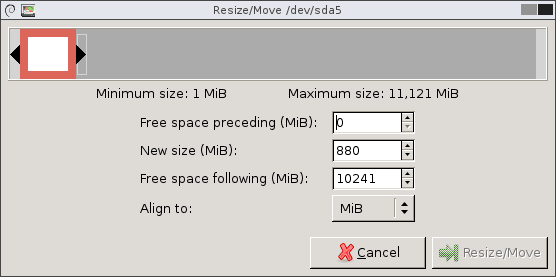
This time rather than expanding the partition, we want to just move swap all the way to the end of the /dev/sda2 space that it is in, this is done by just dragging the box to the end which will then look like this.
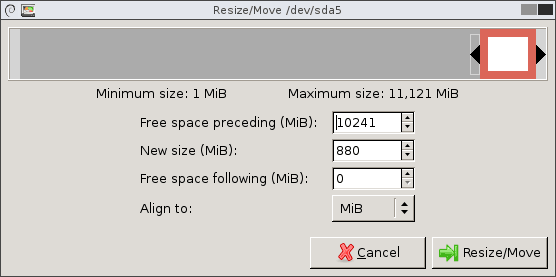
Click the Resize/Move button and then a warning may appear informing you that moving a partition might cause your operating system to fail to boot. It also warns that performing this move may take a long time to apply, read the warning then click OK to continue.
The GUI should now look something like the below image, where /dev/sda1 is located right next to /dev/sda2 which contains the unallocated space.
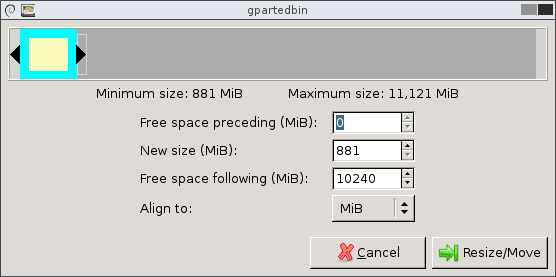
Select the /dev/sda2 extended partition and click Resize/Move.
Drag this to the right so that only the swap space is contained and the grey unallocated space is freed, click Resize/Move once complete.
Once this is complete the disk will look like this.

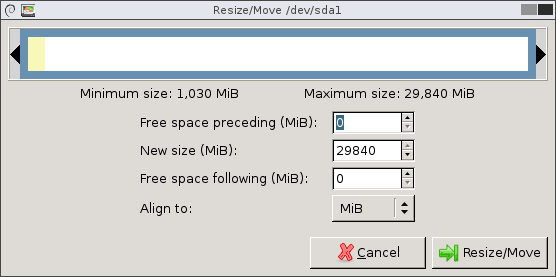
Now we have /dev/sda1 next to the unallocated space so we are finally ready to expand /dev/sda1. Select /dev/sda1 and click the Resize/Move button.
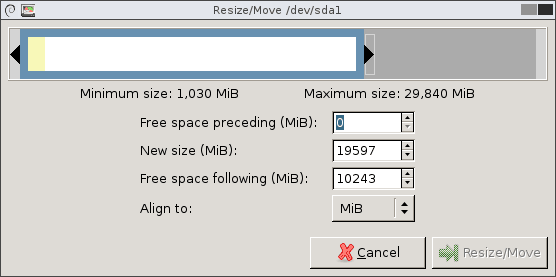
You will be able to perform this action straight away if you did not have swap in between /dev/sda1 and the unallocated space, the previous steps were to get swap out of the way in GParted.
Drag the arrow over so that the unallocated space is then consumed by /dev/sda1 as shown below, then click Resize/Move.
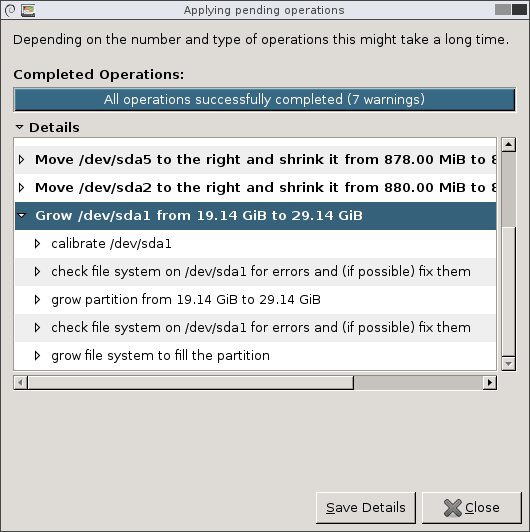
Once this is done the /dev/sda1 partition will now be using the unallocated space that was previously there. All that is left to do is click the apply button which will apply the changes – you will be prompted to confirm with a warning that data loss may occur.
Note that this may take a while depending on how much of the disk is currently in use and the amount of disk space you are increasing, because a file system check (fsck) is run before the expansion and after it to ensure that there are no issues. I have performed this method on a 400gb server in the past and to increase it 100gb took approximately 5 hours. In this example I am only increasing by 10gb and there is only about 1gb of data on the disk so this took approximately 2 minutes to finish applying.
Once complete you will see something similar to the below image, you will be able to click close once finished.
Everything is now finished, you just need to reboot the virtual machine and then boot from disk rather than CD, alternatively shut down the virtual machine and unmount the live CD and then power it back on.
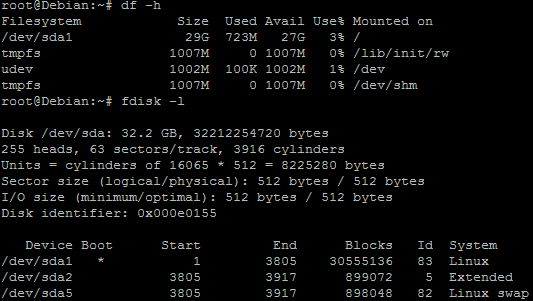
Once the operating system has booted you can confirm that the disk space has expanded correctly. Below you can see that /dev/sda1 is now 30gb in size.
Summary
With this method we have increased the virtual hard disk drive through VMware, booted into a GParted live CD ISO and expanded the primary Linux native partition over the unallocated space, resulting in overall disk space being increased successfully.
Thanks for the nice explanation.
The output of that last “fdisk -l” command show the number of blocks in “Linux swap” decreased slightly after making the changes. I saw the same thing in my own testing. Is this a problem?
Shouldn’t be unless you really need all the swap space you can get, sounds like you may have accidentally moved the slider over for swap a bit perhaps and lowered the space of it.
I was about to follow another guide involving turning off swap, deleting the swap partition and recreating it after repartitioning, but this was a more professional way to manage reallocation of space.
Very easy to follow and worked like a charm. Many thanks for a well written article!
Jack.
Very easy to follow and well written, thank you very much!
:smile: Great post, helped me a million! Very simply explained unlike a lot of other posts I’ve read…
Liam
Thank you very much!
Great tutorial, made increasing the partition size for a Ubuntu virtual machine running in VirtualBox a breeze!
I don’t know if this applies to sda, but for other drives (sdb, sdc…), after increasing the size of the disk in vSphere, I skip the gparted step, and just use e2fsck -f /dev/sdX1, then resize2fs /dev/sdX1. This seems much easier than booting off the gparted ISO, etc.
Before using e2fsck, you have to rescan the scsi block device to load the new disk size:
echo ‘1’ > /sys/block/sdX/device/rescan, then delete and add the primary partition:
cfdisk /dev/sdX
Is there any reason not to do it this way?
Excellent tutorial!
Just a quick message to say THANK YOU, this worked PERFECTLY – first time too.
From someone who is not very familiar with a Linux environment I was a bit unsure but this guide was flawless. I’m running VMware Workstation 9 with a Debian install running a Friendica server.
It was a single 30GB drive originally, I expanded it to 500GB without an issue. I tried other guides and they all went wrong and it failed to boot (thankfully I had decent backups!) but this one booted first time and sure enough, all 500GB is now available to me.
THANK YOU!!!! :cool:
Thanks for sharing. great post.
wow, thanks a lot. the article helps me a lot
Excellent tutorial. You saved me a lot of effort. I have been frustrated for over a week now :)
Thank you guy, this is the best guide I’ve found so far and, most of all, you have saved my life!!!!
Great post. worked perfectly. Thank you for great details.
Hey thanks!
I was looking for a way to increase my Ubuntu VM disk space and I could do with GParted without deleting the swap partition.
There is still some unallocated spaces around the swap partition but the VM is working perfectly.
Thanks!
Great article!! It was a piece of cake..
Thank you Jarrod!
This is great however what if the VM is remote and hosted at a data center by an outside provider. In this case it would require the provider’s intervention or is there any way to do this remotely apart from command line? Thanks.
Do you have console access to the VM or any other form of out of band management? If not you may need to get the help of your provider if that access is required.
Hi,
It is a very nice article.
Since I was using VMware player, I didn’t have the boot options. so installed GParted in Ubuntu Linux, run from the terminal, and increased the size. However, I cloned my virtual machine to protect data loss.
You are the man. remarkable explanation which has resolved a long term problem with my UBU14. Thanks much!!!!
Saved my life! Thank you.
Thanks! Needed exactly this :razz: :razz: :razz:
:grin: :grin: :grin:
Amazing explanation!
Thanks so much :razz:
Thanks alot, did this on Kali linux just recently and worked splendidly!
Just had to press F2 really fast when booting the VM since it didn’t want to boot into the live CD. And then just adjust so that the boot from the CD is before the hard drive.
When I followed these exact steps, I am left 3 unallocated partitions (1, 1.5, 2 MiB’s) for some reason. Annoying, but I left them. Thank you for the thorough guide.
Thank you very much. Succesfully enlarged my Ubuntu-server 14.04 VDI in Oracle VM VirtualBox with this easy to follow guide.
:razz:
Bert
this helped me alot! i wanted to donate some bitcoin but theres no option
Good to hear! :D and good point, I’ve added the Bitcoin address to the donations bar now. :)
Thank you very much for that good explanation. It worked fine for me :D
Hello,
I have this key behind sda1 wich makes it not possible for me to resize it. Do you maybe have a solution for that?
Thnx for this information btw helped a alot :grin:
Hi Rachid, what key is behind sda1? Could you please provide some more information about the problem you’re having? Is there another partition on the way? It should be possible to move them around with some work as covered above, perhaps a screenshot of the problem would help.
Hi,
Thnx for ur very quick reply http://oi60.tinypic.com/211owow.jpg here’s the screenshot,
Ah I think that means that the partition is currently in use, so you must have gparted open within your operating system instead of booting from a live CD?
If that’s the case, you will need to boot from a live CD and run gparted there, this way sda1 will not be mounted and in use so you will be able to modify it.
Alright thnx for the help mate!
Great tutorial, worked like a charm!
Thanks! :smile:
Thank you very much. I just upgraded the HDD in my laptop, went from 500GB to 1TB. Cloned the drive to an external HDD and then cloned that back to the new drive I put in the laptop. I must have missed a step in Clonezilla ’cause I had a 500GB partion what was unused. I followed your instructions, and in less than ten minutes had all the space I was hoping to gain.
Thanks Again.
Thank you very much.
Thank you,
These steps worked perfectly.
Thanks
Thanks a lot for this explanation.
NOTE:
The part “Click the Resize/Move button and then a warning may appear informing you that moving a partition might cause your operating system to fail to boot. It also warns that performing this move may take a long time to apply, read the warning then click OK to continue.”
It might be useful to align it to ‘none’ instead of ‘MiB’ (the last option will cause the unallocated partition to remain with just 1MB).
A very clear and understandable article, though. Thanks!
This is exactly what i was looking for.
Thanks very much!!! I’m sure I’ll be reading this one again.
-Gary
great tutorial, thanks!
Thanks so much for this, exactly what I needed.
Thank you so much!!! This was just what I needed. Very helpful! God bless!
Worked great, great image tutorial!
Great tutorial. The best I have found. Thanks
Great. Thanks, very usefull tutorial.
Amazing! Every few months I’ve tried to do this – and I finally found instructions that work. Perfectly. Kudos!
Nice, I generally use sysrescuecd for the same and do it on CLI. It gives me an added advantage of automating the procedure.
Thanks for the straightforward steps, this worked perfectly.
Hey Daniel, glad to here they worked well for you!
Thanks for the tutorial. It helped me to solve my problem.
Awesome tutorial! Worked like charm!
Thank you very much for the detailed instruction! I had exactly the same disk setup on my VM and wanted to add 20 GB of space, so I could follow your steps one by one. The pictures are really helpful. It worked flawlessly and applying the changes only took 11 seconds to complete. The only thing I needed to do differently, was changing the boot time because my VMWare Player is different somehow. I followed this advice: http://www.howtogeek.com/howto/16876/how-to-increase-the-vmware-boot-screen-delay/
That’s really great to hear, thanks for the VMware player tip! Hopefully it helps someone out. :)
Yes, this is helpful.
Even though I figured out boot options on my own, as we have always done with Windows OS in Dual Boot, but still, the link given by Ashlett is good.
Hi,
Firstly you have made a great article to help us expand the allocated space to the drive. It was a breeze till the step where I had to drag the sliders and adjust space to allocate to /dev/sda1.
It goes smoothly till here for me and till the stage after your last screenshot where your article has the paragraph saying…
“Once this is done the /dev/sda1 partition will now be using the unallocated space that was previously there. All that is left to do is click the apply button which will apply the changes – you will be prompted to confirm with a warning that data loss may occur.”
At this stage, when i press the “Apply” button to apply the changes, the process begins but stops when its trying to bring in the 1st change. On expanding to view the errors it indicates issues with ‘xfs_repair -v /dev/sda3’.
Please view the following screenshots
https://www.dropbox.com/s/23mexrnw1zxmm2r/Error%201%20of%202.png?dl=0
&
https://www.dropbox.com/s/i2w38vh8484u7ku/Error%202%20of%202.png?dl=0
I have also made sure that the VM is saving no “Snapshots” as you have indicated clearly in the beginning of your article.
I am using VMWare Version 11 & my CentOS is a 64 bit OS image.
You help is awaited. :)
Thanks.
Venky.
Hey Venky, I’ve not personally gone through this process with an XFS file system yet so the process may differ a little. Based on the message it sounds like there is content in the XFS file system log that needs to be replayed before proceeding.
GParted is trying to perform a check on the file system before performing any work, it does this both before and after expansion to find any possible errors.
Are you able to still normally boot the system and mount /dev/sda3? If so what happens if you unmount it while booted into your usual Linux based OS and then perform the xfs_repair manually on it? Do you get a similar error or does that work correctly?
If it’s still not working there may be an issue with the journal, in which case I’d recommend checking out this information on fixing this: http://initrd.org/wiki/XFS_Tips#Filesystem_Repairs
Please be careful and make sure you have a backup of all data before proceeding!
hi,
yeah i can still boot into the system.
When i try to mount /dev/sda3, it says its already mounted on / or busy.
So yes it can be mounted too.
If i try to umount it says…
# sudo umount /dev/sda3
umount: /: target is busy.
(In some cases useful info about processes that use
the device is found by lsof(8) or fuser(1))
Which is kind of obvious because the system is using the root drive!
Next, since I really dont care about the data on this VM of CentOS, i went ahead with the commands on the XFS Tips! link you gave. Another blockage as follows:
sudo xfs_repair -L /dev/sda3
xfs_repair: /dev/sda3 contains a mounted filesystem
xfs_repair: /dev/sda3 contains a mounted and writable filesystem
fatal error — couldn’t initialize XFS library
Stuck in a loop here. Help mate… any suggestions are welcome :)
I can go ahead and re-install centos, but that is more like working with Windows, just restart the OS OR re-install the OS and it all works!!!
I am trying to avoid that kind of an approach here :P
I even tried this:
sudo xfs_growfs /dev/sda1
[sudo] password for venky:
meta-data=/dev/sda1 isize=256 agcount=4, agsize=19200 blks
= sectsz=512 attr=2, projid32bit=1
= crc=0 finobt=0
data = bsize=4096 blocks=76800, imaxpct=25
= sunit=0 swidth=0 blks
naming =version 2 bsize=4096 ascii-ci=0 ftype=0
log =internal bsize=4096 blocks=853, version=2
= sectsz=512 sunit=0 blks, lazy-count=1
realtime =none extsz=4096 blocks=0, rtextents=0
Couldn’t understand what its saying or if its possible to expand drive size of sda1 directly using xfs commands(which wanna do anyways).
If /dev/sda3 is the root file system you can’t unmount it with it running, you could try and boot into a live CD and then perform the required commands, however this would be equivalent to GParted trying to run them as that’s a live CD where /dev/sda3 is not mounted. Next I’d probably try the repair command when booted into a live CD.
This is the best tutorial so far…
It was clear and easy to follow…
Thanks a lot friend… it helped a lot.. very clearly explained article.. Worked perfectly on the first time as well. I did this with version gparted-live-0.24.0-2-i586.iso.
One small thing to note, when trying to go the boot options you may be try different keys (Esc/Del/Fx etc) but if not able to go to it, means after the restart, the keyboard focus has moved away from the VM inside. Just reboot/start VM, and immediately click on the VMware icon while its loading and click the Esc key. It appears for very short time.
Well done. Thx!
Thanks! You’re a life saver.
It’s a great help!
I faced this issue today…all these instructions were too terse to follow under a tight deadline. What helped me is the following steps:
1) increase size of disc from VMware.
2) boot into ubuntu vm
3) sudo apt-get install gparted
4) start gparted with sudo
5) In GUI: delete swap and intermediate drives
6) apply changes
7) then extend the primary drive…and apply changes..
saved me so much time!
Thank you very much, this worked great. Very well explained.
In this particular scenario, the gparted bit is overkill. What I would do:
1. Unmount and delete the SWAP partition
2. Delete the extended partition
3. Extend the vmkd on a vCentre
4. echo 1 > /sys/block/sda/device/rescan
5. Run fdisk to extend the sda1 partition
6. Run partprobe
7. Create a new swap partition
No downtime.
Tomas, Your resolution though having “No Downtime”, works only with people haivng vCenter’s and vSpheres and ergo no good for people without the aforementioned applications. So don’t undermine anything as an “overkill”. I don’t have / need a vShpere / vCenter and this tutorial helped me out of the situation.
Awesome exactly, what I was looking for
my problem is, that the partition i want to increase is on the right side of my unallocated space.
so i cant extend my partition
you guys know how to fix that?
thanks for this article anyway :)
Are you able to move them around at all? Can you provide an image?
thankyou thankyou, worked fine for a vagrant box, you saved my life today ;-)
Haha great to hear!
thank you so much!! since last 2days, i’m suffer from this root partition resize …thank you so much indeed…
Hi Jarrod! Being a Noob I was struck here for the last coupls of hours. With all the website (askubuntu, vmware, stackexchange Et al) and million other hits on Google, turning out to be useless, yours this post was the life saver. Thank you so much for posting this beautiful tutorial which literally spoon feeds any noob hurdles out of the way. Kudos!!!
Thanks a ton. God bless!
Thanks! Glad to hear it helped you out!
Double Kudos for this post!!!!!
Excellent
Great tutorial. Thank you!
Thank you so much for this well-explain and simple tutorial. This is the most straightforward tutorial I have come across regarding this. Legend
I am expanding my dev/sda1 from 15 GB to 20 GB (adding 5 GB). GParted has been running for 7 hours and is not completed yet. Is this normal?
For just 5gb of space, I would not think that that is normal. However with that said I have had to run gparted for multiple hours in the past, though that was for hundreds of gb at a time on a slow disk.
It is still running. What is the consequences if I just cancel it and reboot?
I’ve not personally done that so can’t say for sure, I’d be careful though as if it’s in the middle of an operation you could end up with a corrupted disk. If you have backups or it’s not an important disk then after this amount of time it’s probably worth cancelling to see what happens. Are there any errors logged in /var/log about it?
Although I increased my hard disk in vm ware,unallocated space can not be swapped to sda 1.
I did as your advice,but R-click on sda 2 ,all are disable to click “Resize/move”.
Could you perhaps upload and link to a screen shot of what you’re seeing?
put 2 cores on your Vm to increse gparted speed i geuss or more ram
Thank you so much!
Thanks. I worked with ubuntu 12.04 on hyper v and windows server 2008 r2.
Hi Jarod,
first of all, I would like to say THANK You, for taking the time to make such a comprehensible manual, guided by images. Excellent :)
I cannot seem to be able to upload an image, so here is a Google Drive shared file link :
https://drive.google.com/file/d/0B4EJhzFZiJAAX3RRSHd2aFhianc/view?usp=sharing
Have no issues getting to the point where I want to resize the sda5 to include the 28 GB empty space, but then .. failure :(
Are such resize operations somehow limited for filesystem ? Can I not extend the lvm2 pv to include the remaining Gb ?
Cheers for any hinting in the right direction :)
Hey, I think to increase lvm2 pv you would first need to expand the volume group with vgextend, I’m not sure if logical volumes will expand in this way with GParted. Check out this post which covers expanding LVM: https://www.rootusers.com/how-to-increase-the-size-of-a-linux-lvm-by-expanding-the-virtual-machine-disk/
Perfect tutorial..!!! You save me after many days of searching for this perfect one.God Bless you forever and ever…!!! and thanks a lot and a lot…!!!
Amazing! this hero deserves a medal!
Brill! Just what I needed!
Brilliant, amazingly simple and perfect :)
Wish Microsoft was this clear on instructions.
God bless you !
Thanks!!!! Really thanks!!!! Absolutely useful
worked great!
I did not use the gparted iso, but installed gparted locally.
There is no big risk losing your data — hey, its a virtual maschine!
HI,
After increasing the size using the gparted iso , am not able to boot, it says meta data corrupted.
Thanks!!!! Really thanks!!!! Absolutely useful
Absolutely useful and very well described!! AWSOME !
AWESOME! Thank you! Worked perfectly for me!
Easy to follow, worked like a charm. Thanks !
This is exactly what I wanted to do, and even though I knew what needed to be done with GParted, having these step by step instructions was just PERFECT to keep the anxiety down while expanding my partition! Thanks so much!
This is great! Darn near perfect! But a bug in gparted raised its ugly head while attempting this process.
The Fix: During the Step: “Drag this to the right so that only the swap space is contained and the grey unallocated space is freed, click Resize/Move once complete.”
Change from MiB to Cylinder and it becomes flawless.
Thank you the great guide
Excellent instructions, clear and easy to follow. I was working from Hyper-V but the steps were similar to the VMware instructions.
I had the same issue with it requiring Cylinder vs MiB that Victor mentioned.
Thanks!
Good to hear!
GREAT INSTRUCTIONS!!!
THANKS!!!
Hi Jarrod, Thank you much for this article. Just tested on a RHEL 6.6 machine and worked perfectly.
thanks for sharing. anyone know how to increase root partition for eve-ng after a baremetal installation? no VMware. Im puzzeled of why eve-ng installation doesn’t have the intelligence to pick right size of space for root!? Thank you.
Thank you, I wish I had found this hours earlier!!!