Today it has been announced that if you are using the Wheezy image of Raspbian you can update to allow dynamic overclocking without voiding warranty. I’ve been using my Raspberry Pi for a little while now and have begun to notice the CPU limitations when compiling code and performing other tasks so I jumped at the opportunity to give this a go. I’ll briefly go through the steps I went through in order to update the OS, as well as provide a basic benchmark that will display the changes.
Upgrading
You can either upgrade your current software versions, or alternatively you download the latest version of the Raspbian image which is up to date with everything already.
So running the following as root:
apt-get update
apt-get upgrade
I had not upgraded my Raspberry Pi since my original installation so this process took me quite a while.
As I’ve never done any form of updating I needed rpi-update so I could update firmware.
wget http://goo.gl/1BOfJ -O /usr/bin/rpi-update && chmod +x /usr/bin/rpi-update
After this I tried to run rpi-update, but found that I needed to first have GIT installed.
root@raspberrypi:~# rpi-update
Raspberry Pi firmware updater by Hexxeh, enhanced by AndrewS
Performing self-update
This tool requires you have Git installed, please install it first
In Debian, try: sudo apt-get install git-core
In Arch, try: pacman -S git
No problem, I installed GIT and then proceeded with running rpi-update once.
install git-core
rpi-update
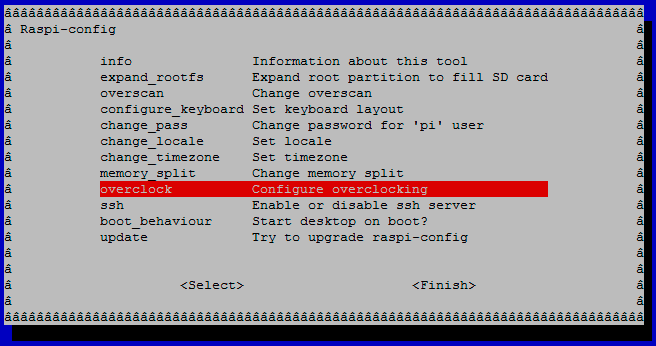
rpi-update took a little while to complete, but finished successfully. After this I was able to run raspi-config
raspi-config
Once running this you will get the below menu, navigate to overclock with the arrow keys and press enter.
Next you will be given a warning about overclocking, after that you will be presented with the 5 levels that you can overclock to.
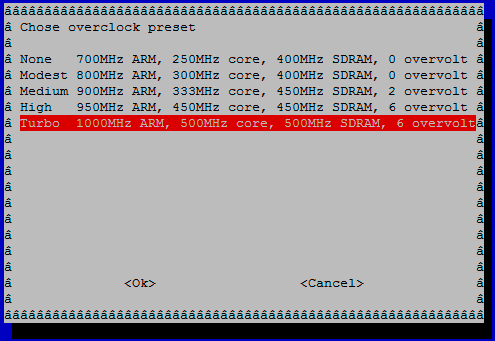
Note that every time you change the overclock preset you will need to reboot for it to take effect.
Benchmarks
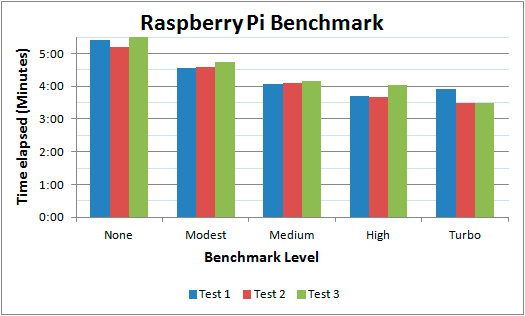
The current benchmarks I have performed were done using this Python script which calculates all the prime numbers up to 1,000,000 – a task that works the CPU quite well.
I’ve run the test 3 times at each overclocking preset level so that you can get an idea of the difference in performance between the 5 levels.
None   700MHz ARM, 250MHz core, 400MHz SDRAM, 0 overvolt
Found 78497 primes in 0:05:24.025816
Found 78497 primes in 0:05:12.471679
Found 78497 primes in 0:05:45.434684

Modest 800MHz ARM, 300MHz core, 400MHz SDRAM, 0 overvolt
Found 78497 primes in 0:04:34.712732
Found 78497 primes in 0:04:36.838428
Found 78497 primes in 0:04:44.019617

Medium 900MHz ARM, 333MHz core, 450MHz SDRAM, 2 overvolt
Found 78497 primes in 0:04:04.950124
Found 78497 primes in 0:04:05.154845
Found 78497 primes in 0:04:10.899346

High   950MHz ARM, 450MHz core, 450MHz SDRAM, 6 overvolt
Found 78497 primes in 0:03:42.140013
Found 78497 primes in 0:03:41.933866
Found 78497 primes in 0:04:03.094127

Turbo  1000MHz ARM, 500MHz core, 500MHz SDRAM, 6 overvolt
Found 78497 primes in 0:03:54.706406
Found 78497 primes in 0:03:29.330381
Found 78497 primes in 0:03:29.302173
Here is the above data in a graph.
Summary
As you can see the overclock is performing much better at the simple test I have performed, I have also noticed when using my Raspberry Pi normally that everything feels much smoother which is great. If you’re interested in the Raspberry Pi you can pick up a kit from Amazon fairly cheap and get started!
Disclaimer:
We are a participant in the Amazon Services LLC Associates Program, an affiliate advertising program designed to provide a means for us to earn fees by linking to Amazon.com and affiliated sites.
I see that some of your tests seem to increase in execution time with the 2nd and 3rd iteration. Do you believe this to be due to heat increase and the dynamic over clock adjusting itself?
It very well may be, at the time I didn’t monitor the temperature. I did however reboot after each set of 3 tests in order to apply the overclock preset which could have allowed time for it to cool down.
I was thinking along the lines of performing more than one test just so that I could get a more average set of results.
I’ll try the tests again when I get some time and monitor the temperature to see if this factor is skewing the results.
Alright so I ran the test again at 1GHz in the exact same way I did the first set and the temperature never passed 45c.
During this time there was no idle CPU.