Recently while rebooting the web server that hosts this website in order to perform a kernel update I ran into a kernel panic on boot.
Amazon Web Services (AWS) do not seem to provide an interactive console for Elastic Compute Cloud (EC2) instances, so I had to work out another way to fix the problem which I have documented here.
Determining The Problem
First we need to identify what the problem actually is, I did this in two different ways. We can take a screenshot of the console, or view the log.
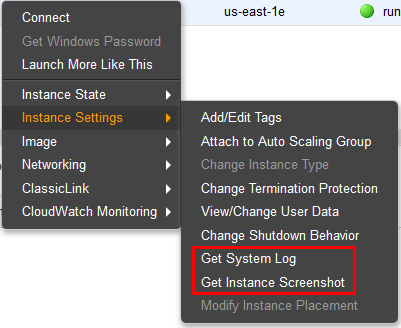
Right click the EC2 instance that is not booting properly, select Instance Settings, followed by either Get System Log or Get Instance Screenshot.
In my case both of these steps indicated that my system was failing to boot due to a kernel panic.
Fixing The Problem
Now that we have identified the issue, let’s work towards fixing it.
-
1. Shutdown EC2 Instance
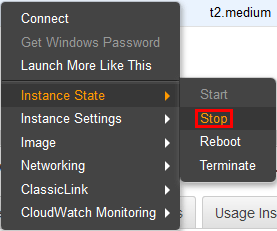
As we need to detach the original volume attached to the EC2 instance that has the problem, we will first begin by shutting it down. This can be done through the AWS console by right clicking the instance and selecting Instance State, followed by Stop. -
2. Snapshot Volume
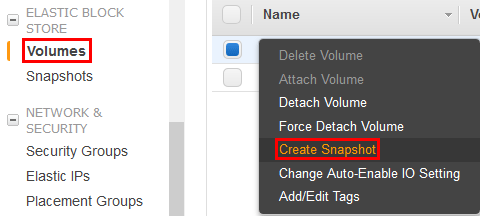
In the AWS console select Volumes. Find the volume that is attached to the EC2 instance that you need to repair and just shutdown, right click it and select Create Snapshot.Tip: To avoid confusion later, you may also wish to give the volume a name that makes sense to you by editing the tags.
You can go into the Snapshots area to view the progress of this, it must complete before you can move on to the next step.
-
3. Create New Volume From Snapshot
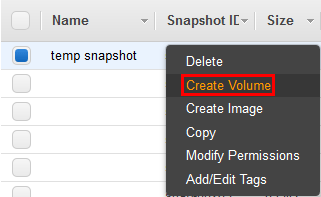
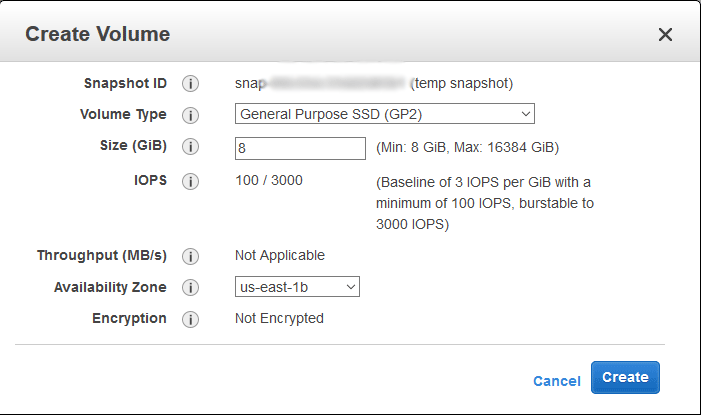
Once the snapshot process has completed, create a new volume from the snapshot. Be sure to create the volume in the same availability zone as your existing EC2 instance so that you can easily attach it later, otherwise you’ll have to move volumes around which takes more time. It will still work fine, just take longer than required.This is done by right clicking the snapshot that was just created, and then selecting Create Volume, as shown below.
This may take some time to complete, the volume must finish creating before we can attach it to anything. We have now created a new volume containing the same data as the original volume that we took the snapshot of.
Tip: Again, you may wish to optionally give the new volume a name that makes sense to you so that you don’t confuse it with any other volumes later.
-
4. Create New Temporary EC2 Instance
We will temporarily need a running EC2 instance in order to repair our new volume. I just create the smallest possible tier of CentOS 7 as this will work fine to get the job done and costs the least amount of money. From the Instances menu, simply click the Launch Instance button to begin the process.Once the new temporary EC2 instance has finished deploying, shut it down. The instance needs to be in the stopped state in order for us to attach our volume. Simply right click the instance, and select Instance State > Stop. Once the instance state has changed to Stopped, you can continue.
-
5. Attach New Volume To New EC2 Instance
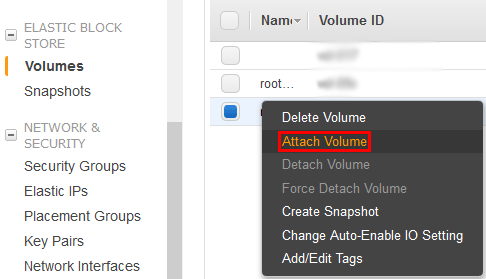
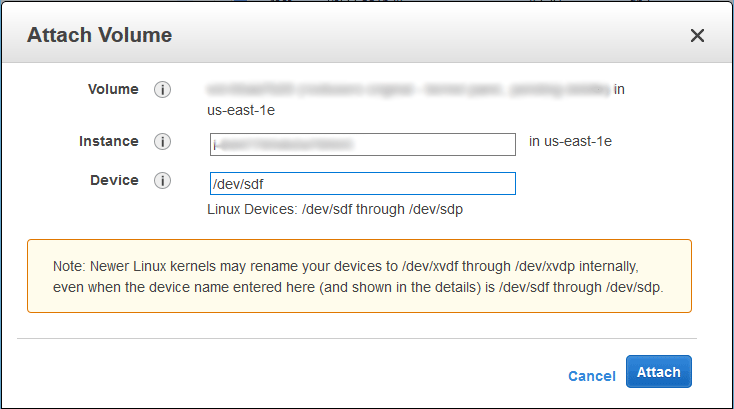
In the AWS console, from the Volumes menu right click the newly created volume and select Attach Volume.In the window that appears, ensure that your new temporary instance is selected rather than the existing instance that we are fixing. In this instance, the disk will be added as device /dev/sdf, however as noted this will appear as /dev/xvdf in the operating system, as we will see next.
Once complete, start the instance back up.
-
6. Mount New Volume Within Operating System
SSH into the temporary EC2 instance and run ‘fdisk -l’ as shown below, we should see our secondary disk listed which in this case is /dev/xvdf as mentioned above.[root@temporary ~]# fdisk -l Disk /dev/xvda: 8589 MB, 8589934592 bytes, 16777216 sectors ...snip... Disk /dev/xvdf: 8589 MB, 8589934592 bytes, 16777216 sectors Units = sectors of 1 * 512 = 512 bytes Sector size (logical/physical): 512 bytes / 512 bytes I/O size (minimum/optimal): 512 bytes / 512 bytes Disk label type: dos Disk identifier: 0x000aec37 Device Boot Start End Blocks Id System /dev/xvdf1 * 2048 16777215 8387584 83 LinuxWe now want to mount this to some directory within the file system, in this case we will create the /mount directory and mount the disk there.
[root@temporary ~]# mkdir /mount
[root@temporary ~]# mount /dev/xvdf1 /mount
We can now confirm that our new volume has successfully been mounted.
[root@temporary ~]# df -h
Filesystem      Size  Used Avail Use% Mounted on
/dev/xvda1      8.0G  876M  7.2G  11% /
/dev/xvdf1      8.0G  4.9G  3.2G  61% /mount
At this point you can access all of the data from the original server through the /mount directory.
-
7. Chroot Into New Volume
Once the disk has been mounted there a few more things to mount before we perform the chroot. We will mount /dev, /dev/shm, /proc, and /sys of our temporary EC2 instance to the same paths on our newly mounted volume.[root@temporary ~]# mount -o bind /dev /mount/dev [root@temporary ~]# mount -o bind /dev/shm /mount/dev/shm [root@temporary ~]# mount -o bind /proc /mount/proc [root@temporary ~]# mount -o bind /sys /mount/sys
With this complete we can now perform the chroot in a way that will put our session into the context of the machine that we are trying to repair.
[root@temporary ~]# chroot /mount
-
8. Fix The Problem
Now that we are working within the context of the original EC2 instance with the kernel panic problem we can work on fixing it. In my instance I suspected that the problem was due to the kernel update failing somehow, so I simply removed the most recently installed kernel so that an older version would be used instead. Of course this may not be the issue that you were having, so you will want to perform the task in here that best addresses the issue in your kernel panic error.At this point any commands we run will be in the context of the attached mounted volume, so for example if I perform a ‘yum list installed | grep kernel’ I will see versions of the Linux kernel installed on my broken machine and not the ones installed on the temporary EC2 instance.
[root@temporary /]# yum list installed | grep kernel
kernel.x86_64                              3.10.0-327.28.3.el7         @updates
kernel.x86_64                              3.10.0-327.36.1.el7         @updates
kernel.x86_64                              3.10.0-327.36.2.el7         @updates
kernel.x86_64                              3.10.0-327.36.3.el7         @updates
So I can simply remove the latest version of the kernel which I suspect as being the problem and it will remove within the context of the chrooted environment rather than removing an installed kernel on the temporary EC2 instance.
[root@temporary /]# yum remove kernel-3.10.0-514.2.2.el7.x86_64 -y
If you need to exit the chrooted environment, simply run ‘exit’.
-
9. Shutdown The New EC2 Instance
Once you’ve fixed the issue within the chroot, we need to shutdown the EC2 instance in order to detach our repaired volume. Through SSH you can either type ‘exit’ to leave the chroot followed by the shutdown command as shown below, or right click the instance in the AWS console and stop it as we did earlier.[root@temporary /]# exit exit [root@temporary ~]# shutdown -h now
The instance needs to have completely stopped in order to proceed.
-
10. Detaching Volumes
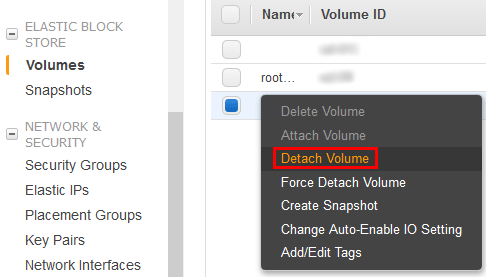
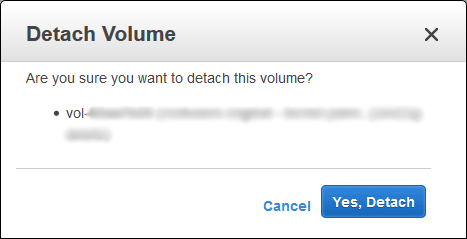
Once the temporary EC2 instance has entered the stopped state, go to the Volumes section and right click the newly created volume that we just repaired and select Detach Volume.A confirmation window will appear next, select “Yes, Detach” to confirm the operation.
At this stage we also want to detach the original volume that is still attached to the original EC2 instance, don’t forget to give it a name in the AWS console so you don’t confuse it with the newer repaired volume. If in doubt you can check the creation time on the volume which should help you make sense of which is which.
-
11. Attach Repaired Volume To Original EC2 Instance
Attach the newly repaired volume to the original EC2 instance. Note that this must take place after detaching the original broken volume which was done in the previous step.This is done by right clicking the newly repaired volume and selecting Attach Volume.
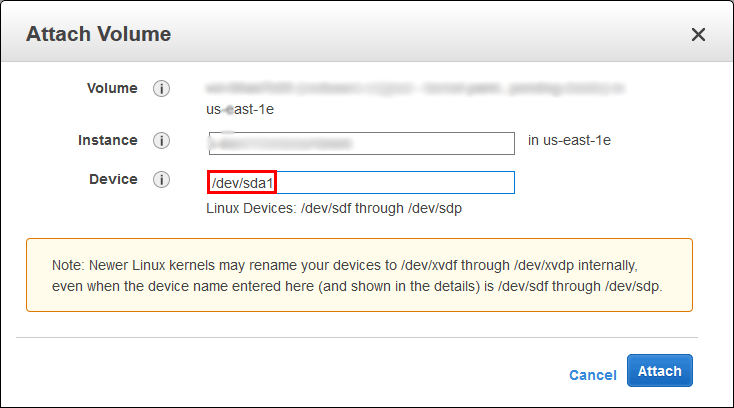
In the window that opens up, as this is the primary disk for the EC2 instance I specified /dev/sda1 for my device as shown below. If this does not work you may want to try /dev/sda, or perhaps /dev/xvda or /dev/xvda1.
-
12. Power On Original EC2 Instance
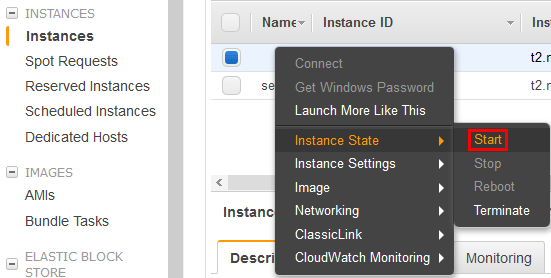
Now that the new repaired volume is attached to the original EC2 instance, you can power it on through the AWS console. Note that at this point, only the newly created repaired volume should be attached, the original volume should not be attached any longer. The old volume has now been replaced by our newly repaired copy.In the Instances menu, simply right click the original EC2 instance, select Instance State, followed by Start.
Keep an eye on the console logs or take screenshots during the boot process to ensure things are working as expected, or otherwise record any logs regarding any remaining problems. If the guest operating system fails to properly boot you may need to go through the whole process again, attempting a different fix.
-
13. Cleanup
Don’t forget to terminate the powered off temporary EC2 instance that we created in step 4. Also delete any unused snapshots or volumes when you’re done, as you will be paying for these the longer you keep them around. In my instance I kept the original snapshot and original volume for a couple of weeks just in case there were any further unexpected problems.
If you like living on the edge you could also simply detach the original volume with the problem and attach this directly to the new temporary EC2 instance and fix it. I instead took the safer route of creating a copy to work on first, this way if you break anything you still have your original data.
Summary
Without the ability to interact directly with the virtual machine console of an AWS EC2 instance we instead have to go through this slightly more painful process to fix various problems. Basically we created a copy of the volume that has the problem, attached it to a temporary EC2 instance and repaired it. Once fixed we attached the repaired copy back to the original EC2 instance and booted it up successfully.
I’d really like to see an interactive console available for EC2 instances in the future from AWS, as this could have been used to fix the problem much faster.


You rock, Jarod.
Thanks,
Mitch
Cheers :)
Thank you, this saved me when I ran into the initramfs bug with updating kernel: https://bugzilla.redhat.com/show_bug.cgi?id=1484430
Hi Jarrod,
Thank you very much for this detailed post. It was a life saver after we had a similar outage yesterday. Keep up the good work..
Regards
Moses
No problem, happy to help!
Hi Jarrod
I didn’t have to uninstall anything but just following the instructions got the instance going again. Thanks very much for the info.
Saved my life. Thank You, best tutorial.
when i attached the repaired volume to the old instance how will i make it the root volume since there would be already a root volume attcahed
Thank you very much.
You saved my life !!!!
As a long-time developer who inadvertently hosed my company’s gitlab instance during a botched kernel upgrade… THANK YOU! Well explained, easily followed and — better yet — it worked! You’ve truly saved my holiday season!
Hi Jarrod !!!
Nice post, this article helped on my job. thank u very much for this post.
Excellent article, but the first few steps are outdated.
– Get system log and get system screenshot instructions have changed, see https://docs.aws.amazon.com/AWSEC2/latest/WindowsGuide/screenshot-service.html#how-to-ics
– no longer necessary to shut down an instance before taking a snapshot
That said, this is truly an excellent article. Many thanks!
Cool thanks for the update!
I just wrote a similar article, giving credit to this article. It is more specifically targeted for Ubuntu, and shows a few techniques for working with AWS CLI.
https://mslinn.com/blog/2020/10/25/rescuing-catastrophic-upgrades-to-ubuntu-20_10.html
This is one of the most useful articles I have encountered in a while. Thank you!