TP-Link offer reasonably priced 10G switches, but the fans in the actively cooled models leave a lot to be desired. I guess it’s like they always say, more ports, more problems.
I was inspired to purchase a couple of TP-Link TL-SX1008 switches to upgrade my entire home network to 10 gigabit after watching this video by Gear Seekers covering the smaller 5 port version – the TL-SX105.
In the comments of that video, Nick warned me that the 8 port TL-SX1008 was actively cooled. “No problem!”, I thought, I’ve got enough fans going I’m sure this won’t be much extra.
I was incorrect.
Loud fan noise
Upon first powering on the TL-SX1008 I was greeted to fan noise of ~67dB(A), however before long it settled in at ~47dB(A) while running completely idle – absolutely audible over my other equipment.
I found the fan would ramp up and down a little inconsistently even with minimal network usage, and considering we’re only just exiting winter here in Australia I’d expect the fan to ramp harder in the coming warmer months.
There’s no sort of management interface or otherwise any other way to control the fan speed, at least nothing that stuck out in documentation online.
Stock fan details
Opening the TL-SX1008 is simple, unscrew 6 Phillips head screws and pull off the metal cover, here’s the fan it ships with.
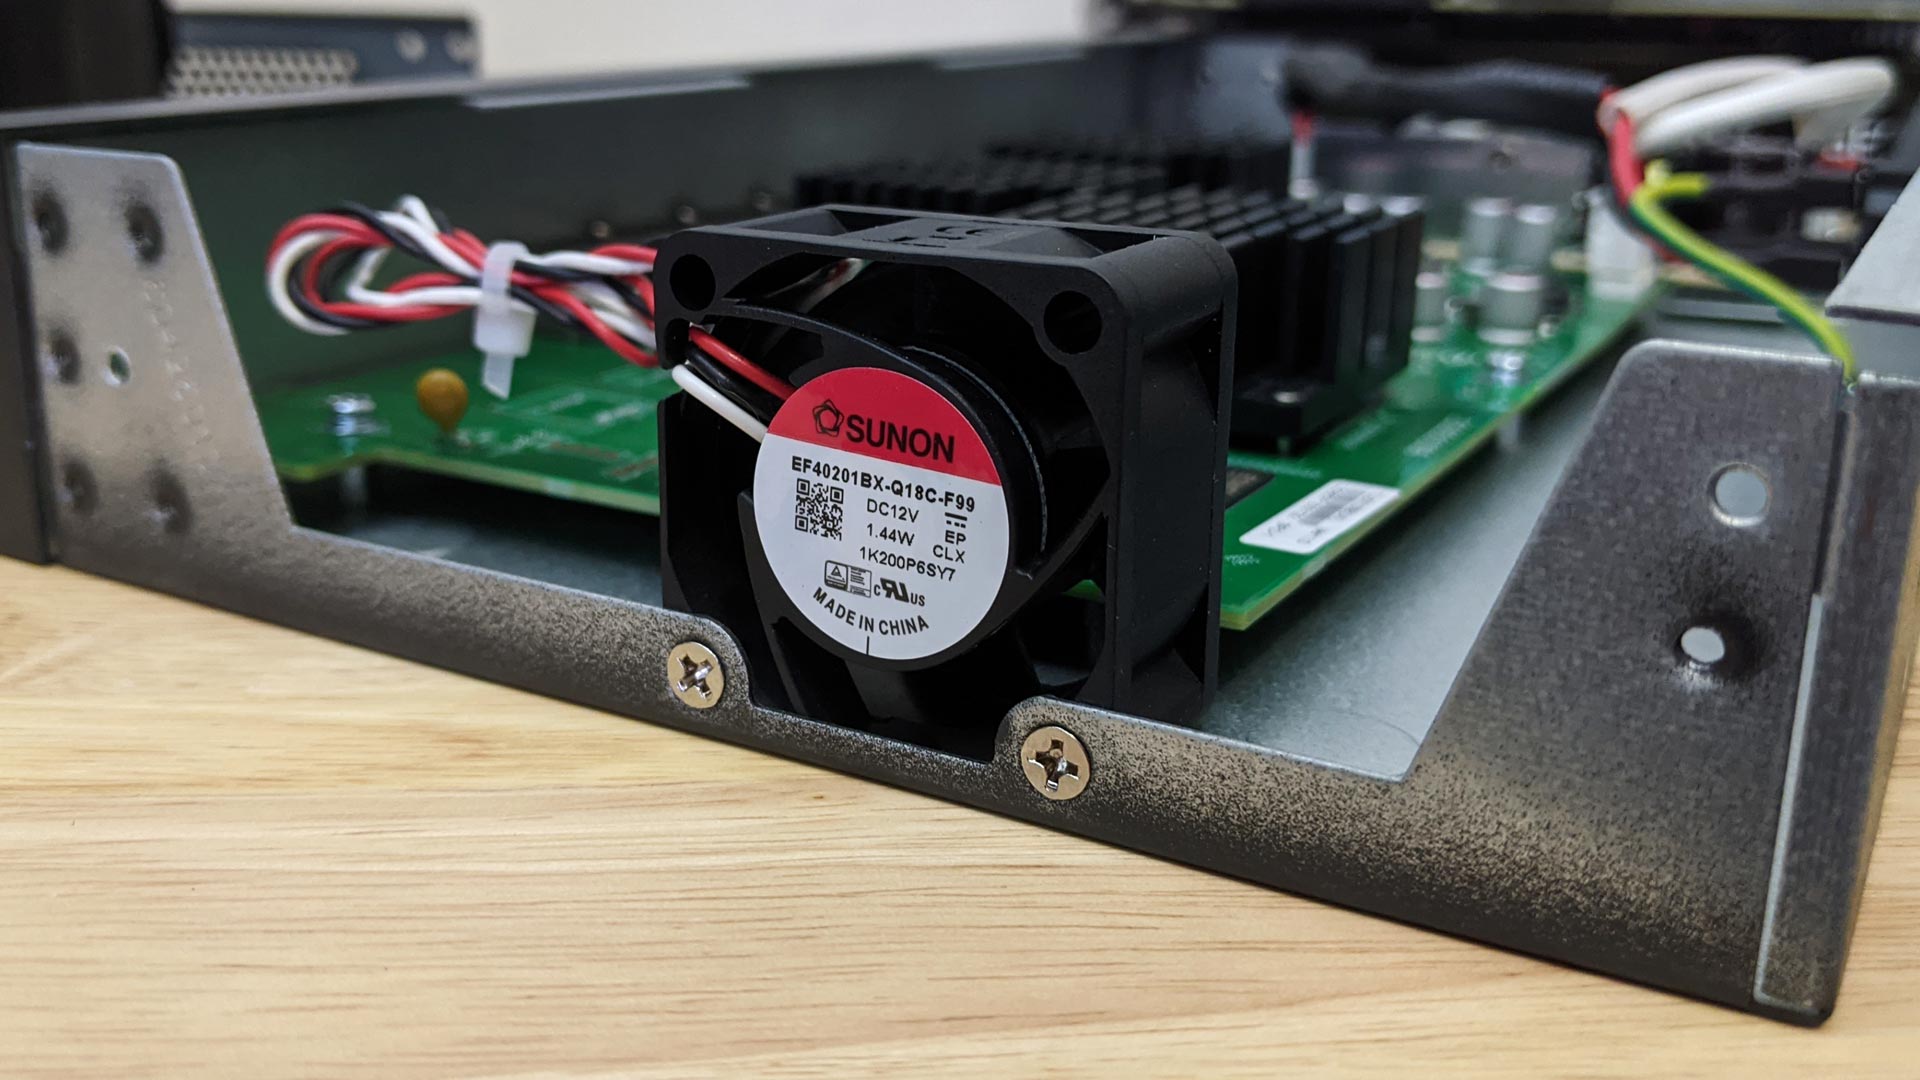
TP-Link TL-SX1008 Fan
The fan model is EF40201BX-Q18C-F99, after searching for it I was able to find the following spec sheet.
The following helpfully breaks down what the model number means:
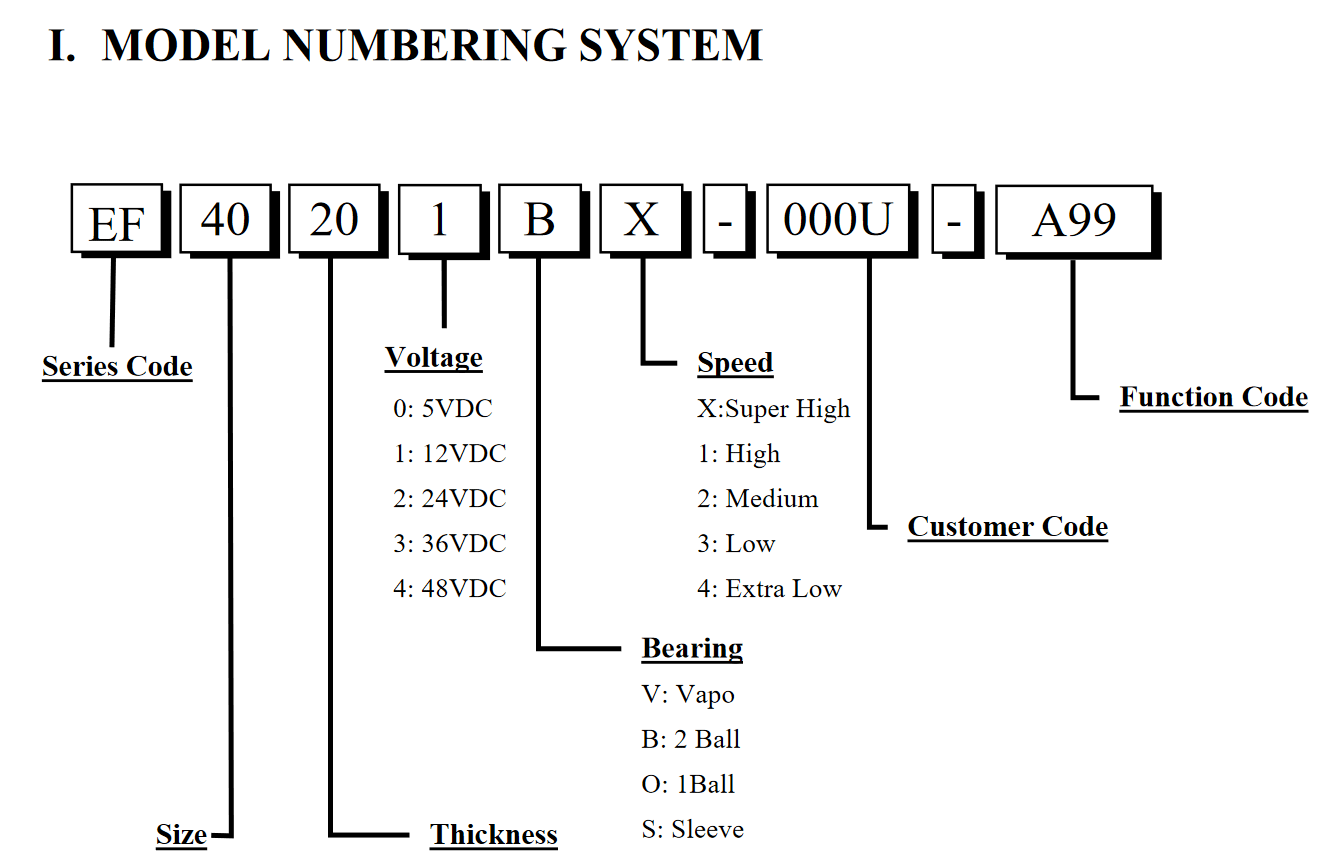
Along with the dimensions (40x40x20) which are apparent from just measuring the fan, this tells us it’s 12V, which was on the sticker anyway, but what I found interesting was that the “X” denotes “Super High” fan speed – lucky us. Otherwise it’s noted that it’s a 6,800 RPM fan with an air flow of 10.8 CFM at 28.5dB(A).
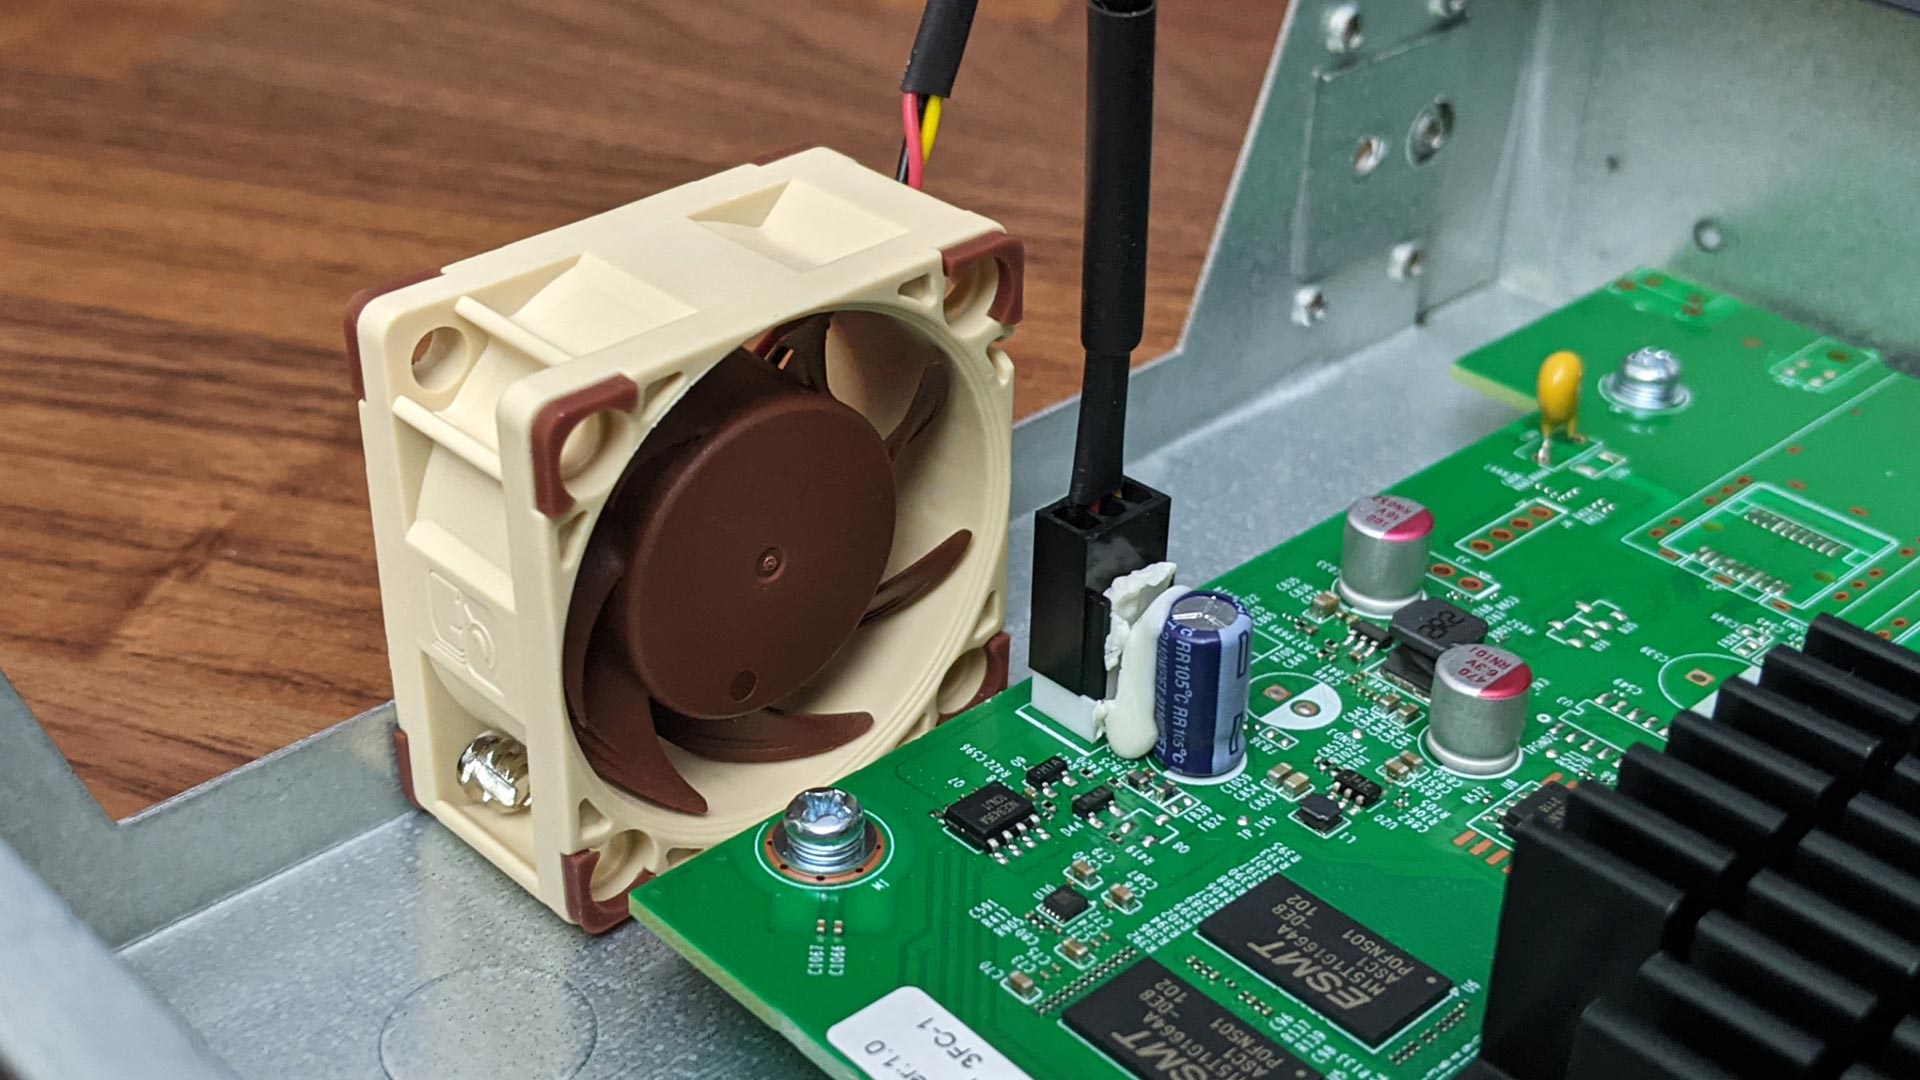
The fan appears to use a regular 3-Pin connector, but someone thought it was a good idea to glue it to a nearby capacitor.

I carefully removed the glue from the cable with a knife. Consider holding down the capacitor with your finger while pulling the fan cable out if there’s still some glue sticking it.
The fan is held in with two long Phillips head screws, you can see the nuts holding them in place in the image above.
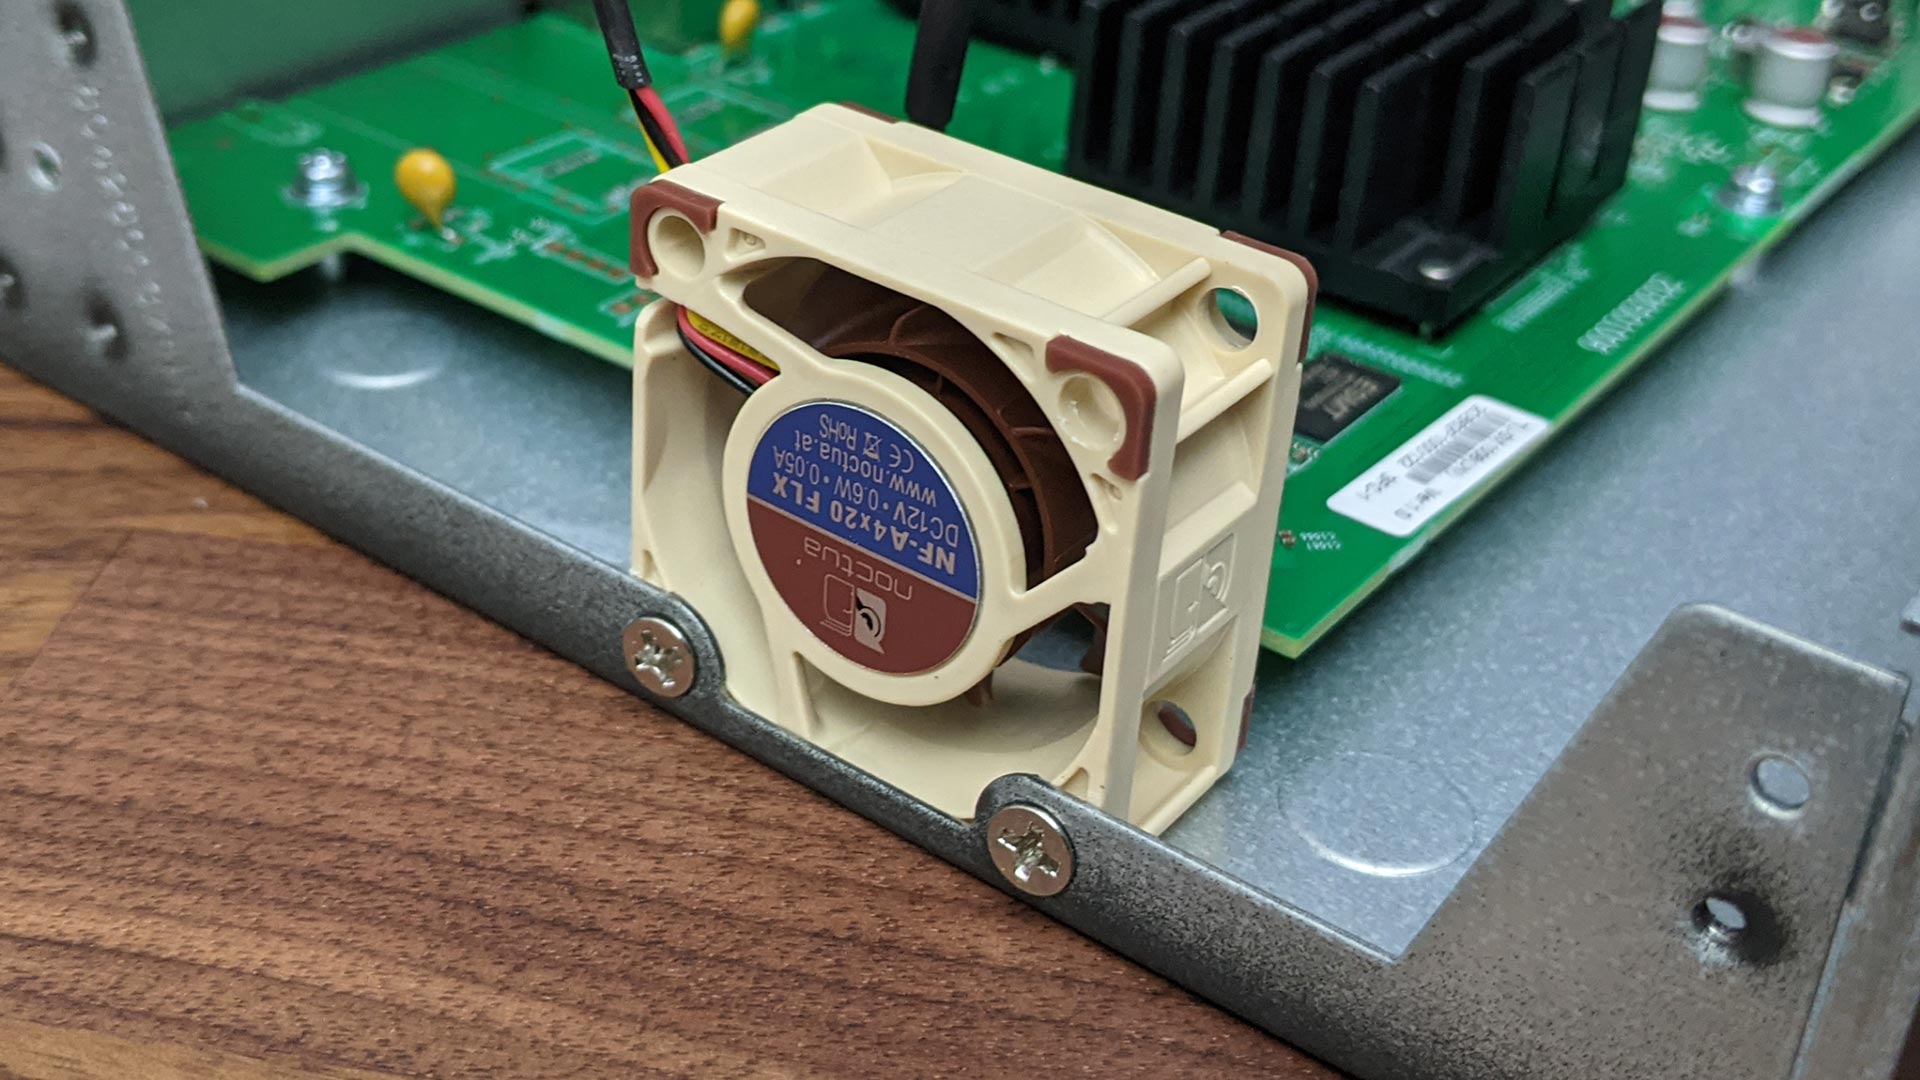
Replacement fan
After less than a minute of thoroughly researching Google for the best 40mm fan replacement, I settled on the Noctua-NF-A4x20 FLX. The main reason was because it was rated much quieter while also offering increased air flow.
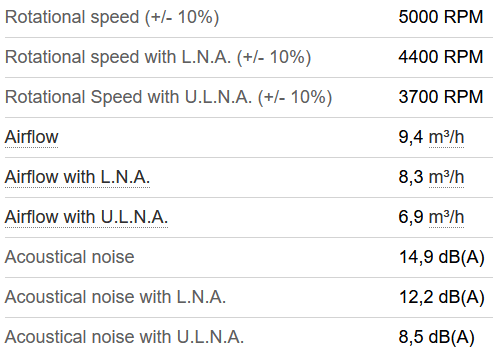
Noctua NF-A4x20-FLX Specs
Even at 5,000 RPM it’s quieter, but the NF-A4x20 also comes two low-noise adapters (L.N.A.) should you want to run even quieter. The stock fan at 10.8 CFM equates to 6.36m³/h, so even with Noctua’s ultra-low-noise adapter at 8.5dB(A) we’re getting more at 6.9m³/h.
Given there’s space for a 20mm deep fan, it’s probably not worth considering a 10mm option. Generally more space allows you to get more air flow with quieter operating temperatures, so might as well use the space if you’ve got it!
Installing the new fan
I wasn’t able to install the new fan with the screws from the original fan, at least not without taking out the switches board due to a lack of clearance and I was lazy. I used two of the shorter screws that came with the Noctua fan instead which worked perfectly.
The metal cover fit right back into place, good as new. Well – Almost, the cover still fit perfectly fine but the screws weren’t completely flush against the case so there’s a little bump, but it still closes comfortably. If that’s a concern then just use the screws that came with the original fan.
I measured the new fan at ~37dB(A) during the initial startup, and then once it settled in at idle it was around 36.3dB(A), or very close to my noise floor and barely audible – a massive improvement compared to the stock fan.
Conclusion
TP-Link, you’ve got a nice product here for a reasonable price, but please just increase the price a little more and use a better fan. This simple change has significantly improved my experience with the product, as now I can go back to forgetting about the hardware I use to get the job done.
I understand that this is one of the cheapest 10G 8 port switches out there, and it likely still would be with an extra $10-$20 added to the fan. I suppose this would be less of a problem if you’re deploying it in a server room or elsewhere where the fan noise doesn’t really matter, but at least it’s a relatively easy fix.
Long Term Use Update
June 2022 update: One of the two switches has died, however I don’t believe it’s due to the fan swap. Basically I unplugged one of the switches because I was changing out the desk it was sitting on. All I did was move it carefully to another room and after plugging it back in it didn’t work. It appears to boot up but none of the ports work. There are plenty of reviews online from people having similar issues with ports dying who haven’t changed the fans. It’s probably a case of “buy nice or buy twice”, this is one of the cheapest 10gbe switches available. Anyway I’ve replaced it with a QNAP switch that costs twice as much and runs quiet without any mods. I only bought it because I’ve already been running the same model here for even longer with no issues.
August 2022 update: The 2nd switch has now died lol, so I’m out $1200 AUD or so on these pieces of crap. Going to buy a 2nd QNAP as in above update.
Disclaimer:
We are a participant in the Amazon Services LLC Associates Program, an affiliate advertising program designed to provide a means for us to earn fees by linking to Amazon.com and affiliated sites.
Thanks for this. I had the same problem and this gives me an easy fix for my noise problem…
Happy to help!
Many thanks for this. I had the same problem and you help me fix it.
No problem at all!
I got this exact same switch today and immediately noticed the noise issue. Thank you for putting this together, already ordered the Noctua fan. Pity that they haven’t placed the hole cut outs on the exhaust side as they have on the intake side. Then you can put x2 Noctua fans side by side and get even superior cooling
Nice let us know how it goes! Could probably mod in a 2nd one if you want to get creative haha, no header for it, not sure if you could add one as there appears to be space on the PCB, or otherwise maybe a splitter?
Why not installing two Noctua NF-A4x10 FLX behind each other instead the 20mm model?
Like right next to each other? I’ve never seen that actually be super beneficial compared to just having one, can cause trouble / more air turbulence.
yeah, stacking fans does not provide real benefits
This is a great idea, but 10.8 CFM is more like 18.3 m³/h, not 6.3.
Looks like you converted 10.8 m³/h to 6.3 CFM.
So the Noctua has just over half the maximum airflow.
Which might actually be fine if you’ve got good airflow otherwise.
How’s it going so far?
Both switches perfectly fine, running 24/7 since I wrote this.
Just checked the TP-Link TL-SG3210XHP-M2 fan(s) because of the intolerable noise, and it has 2 of these fans, also glued to the board.
Fan noise is almost the same as a dell r710 server that i have laying around but never used because of the noise.
Also gonna swap these for the Noctua NF-A4x20 FLX and ordering some spare ones for the next tp link switch.
heres what i did:
https://i.postimg.cc/gJKWHRVz/IMAG1962.jpg
however, after six months of 24/7, my switch is failing… first four ports are dead :(
with void warranty…
That’s interesting given the fan is so large, both of mine are going alright so far.
buy a new one and swap top cover. When you get the new one (or refurbished), sell or keep it.
You could also try a cheaper one. It is most likely they keep the same dimensions so it is cheaper for them to manufature.
well after a week or two, the other half of the ports also died.. so I dumped it, and went with qnap Jarrod is mentioning. works like a charm
So how was your QNAP? Does it run more silently?
Yes, they’ve been great.
I did the very easy Noctua NF-A4x20 FLX fan switch using the same two screws and nuts (needed needle-nose pliers to hold nuts in place), and am dismayed that while it altered the switch noise from 43-45 dB to 39-41 dB (measured with the Smart Tools Sound Meter app from a couple of inches away on the fan side of the switch), the Noctua continually ramps up and down slightly every 8 to 10 seconds, and that oscillation at that certain pitch is very distracting / annoying. My partner doesn’t hear it at all, but she is also deaf in one ear.
I bring it up only because I don’t recall anyone mentioning it before. I may have overlooked that on the Sunon fan since it was much louder and loud was all I noticed, haha. Since I will probably put the switch in a cabinet with many rear vents holes (and monitor temps with an cheap and probably not very accurate Rubbermaid THO550 oven thermometer that shows about 80 degrees in the cabinet right now) and will likely not notice that oscillation, it certainly is a much better solution that the cheapo Sunon solution TP-Link used. TP-Link should be ashamed (ha, as if) for that choice at this price point.
BTW, I love Marko’s install of that fan on the stitch cover. I am dismayed at the switch still failing after six months though with that heating solution, considering the cost of the switch.
Great solution. I just wonder how 9.4 m³/h airflow of the Noctua should outperform 10.8 CFM of the Sunon?
1 m³/h is about 0.59 CFM, so 9.4 m³/h x 0.59 = about 5.55 CFM.
This is significantly less than the Sunon, about 1/2 of the airflow. Why does the article state the Noctua offers increased air flow?
I mean I’ve never converted this stuff before, but as per the post from my understanding the Noctua provides more. Even if it doesn’t my switches are still working perfectly fine while being much quieter so it doesn’t really matter.
Any fan errors reported by switch after swapping fan to Noctua one? Also, from your photo of the Sunon pinout it is clear that TP-Link uses non-standard OEM pinout: black (-) is on the place of RPM signal wire and versa – if you check online standard Noctua 3pin header pin-out and compare with yours replaced Sunon, you will see what it is about. So, did you just plug Noctua and it worked fine for you as it is or had you first swapped pins on the Noctua 3pin header? Thank you.
I plugged it in and it seems to work fine. How would I check for fan errors? As far as I am aware this is an unmanaged switch with no obvious way of accessing logs etc.
You are right, particularly this model has not fan error led. As was mentioned previously – Sunon fan’s header pin-out (as per your photo) is different from the Noctua.
Therefore my concern is still about how does Noctua spin at all?
Sunon header negative and RPM pins are placed opposit way to Noctua’s header pin-out. That means Noctua receives negative from PCB to its RPM tachometer and Noctua’s negative pin connected to RPM receiving pin of the PCB.
The Noctua header pin-out is made by common 3-pins header standard: https://noctua.at/pub/media/wysiwyg/faqs/noctua_pin_configuration_12v_fans.png
Actually there is more to it than just that.
The 3 wire fan that Sunon provides doesn’t generate a tach signal, it is generating a rotation signal that pulls down the connection as long as the fan is spinning.
I suspect the fan warnings everyone is seeing are because the fans are generating a square wave and they are expecting to see the signal just pulled down. The F99 in the model number refers to “R Type” or “Rotation Detection”, as per https://www.sunon.com/eu/MANAGE/Docs/WEBCONT/Files/1236/SUNON%20DC%20Brushless%20Fan%20&%20Blower(255-E).pdf
That generates a constant pull down as long as the fan is spinning.
I was able to fix my switch fan noise by following the steps that you shared. Now it works like a charm! I hope this helps other people who are having similar problems with their TP-Link TL-SX1008 Switch Fan Noise. I would love to share it on my https://techishow.com/ blog. Thanks for sharing this wonderful guide. Keep it up.
Thank you for this article!
I now have a Noctua fan in my switch and it is silent… almost.
But…
I felt I had to check what’s going on with the wires.
The Vcc (red) is in the middle, which is standard, but Gnd (black) and signal (white) are swapped, compared to the standard.
Using my oscilloscope I checked what was going on with the original fan.
Vcc starts of at 12V and after booting, it goes down to idle around 5V.
Gnd… is Gnd.
White is very jittery and, as stated above, fairly close to 0 regardless of fan speed. At slower fan speed, the “jitteryness” slows down too (lower frequency), but otherwise looks the same and at the same level.
Going forward, I decided to swap the yellow and black wires on the Noctua fan.
It doesn’t feel right to push current (that should have gone to Gnd) into the signal input on the switch. Even though the current is very small.
The differences I found in behaviour between the original fan and Noctua is this:
– Noctua fan is very stable on the signal.
– Noctua might have a slightly lower voltage on the signal than the original fan.
– Noise… hehehe… Noctua wins ;-)
The fan speed is controlled by the switch by lowering the voltage on Vcc, so that works perfectly with Noctua as well.
Disregarding the signal jitteryness on the original fan, I can’t see any real difference on the signal (Noctua might be lower, as I said. Can’t really tell because of the jittery signal on the original fan) between full speed at start up and idle speed after the switch “booted up”.
Even though I decided to install a Noctua fan, I still have one worry left…
If this switch is pushed to its full capacity, I afraid it might overheat with the Noctua fan.
My reasoning it this:
At higher fan speeds, the pressure generated by the fan is significantly lower (3 times lower) with the Noctua fan.
Original fan: 6.86 mmH2O
Noctua: 2,26 mmH2O.
The volume pushed by the fan is measured at ideal conditions, which never applies in the real world, because you always have some kind of pressure build up on either side of the fan.
The static pressure is measured when no air allowed to flow at all… so that never happens in the real word either.
So, the max volume is measured with zero pressure and the max pressure is measured with zero volume.
Therefore, Noctua will never push the same amount of air at full speed compared to the original fan. This is also just one version of the truth, because we don’t really know if the pressure build up within the case is within the correct limits.
But how often will full capacity be reached, really? Probably never in my case.
If you have this switch in your home and use for some gaming, tv, music and the occasional file transfer (just as I do), I believe this fan swap will work just fine.
Just be careful and check that the heat is vented out and that the switch behaves in an normal fashion. The fan should not be on full speed all the time.
But I decided to make an addition anyway. I know, I’m crazy…
These things are not yet delivered…
I bought three 40x40x10 fans from Amazon and an adjustable buck converter.
The fans will be fastened on the three big black heat sinks inside the switch. There are no mounting holes, so some force will be needed.
The buck converter will be dialled down so the fans don’t make any noise, just getting the air moving around the heat sinks.
My hope now is that the Noctua fan on the side will make sure there is enough fresh air inside the case, and the three new fans are each responsible for cooling the heat sink under it.
The buck converter will be connected to the outlet on the main power converter inside the case. There are 4 wires (2 red, 2 black) going the switch board. These are fixed on 12V, so this is where I will steal some electrons…
Cheers!
Just want to share my personal experience on that topic:
I have a TL-SG3210XHP-M2 switch which contains two of those Sunon EF40201BX-Q18C-F99 fans.
As already clarified in the comments of this article, the built in Sunon is a R-TYPE fan with ROTATION DETECTOR (see page 58 on SUNON DC Brushless Fan & Blower(255-E) specs) = pulls signal on white pin (ROTATION DETECTOR) almost down while fan runs and provides a high signal when fan is locked. On this way, the TL-SG3210XHP-M2 switch is able to show up a FAN ALERT.
Pin assignmet Sunon EF40201BX-Q18C-F99:
– Pin 1 – ROTATION DETECTOR (white)
– Pin 2 – VCC +12V (red)
– Pin 3 – GND (black)
The Noctua-NF-A4x20 FLX (non-PWM) is definitly incompatible, although people see the Noctua spinning somehow after the replacement. It is also incompatible when Pin 1 and 3 are swapped on Noctua side.
The Noctua fan provides a tachometer output signal on yellow pin with the following characteristics:
– two cycles per revolution (two pulses per rotation)
– open collector output
– Maximum current is 5mA for 5V and 12V fans
So after clarification with the tech. support of Noctua, they don’t recommend to replace this fan model with the original Sunon.
Pin assignmet Noctua-NF-A4x20 FLX (non-PWM):
– Pin 1 – GND (black)
– Pin 2 – VCC +12V (red)
– Pin 3 – RPM speed signal (yellow)
So I decided myself not to replace the fans, especially due to the fan alert of the TL-SG3210XHP-M2 switch.
Anyway, principally I have the same “problems” than all other owners of an active cooled TP-Link switch:
In my case:
1. – horrible vibrations causing resonance frequency/noise (Sunon fan->fan screws->metal housing chassis switch->server rack->wall mount bolts->stone wall)
2. – noise of the Sunon fan based on its RPM, even if installed within a server rack in my separated technical room
Solution for me:
1. – I have replaced the original fan screws with Noctua NA-SAV4 anti-vibration rubber fasteners – flat side on switch chassis outside. I have also installed the anti-vibration fasteners on the unused upper fan holes, to avoid 100% that the fan body is touching the metal housing chassis of the switch. So 4 pieces of NA-SAV4 per Sunon fan.
With this measure, I could DRASTICALLY reduce the body resonance frequency of my system chain.
2. – I have installed the Noctua NA-SRC10, 3-Pin Low-Noise-Adapters in between the Sunon fans and switch mainboard fan headers. This adapter is full compatible without any further modification as it just contains a 51 Ohm resistor in series connection within the VCC +12V signal.
Pin assignmet Noctua NA-SRC10, 3-Pin Low-Noise-Adapter:
– Pin 1 – connected to Pin 1
– Pin 2 – connected to Pin 2 via 51 Ohm resistor
– Pin 3 – connected to Pin 3
This simple measure reduces the VCC +12V, so as a result, the Sunon runs with less voltage and less RPM. One of the big advantages, at least for the TL-SG3210XHP-M2 owners:
– NO FAN ALERT from the switch, as the original Sunon fans still provide same functionalities just with lower RPM.
It is clear and of course self-explanatory, that the moved air volume is also reduced by this method!
Finally I got more or less the same noise results WITHOUT replacing the original fans, but facing no fan alerts.
Regards,
Mike
Hello,
I have a TL-SG1218MPE. Noisy as hell as well. And it’s gotten worse since the 2-4 weeks that I’ve got it, there is more of a metallic ring to the fans even at “cruise speed”.
It’s in the laundry room on the main floor where the central network panel for the house is, so it’s not terrible. But it’s still very noisy.
I have a few questions:
– Silly one, but what is I run the switch without the cover and with the fans disconnected? Other than the dust that might accumulate, would there be a problem then? The air immediately over the heatsinks would not be as actively evacuated, but it wouldn’t build up inside the case. Any issue then?
– I’ve ordered two noctua fans. However, as noted here, their max RPM is 5000 whereas the that came from the switch go from 5000-12000RPM, and the fan takes voltage from 12-24V.
– The noctua fan has an operating voltage of 12V and the OEM fans have an operating voltage of 12-24V? Does it imply that the switch might apply a voltage of up to 24V? Would this be a problem?
Thank you.
Might work ok, depends if there is any specific component that needs air blown over it, the intake and case would sort of force air through it with more pressure compared to just sitting there in a room. Not sure about the voltage sorry, I’m really no expert with this 😅
Mike, seems like buying 2 x 51 Ohm resistors (a few cents per piece) and puting them somewhere in the Pin 2 line of the original cables connecting Sunon fans to the mainboard of the switch should be just fine (instead of purchasing the Noctua NA-SRC10 – 10 USD adapter). ;-)
And thank you for the deep analysis of the problem with no-fan alert LED.
Hey. Thanks for that. I replaced the 2 fans in a SG2428P .. noise difference is like day and night. Only problem is, the controller now shows failure for the fans. I guess there is no workaround for it with the Noctura fans?
10cfm is 0.31 m3/min so x60min is 18.6 m3/h and noctua is max 9.4 m3/h . your calculation is wrong
Ok
Sweet sassy molassy, thank you so much for publishing this solution!! Since my network closet is too hot to shut the door on, this fan noise was making our media room near unusable. Quiet as a mouse now!
Happy to help!
any chance you can post a link (affiliate is cool!) to the QNAP replacement if you’re still happy with it? thanks!
Sure: https://amzn.to/3obl4nh
I’ll update the post too.
Thank you very much on this process. Here is another derivative approach which helped me and maybe can help others.
My switch had some absolutely irritating fan noises under even the simplest load of 4 1G devices. It sounded like it’s “intelligent noise level control” was too intelligent for humans to comprehend.
I reproduced your whole process, however, the fan didn’t power up and wasnt working. Probably due to the aforementioned problem with pins.
Due to laziness I didn’t want to rewire fan pins and decided to try another thing, sitting on my desk. With the noctua fans they also provide the ULNA ultra-low-noise adapter.
I simply attached this ULNA adapter to the original fan, and noise levels were drastically reduced even during boot time. This is probably the easiest thing one can do with their new switch as it wouldnt even require removing the messy glue around the board.
Hopefully this half-measure can also help someone else
Insane how big of a difference thus fan made for me. Thank you so much for this easy how-to guide, and with such great data!
You are wrong Noctua-NF-A4x20 FLX give 9,4m^3/h and old original give 18,37m^3/h
To convert from CFM (cubic feet per minute) to m^3/h (cubic meters per hour), you can use the following conversion factor:
1 CFM ≈ 0.0283168466 m^3/min
1 m^3/min = 60 m^3/h
Now, let’s do the conversion:
10.8 CFM × 0.0283168466 m^3/min = 0.306121144 m^3/min
0.306121144 m^3/min × 60 min/h = 18.36726864 m^3/h
Answer: 10.8 CFM is approximately 18.37 m^3/h.
Ok
Noble idea and I love the experimentation, but due to a math error it looks like you engineered a slow death for your modded TL-SX1008 by cooling it with insufficient airflow.
I might get one and drill out some new mounting and exhaust holes to add a second 40mm Noctua side-by-side. I’m sure the onboard fan power can handle a second unit with a Y-connector.
I’m sure it will be fine in correct environment, but you didn’t get the Noctua spec right at all, it’s going to be half the CFM of the original at full PWM.
Whilst 10.8cfm = 18.3 m3/hr and the Noctua fan is half that, I have ordered the thing anyway as this noisy switch is not going to stay like it is – I tried accoustic shielding (arranging foam around it so airflow not impeded but sound pathways were), not much difference.
Also, it is in an air-conditioned office, not a 40 deg servo room in a rack, so I doubt the heatload warrants a larger fan as the oem one is unlikely to speed up in normal use.
I bought this thing a couple of months ago and see it has a 5 year guarantee now. So I am guessing they got to the bottom of whatever was taking out all the ports and this is their way of showing it.
Done. Cut the fan pin off on the main board so can plug the Noctua fan in the correct way round (pen-knife job). Use Noctua’s mounting silicone mounts – pull in from outside case, get Noctua fan mounted properly, tuck the tails under the internal cover for a bit of support and cut off the outside lug bits. When put cover back on it bulges slightly here, but fits just fine. Powers up good and quiet, hooray!
Whilst the airflow may technically seemingly not be the same, I expect Noctua’s numbers are accurate and the Runda “GOOD QUALITY DC FAN” a much more likely candiutate to make up numbers to sound better to their customers. The Noctua is pushing out plenty of air, can’t see it being a problem.
Solution without Replacing Fan:
The fan noise was giving me a headache! After reading all of this post, I realized that replacing the fan wasn’t the solution.
The main source of the noise is the physical coupling of the fan with the flimsy metal switch body.
This solution worked great:
1. remove the fan and cover it on all sides with heavy duty 1ch double sided tape. like: https://www.amazon.com/Double-HitLights-Mounting-Waterproof-Length/dp/B07TC16SZ7
Make sure you put some small pieces of tape on the front part of the fan that mates with the meta. You don’t want the fan touching any metal. Put some on the top of the fan as well to dampen from the lid.
Then instead of using the meta screw that came with the fan. But this: https://www.amazon.com/Noctua-NA-SAV4-Anti-Vibration-Silicon-Mount-Accessory/dp/B071W6KYCG
Noctua Rubber Mounts that replaces screws.
Last part is the more involve part, you’ll need to Dremel part of the lid where the Noctua rubber screws poke out. If you have a Dremel its pretty easy.
SO MUCH QUIETER NOW!