This guide will show you how to add a Nessus scanner into Tenable’s SecurityCenter using certificate based authentication, rather than standard username and password authentication.
Prepare the Nessus Scanner
First we need to install Nessus on the server that will act as our Nessus scanner. You can download the RPM through the Tenable website after you log in.
yum install Nessus-6.8.1-es7.x86_64.rpm -y
Ensure SecurityCenter can connect to the Nessus scanner on TCP 8834, which is its default port. As we’re using CentOS 7 here our example below shows you how to open this port up in firewalld.
firewall-cmd --permanent --add-port=8834/tcp
firewall-cmd --reload
For further information see our guide on firewalld which includes how to use rich rules to specify source and destination IP addresses.
Next we need to tell Nessus that it should use public key authentication, as by default it will be using the standard password authentication which we don’t want.
[root@nessus ~]# /opt/nessus/sbin/nessuscli fix --set force_pubkey_auth=yes
Successfully set 'force_pubkey_auth' to 'yes'.
Now we need to create the key pair on the Nessus scanner server by running the below commands. You’ll need to provide some information about the certificate along the way, in this example I simply accept the defaults.
[root@nessus ~]# /opt/nessus/sbin/nessuscli mkcert
-------------------------------------------------------------------------------
        Creation of the Nessus SSL Certificate
-------------------------------------------------------------------------------

This script will now ask you for information to create the SSL certificate
for Nessus. Note that this information will *NOT* be sent to anybody
(everything stays local), but anyone with the ability to connect to
your Nessus daemon will be able to retrieve this information.

CA certificate life time in days [1460]:
Server certificate life time in days [365]:
Your two letter country code [US]:
Your state or province name [NY]:
Your city [New York]:
Your organization [Nessus Users United]:
This host name [localhost]:

--- Confirmation ---
CA certificate life time in days: 1460
Server certificate life time in days: 365
Country: US
State or province: NY
City: New York
Organization: Nessus Users United
This host name: localhost
Is this ok? (y/n) [n]: y

Congratulations. Your server certificate was properly created.

The following files were created :
  Certification authority :
    Certificate = /opt/nessus/com/nessus/CA/cacert.pem
    Private key = /opt/nessus/var/nessus/CA/cakey.pem
  Nessus Server :
    Certificate = /opt/nessus/com/nessus/CA/servercert.pem
    Private key = /opt/nessus/var/nessus/CA/serverkey.pem

[root@nessus ~]# /opt/nessus/sbin/nessuscli mkcert-client
-------------------------------------------------------------------------------
        Creation of the Nessus SSL Client Certificates
-------------------------------------------------------------------------------

This script will now ask you for information to create SSL client certificates.

Nessus username for user: admin
Do you want to add admin to the Nessus server
as soon as their certificate is created? (y/n) [y]:
Should this user be an administrator? (y/n) [n]: y
User rules
----------
nessusd has a rules system which allows you to restrict the hosts
that admin has the right to test. For instance, you may want
him to be able to scan his own host only.

Please see the Nessus Command Line Reference for the rules syntax

Enter the rules for this user, and enter a BLANK LINE once you are done :
(the user can have an empty rules set)


Login    : admin
Password : ***********
Client certificate life time in days [365]:
Two letter country code [US]:
State or province name [NY]:
City [New York]:
Organization [Nessus Users United]:
Organizational unit [nessus-users]:
Email [[email protected]]:

--- Confirmation ---
Username: admin (This user will be a new administrator)
Client certificate life time in days: 365
Country: US
State or province: NY
City: New York
Organization: Nessus Users United
Organizational unit: nessus-users
Email: [email protected]
Is this ok? (y/n) [n]: y

Congratulations. Your client certificate was properly created.

The following files were created :
  Nessus Client :
    Certificate = /opt/nessus/var/nessus/tmp/cert_admin.pem
    Private key = /opt/nessus/var/nessus/tmp/key_admin.pem

The user admin was successfully created.

Create another cert? (y/n) [y]: n
The below command will copy the certificate and private key to a new file titled ‘certificate’ which we will upload through SecurityCenter.
cat /opt/nessus/var/nessus/tmp/cert_securitycenter.pem /opt/nessus/var/nessus/tmp/key_securitycenter.pem > /root/certificate
Now that the Nessus scanner has been configured, we need to restart nessusd to apply all of our changes. It is important to note that once this is done, both the certificate and private key that were created in the /opt/nessus/var/nessus/tmp/ directory will be deleted, so be sure that you have copied them in the form of our concatenated /root/certificate file.
systemctl restart nessusd
Add Nessus Scanner To SecurityCenter
Now that our Nessus Scanner is configured we need to log into the SecurityCenter web interface and add the Nessus Scanner.
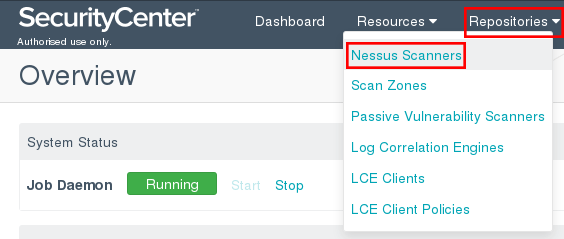
Select “Repositories” followed by “Nessus Scanners”.
Towards the top right corner select the “+Add” button.
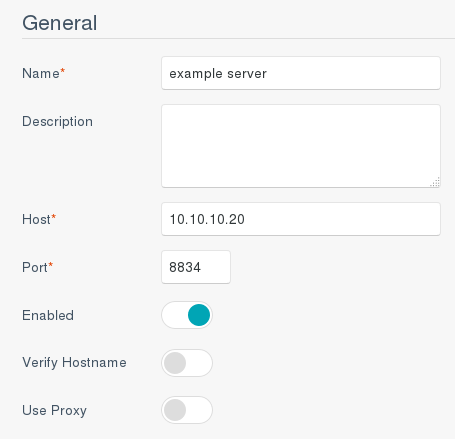
Give the Nessus scanner a name that makes sense, and optionally a description. The host should be set to the IP address of the Nessus scanner, and the default port of 8834 will be used.
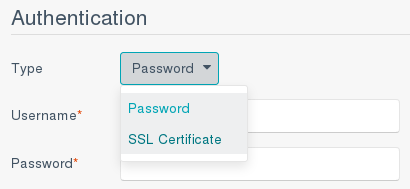
In the Authentication section, change the Type drop down from Password to SSL Certificate. Click the Choose file button and select the /root/certificate file that we created earlier.
Finally click the Submit button at the bottom when you’re done. You may need to wait some time for the plugins on the Nessus scanner to update, if you’re successful the status should change to “Working”.
Congratulations, the Nessus scanner can now be used from within SecurityCenter.
Summary
By following this process you will be able to install a Nessus scanner on a Linux server and join it to SecurityCenter with public key authentication, where you will then be able to further manage it and perform vulnerability scans.


I could not find the cert_securitycenter.pem and key_securitycenter.pem to do this step:
cat /opt/nessus/var/nessus/tmp/cert_securitycenter.pem /opt/nessus/var/nessus/tmp/key_securitycenter.pem > /root/certificate
Really helpful.