Previously I’ve covered how to increase disk space in Windows server, now we’ll be outlining how to do the opposite by shrinking the disk space for a virtual machine running Windows Server 2012 R2. Firstly we will be shrinking the file system within the operating system, and then shrinking the actual virtual disk afterwards to reclaim space.
As of Windows Server 2012 R2, Hyper-V allows us to dynamically shrink and expand the size of our virtual hard disk while the virtual machine is still running, meaning that there is no down time. Prior to 2012 R2 you would have to shut down the virtual machine to complete the process, I’ll cover where that’s done later on in case you’re using a version prior to 2012 R2.
Shrinking the available disk space on a server may allow us to use the space elsewhere, perhaps on another virtual machine. Typically most provisioning nowadays is thinly provisioned where the virtual disks will only be the size of the data stored on them rather than wastefully statically assigning the total space of the disk, so this may not be very beneficial for you. With that in mind there are still times where you may want to shrink the available disk space on the server to prevent a user using it. For example a service provider may have a customer looking to downgrade their disk space and we would want to shrink their disk back so they do not use space they are no longer paying for.
Decreasing the file system size
Our test server is running Windows Server 2012 R2 as a Hyper-V virtual machine. In this example our servers primary hard drive is 100gb with less than 9gb actually in use as shown below.
We would like to shrink it down to 50gb as it is not using this space and we don’t want the server to be capable of using this space in the future.
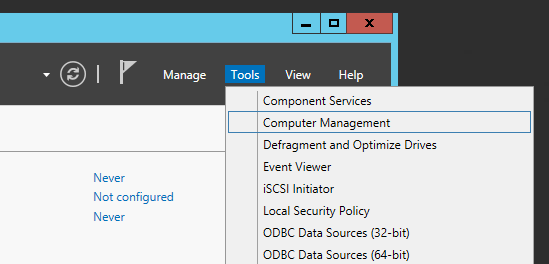
From Server Manager, select Tools > Computer Management.
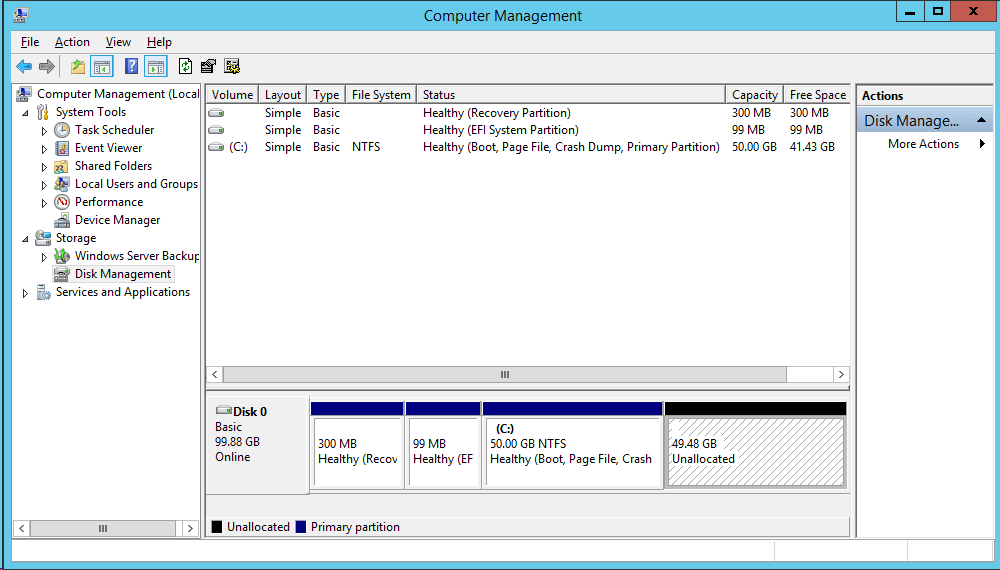
Once the Computer Management window has loaded up, select Disk Management from the storage menu on the left hand side. You will now be able to see the disks and partitions available on the server. In this example we have just the single 100gb disk where the majority of the space has been assigned to the C:\ drive – this is what we want to lower first.
Right click the C:\ partition and select “Shrink Volume…” as shown below.

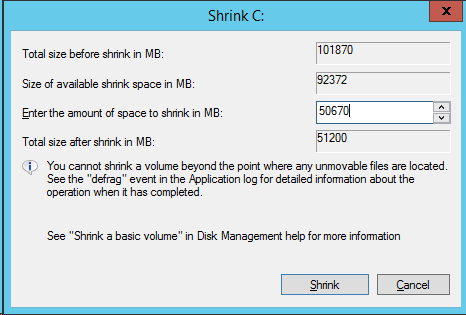
Next enter the amount of space in MB that you want to decrease by, in this example I’ve selected 51200MB so that the C:\ partition will be 50gb in total after completion.
After clicking the shrink button you will see the space become listed as unallocated.
Now that the space is listed as unallocated within the operating system, we can decrease the virtual disk through Hyper-V manager.
Decreasing the file system size
This section can only be done with the virtual machine online and running if you are using Windows Server 2012 R2 or newer. If you are using Windows Server 2012 (Non R2) or older, you will have to power off the virtual machine at this step to proceed. Your user account will also need to be a member of the Hyper-V Administrators group to complete this process. Additionally the virtual machine needs to be using the .vhdx format for online resizing support, if you have an older .vhd disk you will need to shut down.
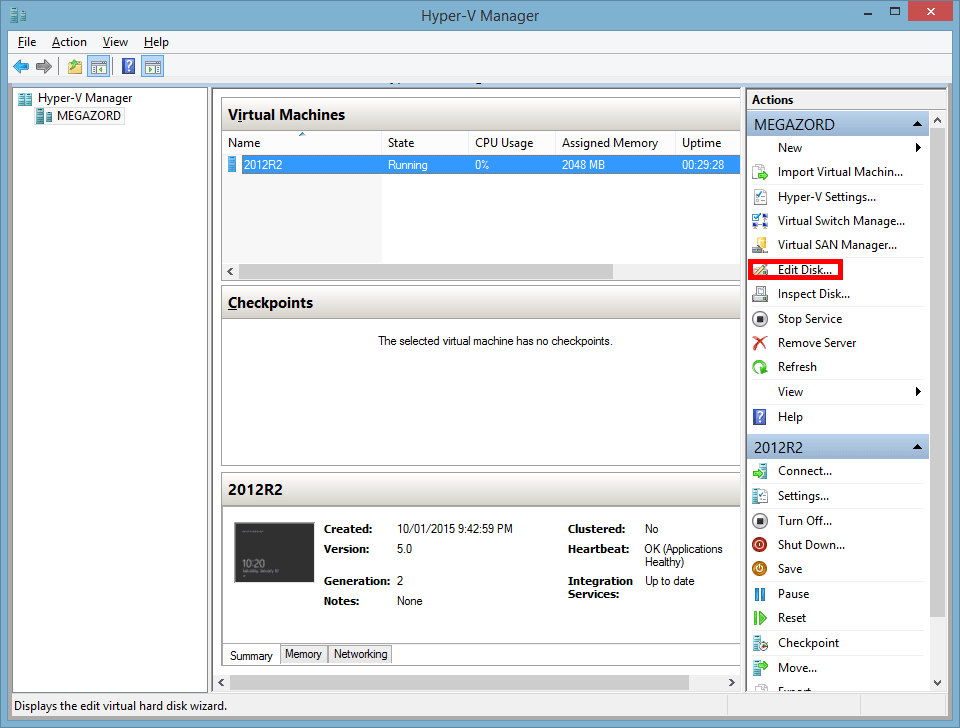
With the virtual machine selected in Hyper-V Manager click on “Edit Disk…” in Actions menu on the right hand side.
This will open the Edit Virtual Hard Disk Wizard, click next to get started on the before you begin screen.
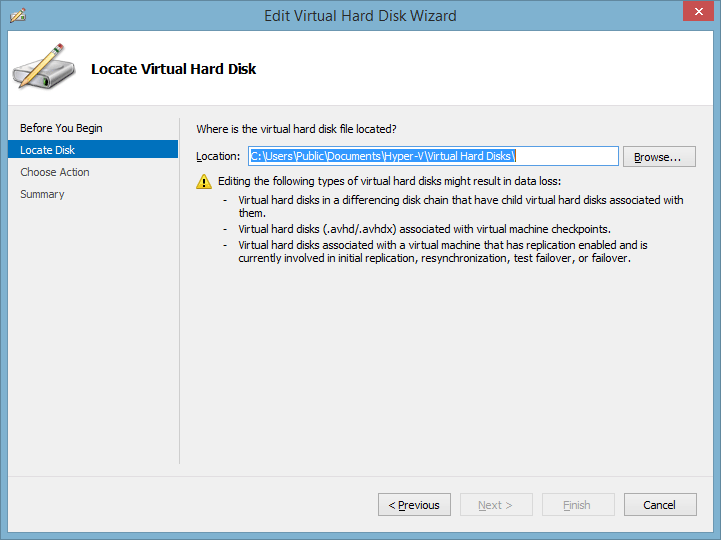
Next you’ll need to browse to the location of your virtual machines disk, once you’ve selected it click next to continue.
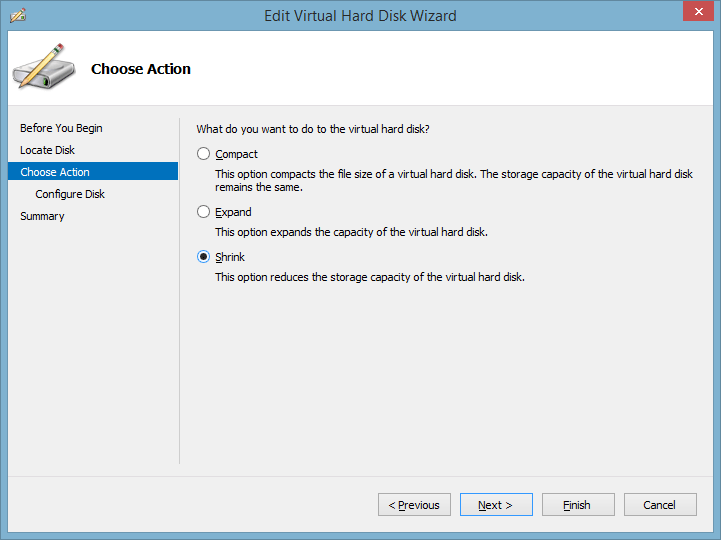
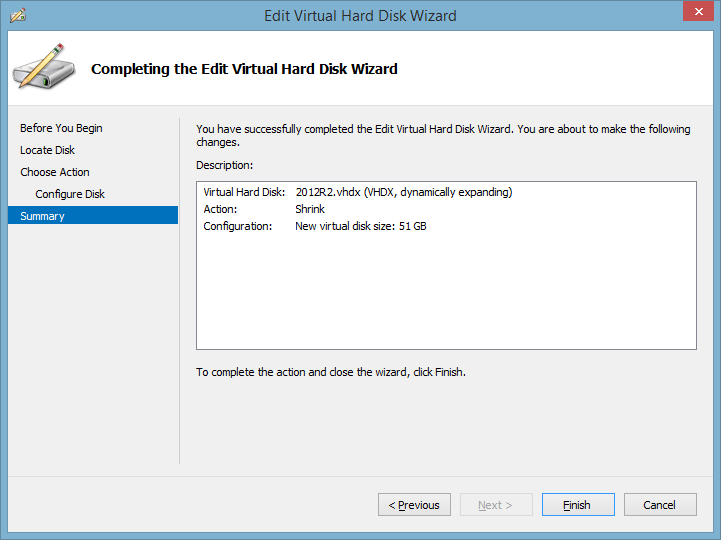
On the Choose Action screen you will be given the options to compact, expand, or shrink the virtual disk. Compacting can be used to attempt to minimize the total file size of the virtual disk and isn’t a bad option to run, however in this instance we’re after shrink, so select that and click next.
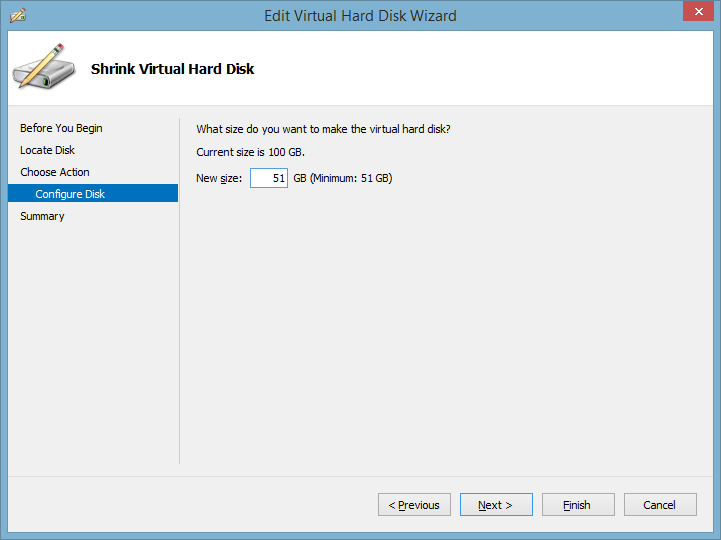
On the Shrink Virtual Hard Disk screen you will see the current size of the disk, and the minimum size that can be selected. This minimum size is based on the shrinking that has already taken place within the operating system that we did earlier, it detects the space marked as free here. In this case the minimum I can select is 51gb as my disk is using a bit over 50gb (50gb C:\, 300mb recovery partition and 99mb EFI system partition).
Review the changes that you’re about to apply and select Finish to complete the process.
If you are running an operating system older than Windows Server 2012 R2 and you had to shut down the server to complete the above steps, you can now power it back on. If you’re using Windows Server 2012 R2 you’re done and the whole process has been completed with no noticeable downtime.
Checking the changes
Back in the virtual machine check the Computer Management console, if you have left it open while performing the above process you’ll need to refresh it to get up to date information, this can be done by pressing the F5 key.
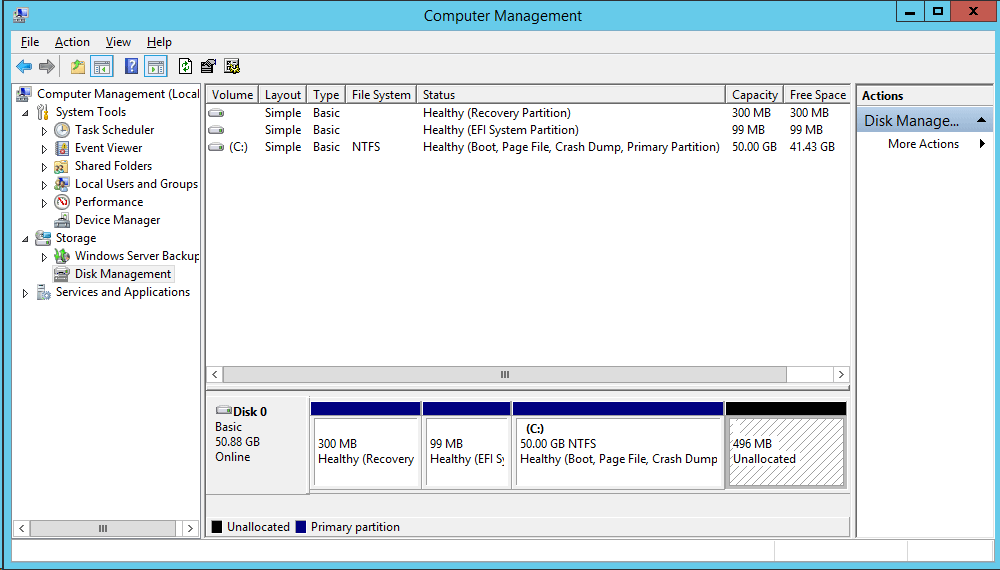
In my example you can see there is still a bit of unallocated space at the end, this is because earlier in the operating system I shrunk the disk so that the C:\ partition would be 50gb. Ideally I probably should have made the whole disk 50gb, so C:\ would have been a bit smaller, and there should then not be left over space. The space comes from only being able to shrink by 51gb as shown previously, that was the lowest I could go.

To make use of this unallocated space, you can simply right click it and select “Expand Volume…” then follow the wizard through. Had everything been done correctly there should have been no unallocated space left, so you may want to ensure when you lower the disk you do it GB chunks to avoid this.
Summary
Decreasing the space of a virtual hard disk in Windows Server 2012 R2 is quick, easy and can be done while running without shutting down. If you’re running a version of Windows Server prior to 2012 R2 you will need to shut down to decrease the virtual hard disk however. Shrinking the disk is first done within the operating system, once that space is marked as free it can then be removed through Hyper-V manager.
Hello Jarrod and thank you for your article. This is exactly what I wanted to do with a windows server 2012 R2 and a hyper v hard disk. I followed the procedure but when I tried to shrink a 5tb partition down in disk manager it gave me an error that there was not enough free space even though I had 100 gb available on the host where the virtual hard drive resides. If there a certain amount of free space that is required to shrink a drive?
Thanks
It’s been around 18 months since I’ve worked with Hyper-V, I’m not aware of there being any limit to the drive shrink process. If the host thinks the space is in use but the host OS reports that it isn’t, perhaps it could be worth trying to perform a defragment within the OS and then performing a compact on the disk in Hyper-V.
Same Problem.
Cant even shrink 1GB down.
Could shrink 100GB
What is the best practice to Shrink a VHDX that resides on a Windows 2012 R2 Clustered Shared Volume? I do not see a way to do this using SCVMM 2012 R2. Do I perform the above steps from the hyper V manager on the node that owns the VM and then refresh the VM in SCVMM? Is there any risk to the CSV if I perform the above steps on a VHDX residing in the CSV?
Bit late to the party but for anyone else who comes looking for answers, this is due to unmovable space such as shadow copies and page file. The general advice is to delete shadow copies and disable the page file and it’ll let you shrink further.
Event Viewer will tell you which files is holding things up.